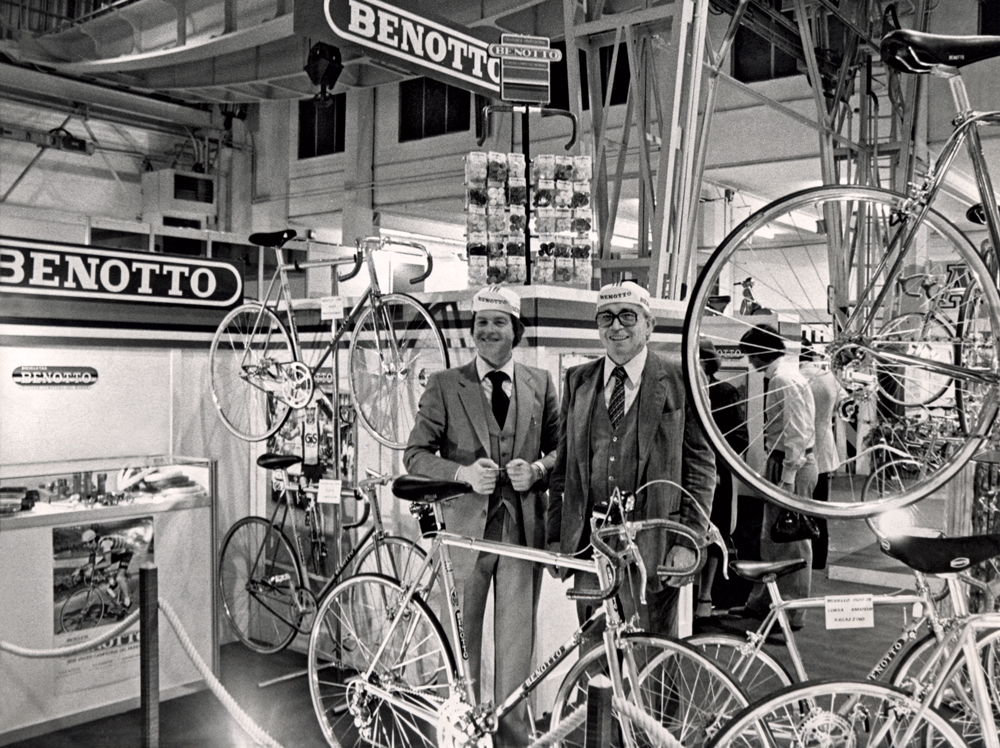
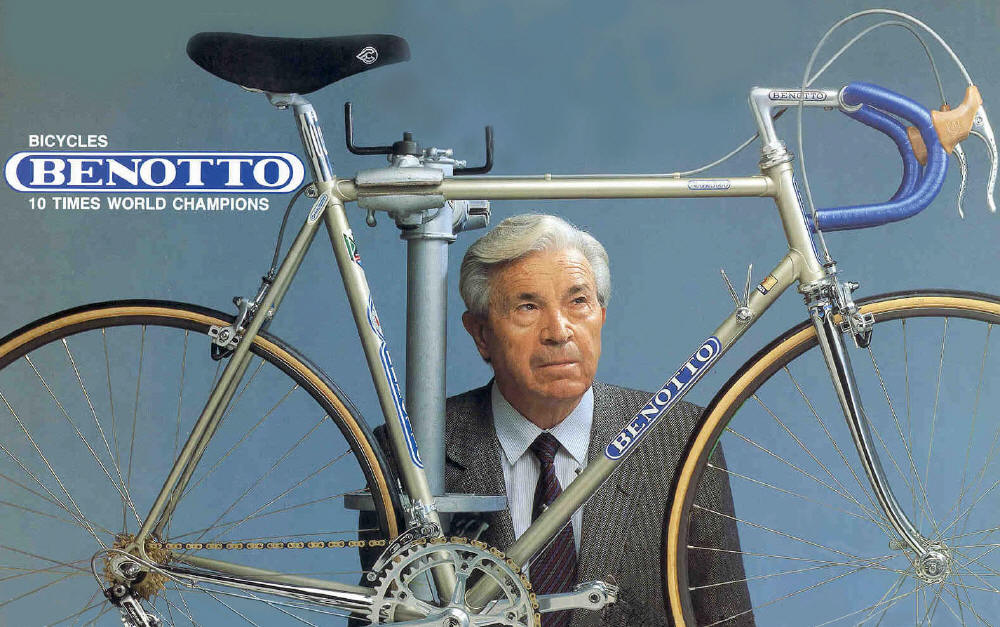
Thank you to Steve Whitmore for sharing this Benotto catalogue from 1979. This is part of the attempt to document all pre 1985 Benotto models. Hopefully this will help others identify or restore their 1979 models.
Here are links to the PDF versions of these files:
If you don’t mind being embarrassed, you can learn anything.
What is it about some designs that they become more beautiful as time goes on. The same could be said of some artists, and some musicians and some songs. It’s true too of some humans. I think of Mahatma Ghandi or Mother Teresa or Nelson Mandela.
If there is one consistent theme to this blog, it is this: If you don’t mind being embarrassed, you can learn anything.
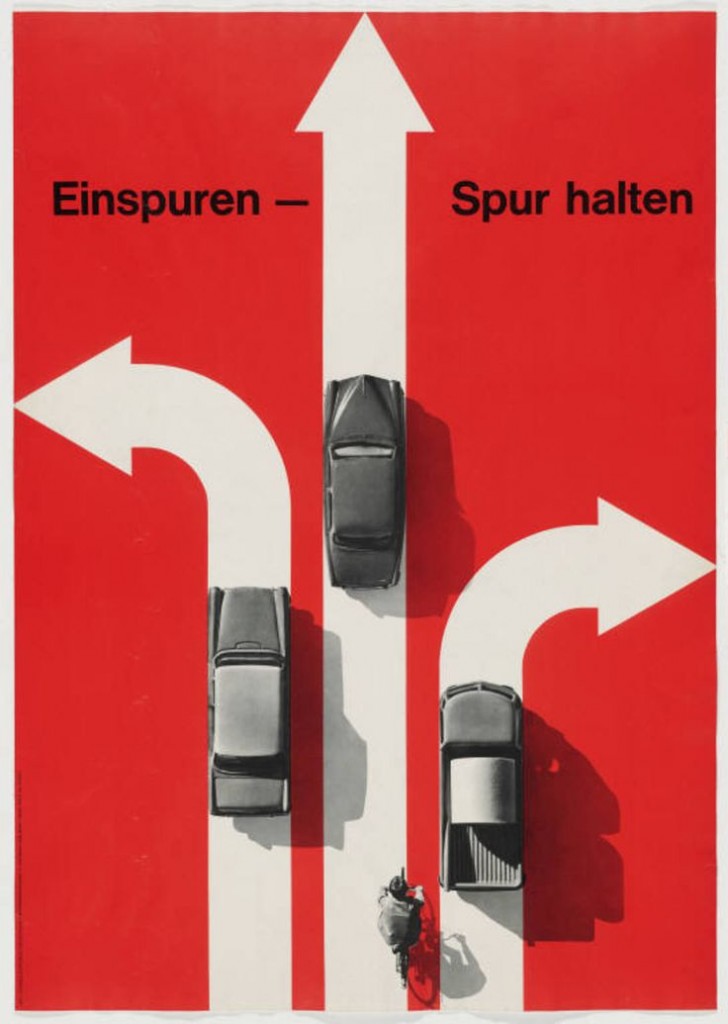
While playing with the above design on photoshop I stumbled upon the work of late Swiss designer Hans Hartmann.
Little is known about Hans Hartmann. Yet his work evokes the sense that their must be a compelling understory to his work.
Einspuren – Spur Halten (1963)
“Einspuren – Spur Halten”, which roughly translates as “Meshing – Keep Track”. That is according to Google. It’s a telling image.
Sometimes I try too hard to create perfect solutions that will stand the test of time. It’s an easy trap for me to fall into, whether programming or renovating my home.
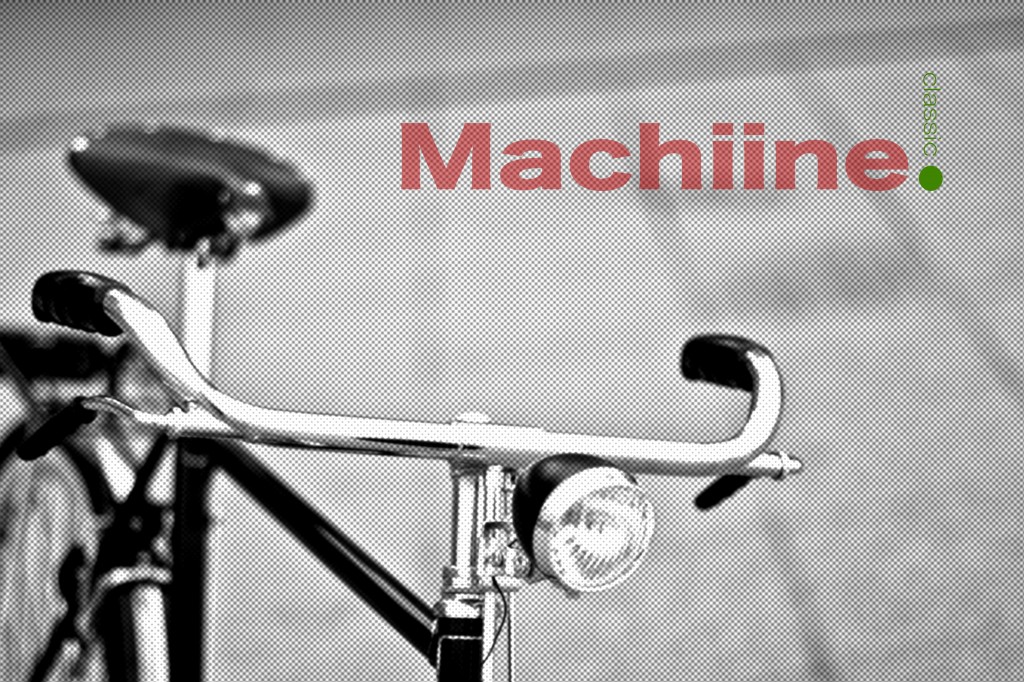
If you’ve followed my blog for any length of time you will notice that the posts are on seemingly random topics. The reason for this is that I want this to be an outlet for writing and sharing that will remain relevant as time and my interests change. While I was advised to write on just one topic, it doesn’t work for me. And, in return I’ve been very lucky. Machiine has had over 300,000 visitors and 536 interesting comments.
I think it comes down to this. If I wrote about a specific topic, I would be doing it for some result, such as to generate web traffic. Whereas, by writing about any topic that I’m actually interested in, I keep writing irregardless of the traffic. Any extra outcome is just a neat bonus.
So, I’ve just been writing and the themes that show up have been occurring naturally. Today, I had the thought about the heart of Machiine. It comes down to a natural interest in classic designs, in true and meaningful biographical stories, and sharing/recording what it is I am learning.
Thank you for your visits, comments and emails. They are appreciated. Most of all, I hope that you find the articles on this blog useful and meaningful to you.
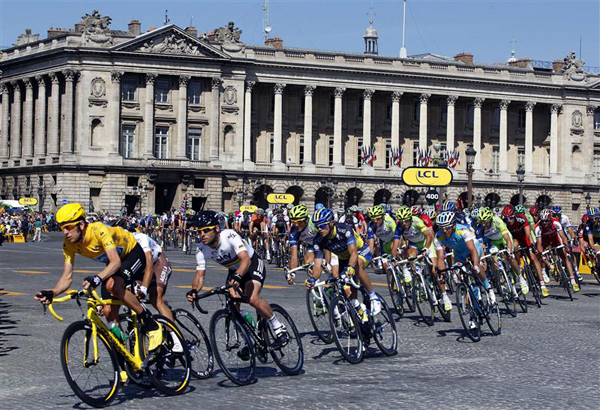
July 22, 2012 Team Sky Procycling rider and leader's yellow jersey Wiggins of Britain cycles during the final 20th stage of the 99th Tour de France cycling race between Rambouillet and Paris
In 2012 British cycling amazed the world by claiming the prestigious Tour de France and 70% of the Olympic cycling podiums. Never before had an English rider won the Tour de France nor had their cyclists performed so well in the Olympics.
July 22, 2012 Team Sky Procycling rider and leader’s yellow jersey Wiggins of Britain cycles during the final 20th stage of the 99th Tour de France cycling race between Rambouillet and Paris
At the heart of British cycling is Dave Brailsford. He and his team around him set an ambitious goal. They proclaimed that they would have a British cyclist win the Tour de France in just 5 years of creating the new Team Sky.
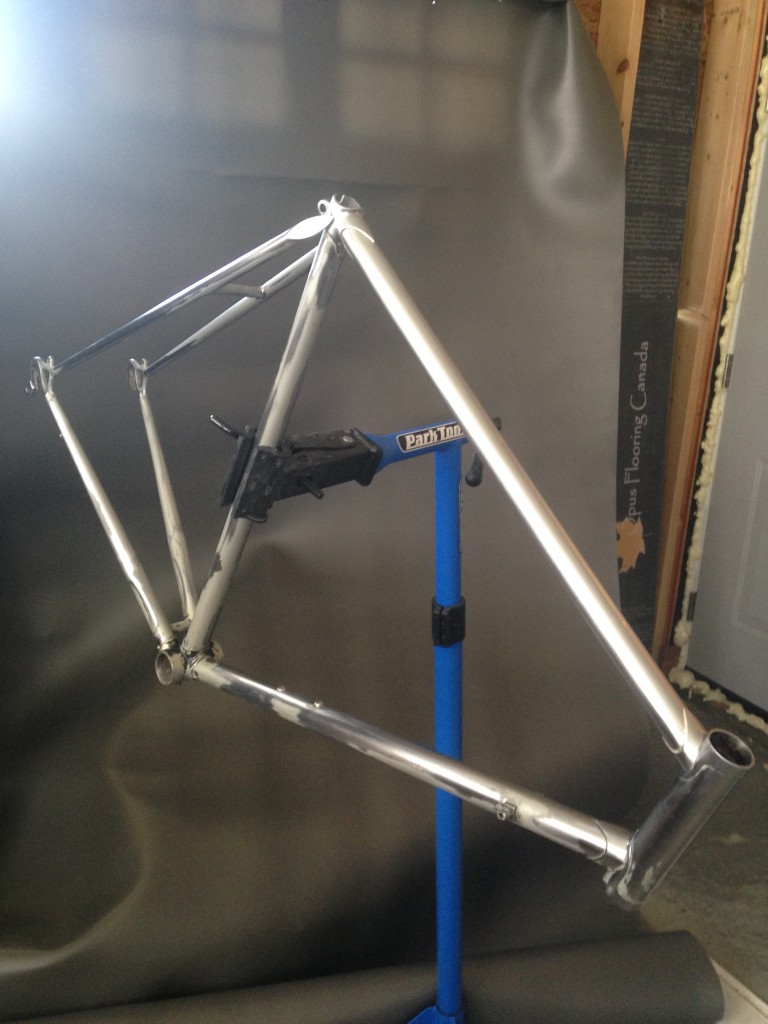
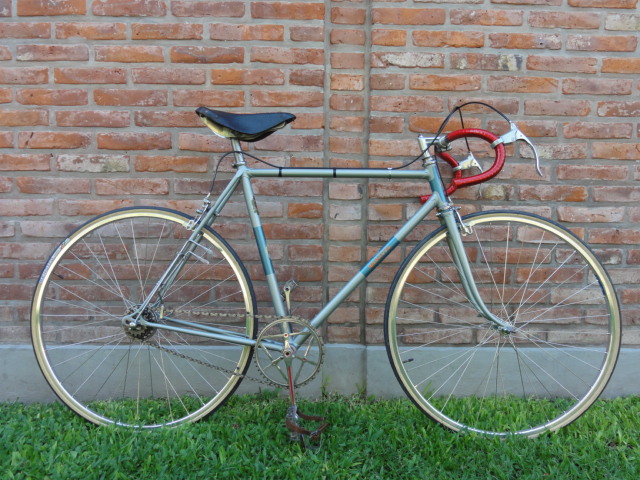
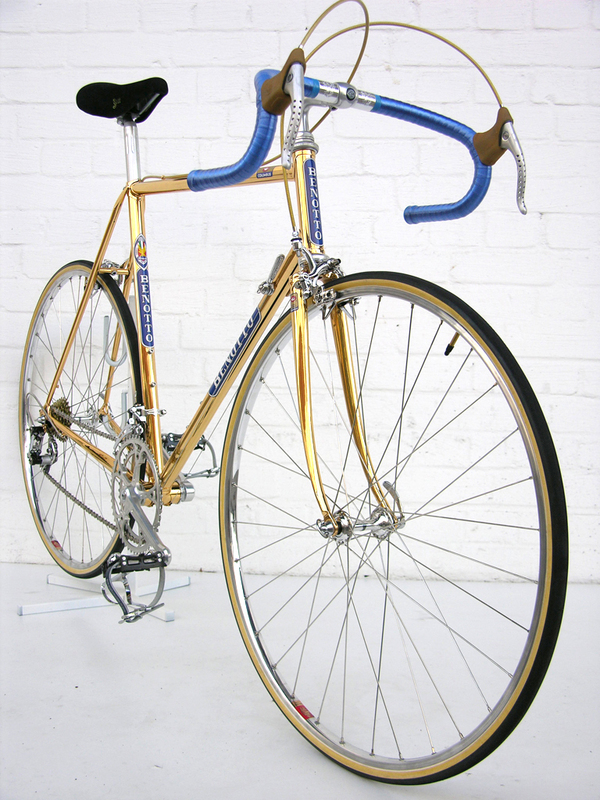
The restoration is coming along nicely. Ordered some NOS Benotto forks and they arrived safely today. The forks are made of Columbus SL tubing, the kind found on Benotto modelo 2500 and 3000. Part 1 and Part 2 of the restoration are here.
Step 1: Sanding (3-4 hrs)
I started with 180 grit sandpaper. Because I had previously sprayed the bike black, I wanted to make sure I got all the old layers of paint off to bare metal.
Next I switched to 200 and then 400 grit sandpaper.
Sanding the bicycle’s frame reveals metal in great condition.
I used 400 grit sandpaper on a drill wheel to clean the brazed areas.
Sanding revealed a really nice metal frame. Almost made me want to clear coat the whole frame.
Step 2: Cleaning (20 min)
I don’t like using water on freshly sanded metal as it creates rust. So I started off with a cotton clothe and wax and grease remover. Went over the frame about 3 or 4 times until the rag came out clean. I wore gloves while doing this to prevent the oil from my hands getting on the bike frame.
Step 3: Taping (5-10 min)
Once the frame was clean I taped the bottom bracket area as I didn’t want the threading painted. I also taped part of the rear dropout.
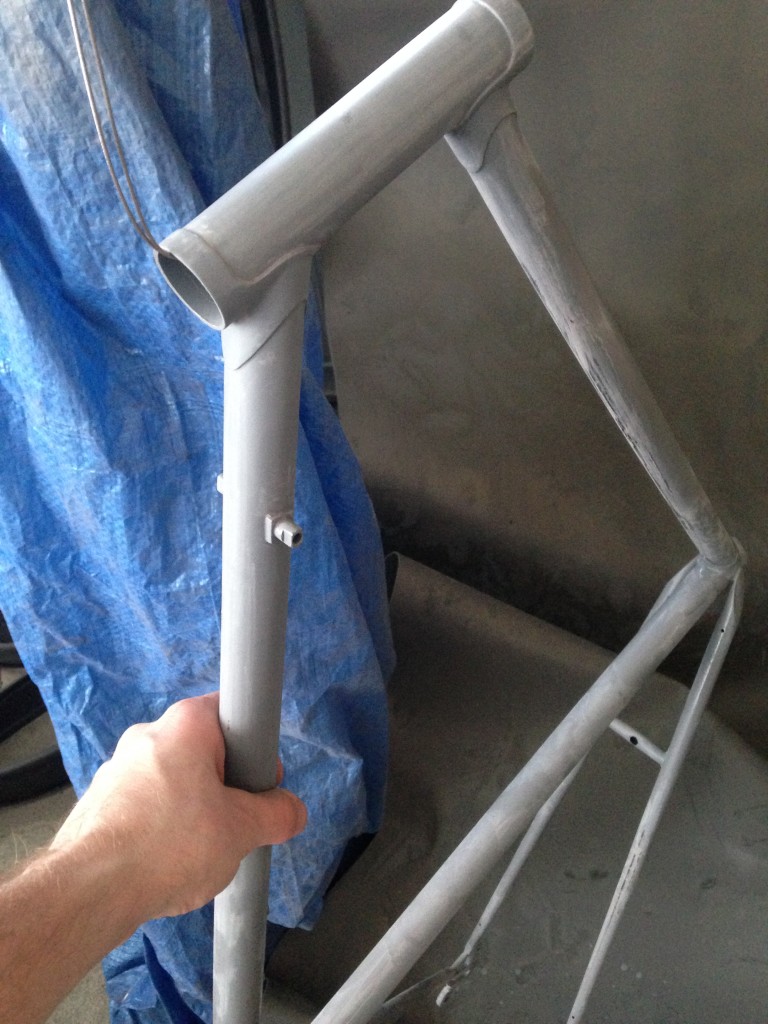
Step 4: Metal Adhesion and Primer (10 min)
To help the bare metal areas that I will be clear coating I sprayed some metal adhesion promoter first. I will be sanding this again prior to clear coating.
Next I did 2 coats of primer over the frame. When using spray paint shake the spray can really well for about 60-120 seconds.
When spraying hold the can about 8inches away from the area and use smooth sweeping movements. Start the spray before you move over the part to paint and release the spray after completing the pass.
Start with the intricate areas first. I sprayed the bottom bracket, lugs, and dropouts first.
Next I did the frame by sections, spraying with the length of the tubes.
Step 5: Wait 10-15 minutes for the primer to dry (15 min)
Step 6: Second coat (10 min)
Spray the sections of the frame a second time.
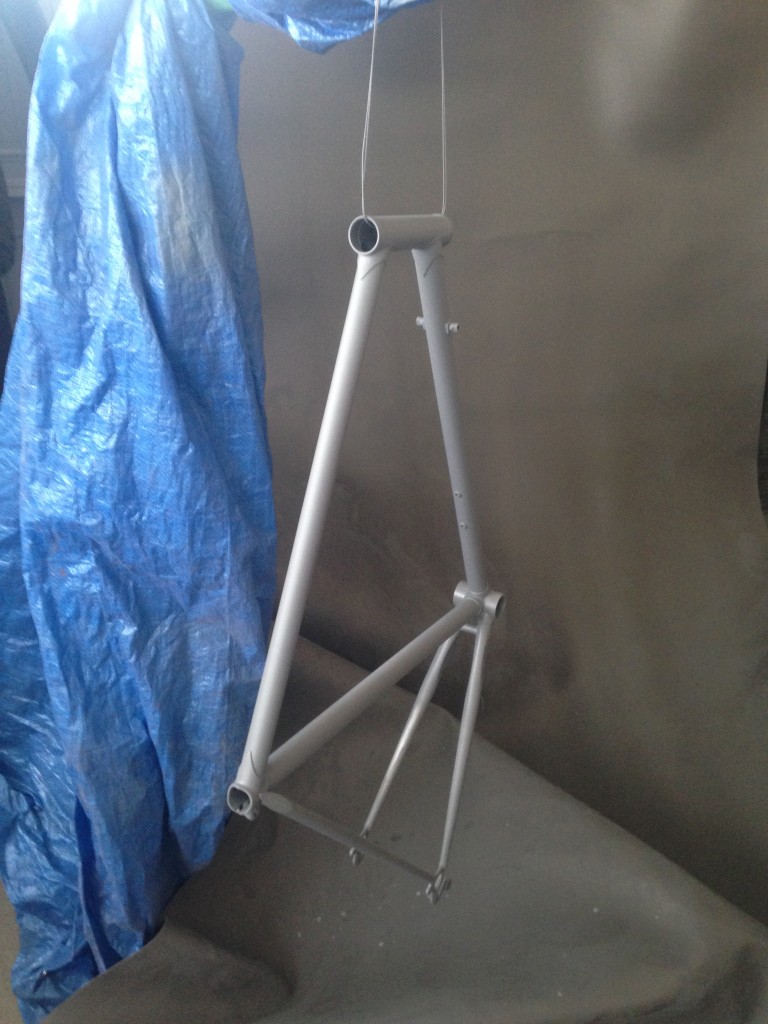
Bike frame primed, doesn’t look like the same bike
Step 8: Go for a long ride (4-8hrs)
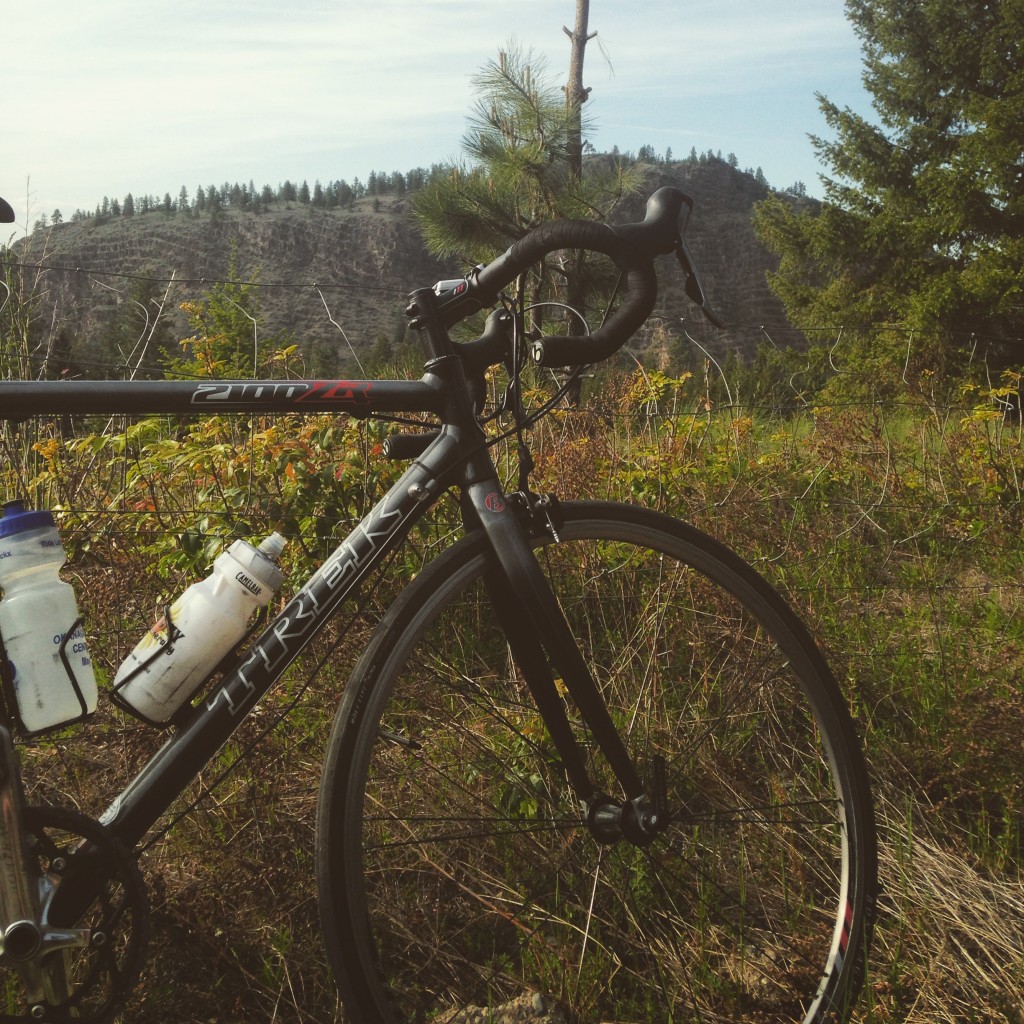
I wanted the primer to set well before sanding to get the best finish, so I left it overnight and went for a ride on my Trek.
This was mid way through the afternoon bike ride
Step 9: Wet sanding (10 min)
1 day later (tonight) I prepped the frame for the second coat of primer. Once your primer is set, you will want to wet sand the frame. I used 400 grit sandpaper, a bowl of water and a cotton cloth. Keep the sand paper wet at all times while working over the paint. Primer is easy to sand and you don’t need to press too hard.
I used a rounded block to keep the sanding as even as possible.
After wet sanding all the tubes I then sanded the lugs and more detailed areas.
Once everything is smooth and your hand glides easily over the paint, it’s time to prep for the next coat of paint.
Wet sanding the benotto frame
Step 9: Clean and prep (5-10 min)
A cotton rag with wax and grease remover works well to clean sanded areas. You want to use a lint free rag. It took about 3 passes for the frame to come clean.
Step 10: Final coat of primer (10 min)
I did one more coat of primer, the same way I did the first one. Starting with the bottom bracket, dropouts and lugs. Next I used smooth sweeping motions to paint the frame tubes as evenly as possible.
Step 11:
Next you are ready for the base coat, I haven’t got the paint yet, so I will need to wait for the next step. I plan on sanding one more time prior to the base coat. It’s not necessary… but hey it’s a classic.
I made the mistake of painting my Benotto black after first getting it about a decade ago. Today I’m restoring it back to something fitting of the Benotto name. But first I wanted to research and find out the model of my bike. It’s proving really difficult so I’m documenting what I’m learning about Benotto’s and hopefully it will help others identify their bikes in the future. Also, thanks to Kris for commenting on part 1 of the restoration, that encouraged me to document in more detail about the frame.
This bicycle restoration is turning out to be a bit addictive. Here’s a quick recap thus far. At first things were going pretty well, stripping the frame for sanding went quickly. Then, tragically while sanding the frame to prepare for paint the centre cable guide snapped off. I rotated the frame in my bike stand unfortunately catching the cable guide.
As a kid I learned to play the violin. My violin was the least expensive model from our local music store, but for my parents it was a big purchase. It was the middle of the day, a few years after first getting it, and I sat down on the edge of my bed, not noticing my violin behind me. I snapped the bridge. I was devastated. At that time of my life my violin was hugely important to me.
I remember my mom walking into the room, looked at the violin, looked at me, and said the last thing I could have expected, “Jon, you need to look at this as a positive thing. Be thankful that you broke your violin.” None of those words made any sense to me in that moment, yet I chose to follow her advice.
We went back to the local music store. The owner was standing behind the counter, he took a look at my violin, and calmly told us, “I may be able to fix this.” He rummaged around the supplies in the back corner and came back with a new bridge. “Ahh, I’ve got one, perfect.”
Taking my violin, the new bridge, and a small file he immediately went to work. About 15 minutes later my violin was back together, tuned and ready to play. I played a chord, it had never sounded so rich. A year or so later my instructor would marvel at the violin, she would go on to ask me how much I paid for it. After telling her, she responded that I must have gotten very lucky as it had a better sound than many violins thousands of dollars more expensive.
My mother’s comment now made sense.
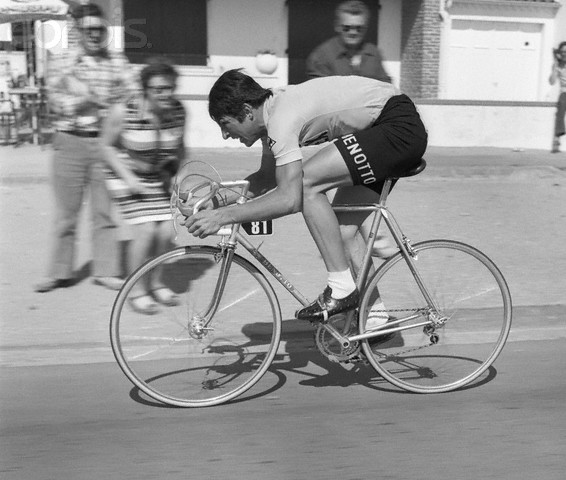
So last week I took a deep breath and ground off the last 2 remaining cable guides from my Benotto. I looked online, found some new braze-on cable guides that I could purchase, but they would be different to the originals. Later, while watching the classic Paris-Roubaix documentary “A Sunday In Hell” a new idea formed.
Benotto used cable guide clamps until 1976-77. After which they moved to braze-on cable guides. Because I had already removed the cable guides, why not use the vintage cable guide clamps and restore the bike to be like the one used by Francesco Moser in the 1976 Paris Roubaix race.
With that decision made, it’s back on the restoration train.
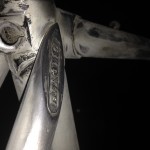
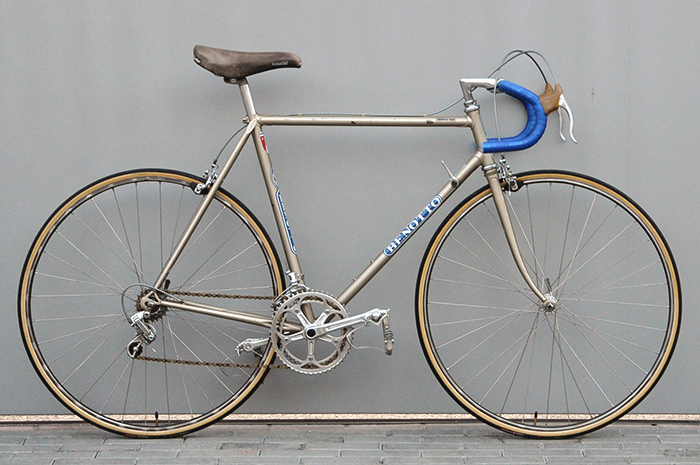
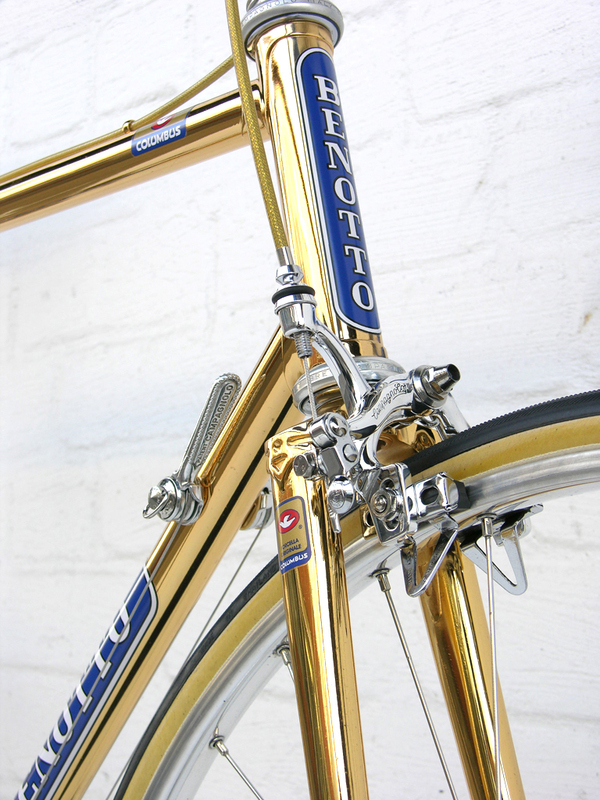
Identifying 1979-1980s Benotto’s by the frame and fork:
In part 1 I explained why the original model and year is unknown. Also, some of the components are original, and some are not… all of which makes identifying the bike just that much more challenging.
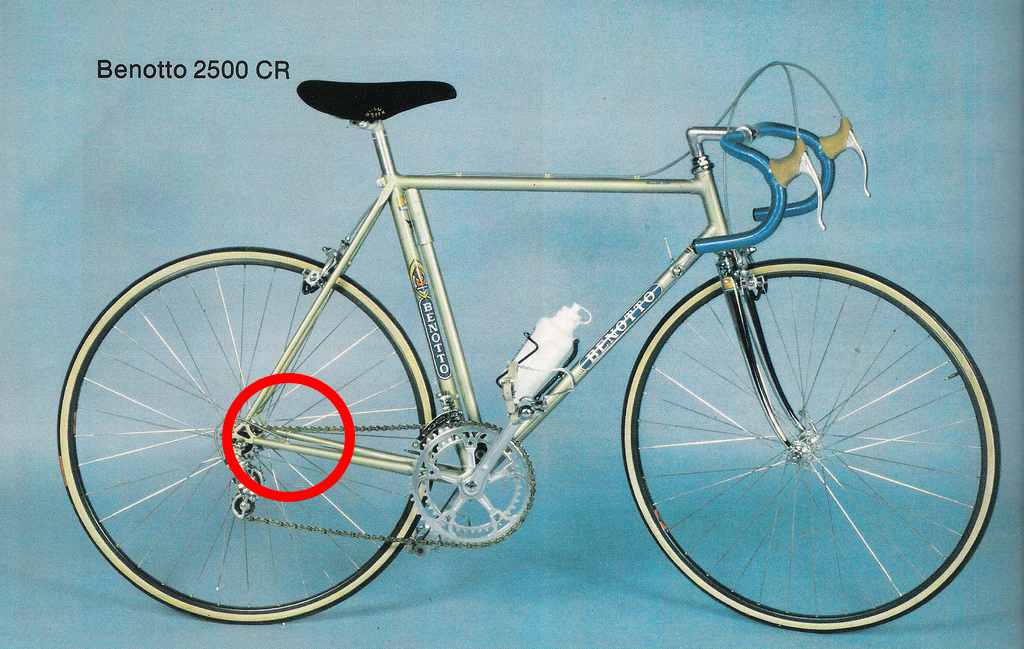
Step 1: Benotto Chainstays
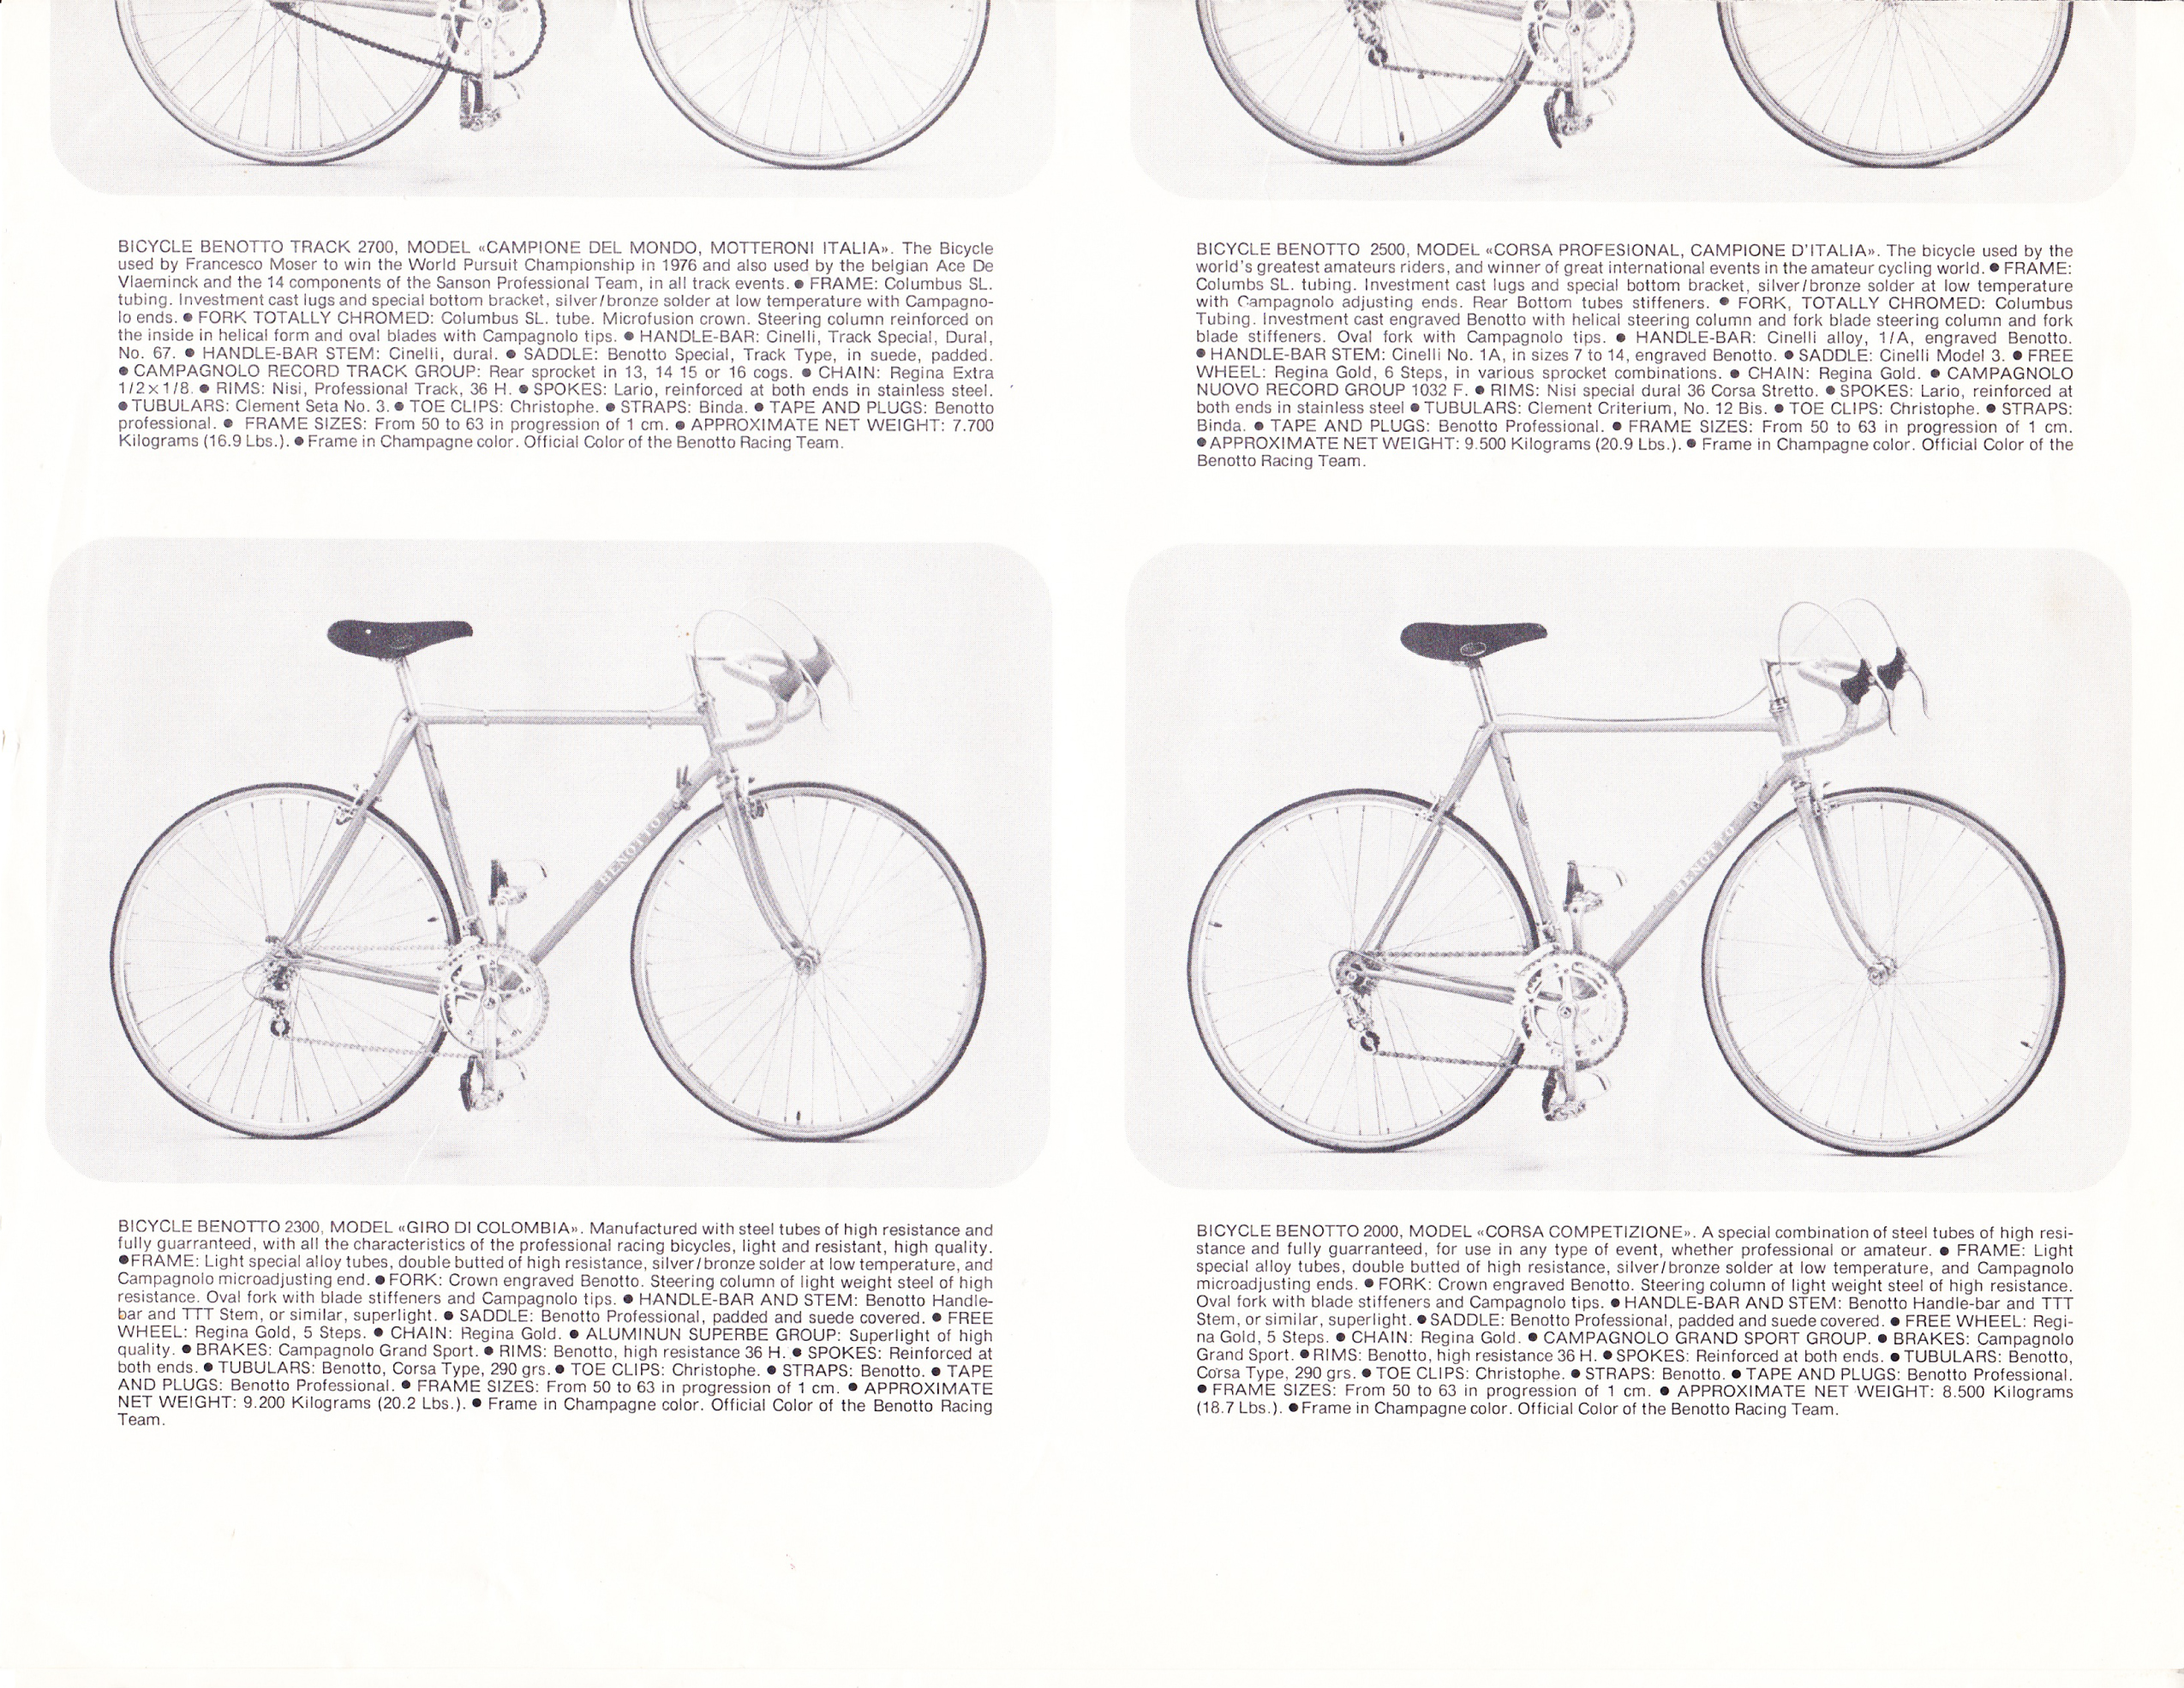
Benotto 3000 chain stays are diamond shape. All other models had the “eye” indents. Quick look at history, the Benotto 2500 was the highest model until the early 1970s, then by the late 1970s Modelo 3000 was the top model.
Benotto 3000 diamond shaped chain stay
My Benotto’s chain stay definitely would indicate a model 2500 or lower.
Step 2: Seat post opening.
Benotto frames have the same outside diameter. However, the inside diameter changes depending on the metal used. For example, Columbus SL has a seat post diameter of 27.2mm as the metal is 0.6mm thick. Columbus SP has a seat post diameter of 27.0mm as the steel is 0.7mm thick. Columbus Aelle has a seat post diameter of 26.8mm, the steel is 0.8mm thick. Columbus Zeta has a seat post of diameter of 26.6mm, the steel is 0.9mm thick. Finally, Columbus double butted steel and plain gauge steel is 1.0mm thick with a seat opening of 26.4mm.
Benotto racing road bikes are listed from highest model to lowest by numbers. Benotto Model0 100-800 are entry level bikes. The Modelo 850 is the first of the amateur series bikes.
Modelo 3000 used Columbus SL
Modelo 2500 used Columbus SL
Modelo 2000 used Columbus SP
Modelo 1600 used Columbus Zeta or Aelle
Modelo 1500 used Columbus Zeta or Aelle
Modelo 1000 used Columbus Zeta
Modelo 850 used Columbus Zeta
Modelo 800 used Columbus double-butted steel, or straight gauge moly steel.
Model 700 (unknown)
Model 500 (unknown)
Model 100 (unknown, but 1976 catalog says it uses light-weight steel.)
Measured my seat post and it was 26.6mm. That would put it somewhere between a Modelo 850-1600.
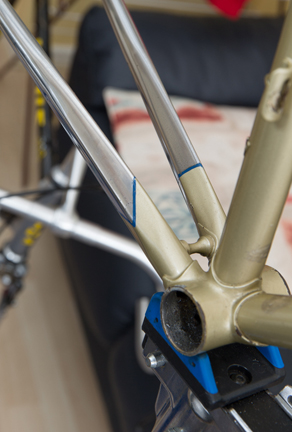
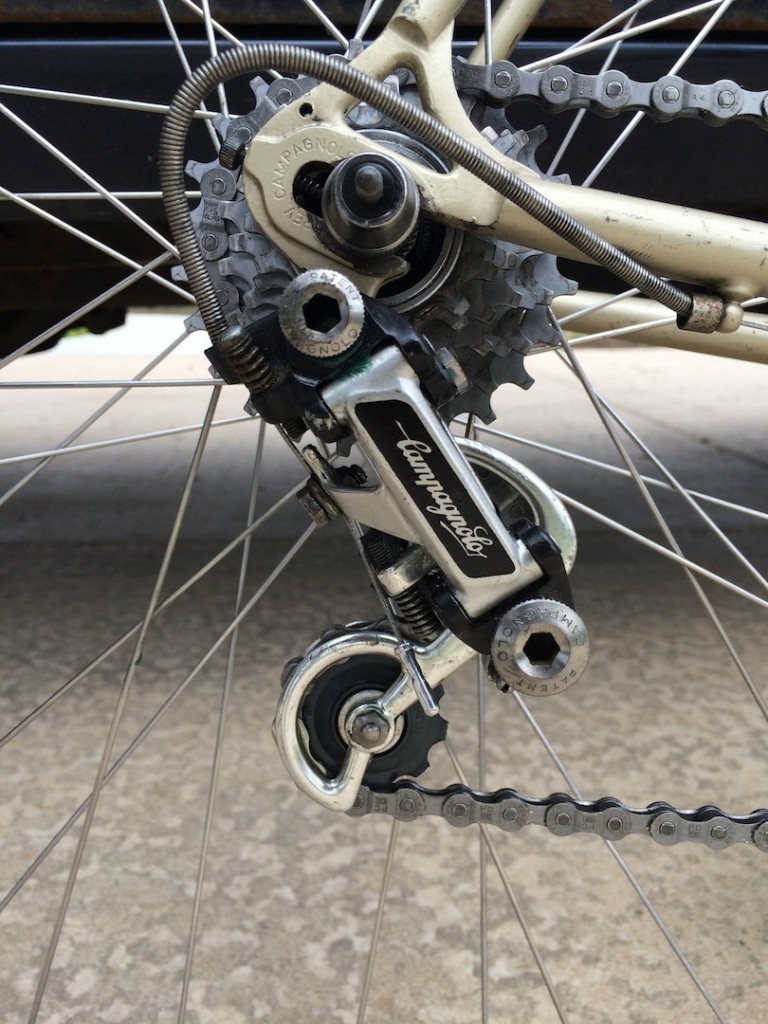
Step 3. Rear derailleur cable guide.
From all the research I’ve done I’ve concluded that Benotto moved their brazed on derailleur cable guides from above the bottom bracket prior to below the bottom bracket in 1979. 1976 and earlier had the clamp on guides.
1977-78 Benotto brazed on cable holders were above the chain stay and bottom bracket1979 and later models have the brazed on cable holder below the chain stay and bottom bracket
Looking at my bike’s rear derailleur cable guides and bottom bracket would indicate that it is a 1979 and later model.
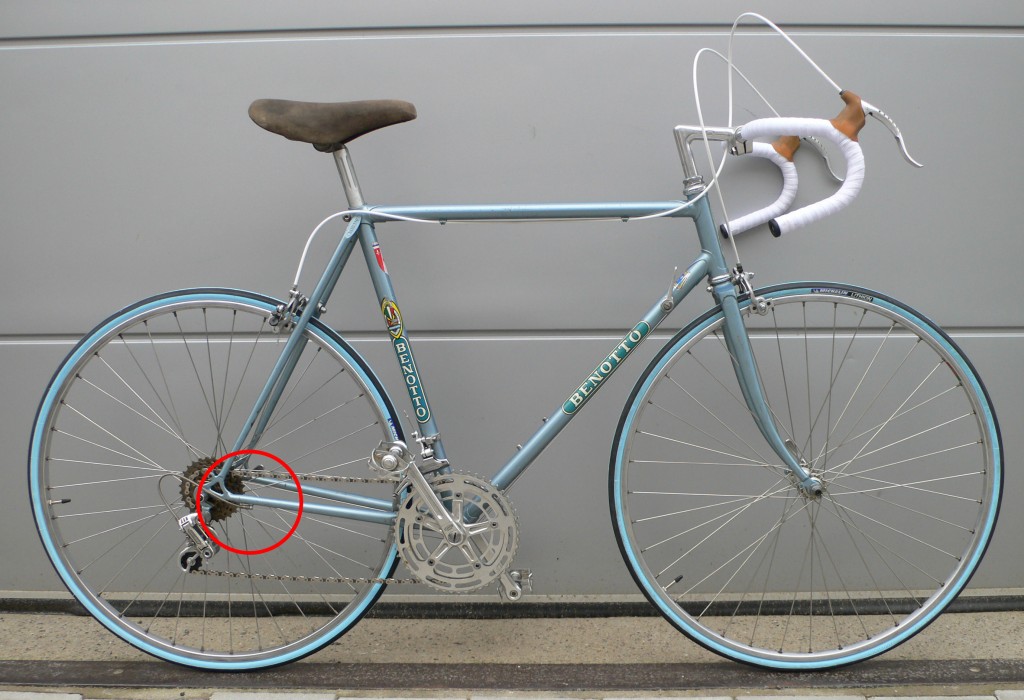
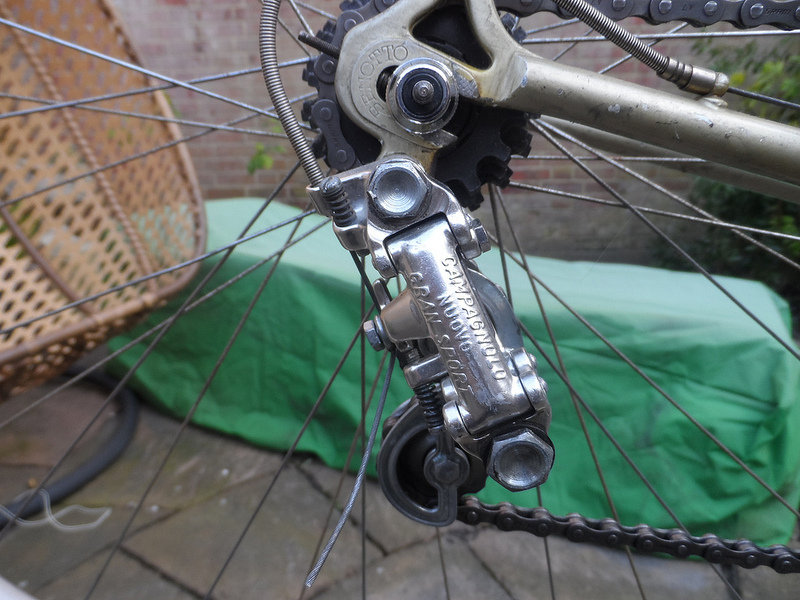
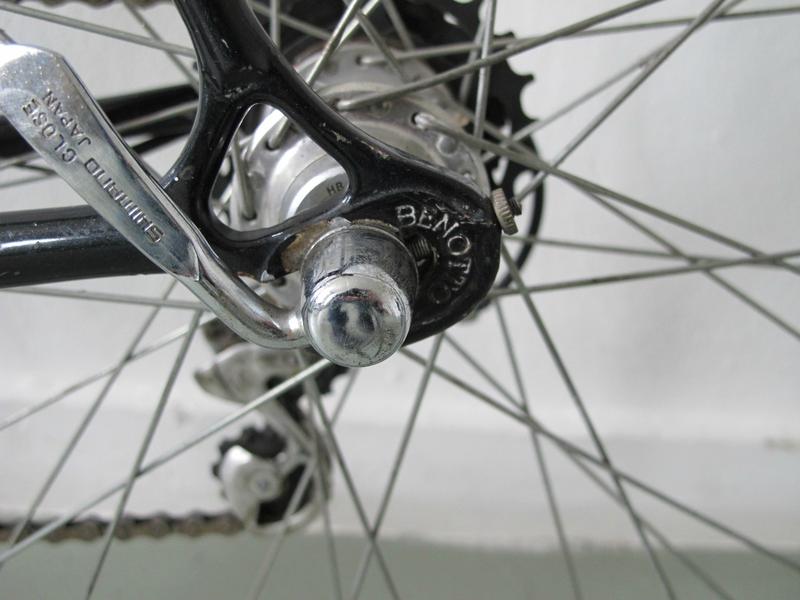
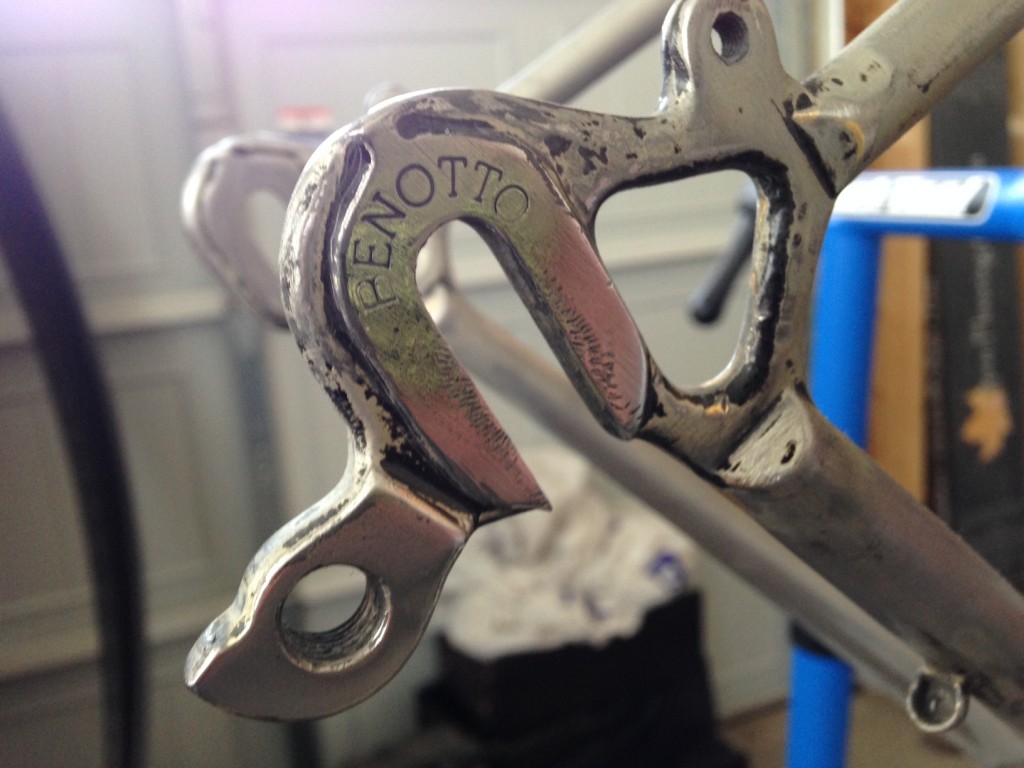
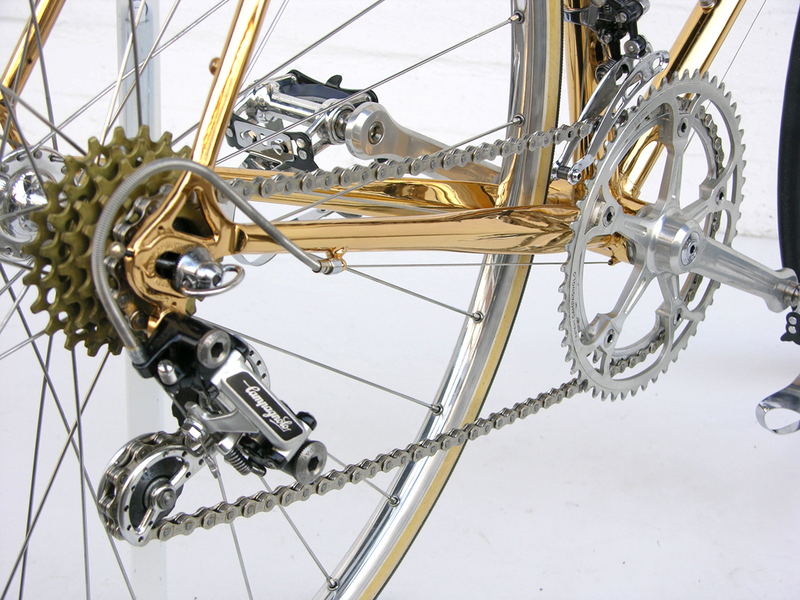
Step 4. Rear drop outs
Benotto Modelo 3000 has Campagnolo rear drop outs.
Benotto 3000 Campagnolo rear drop outs
Benotto Modelo 2500, 2000, 1600, 1500, 850 had Benotto rear drop outs
Benotto 1500 rear drop outBenotto 2500 rear drop out
Benotto Model 800 and lower had Suntour, Benotto or other rear dropout
Benotto Modelo 800 Suntour dropout
My bike has the Benotto rear drop outs
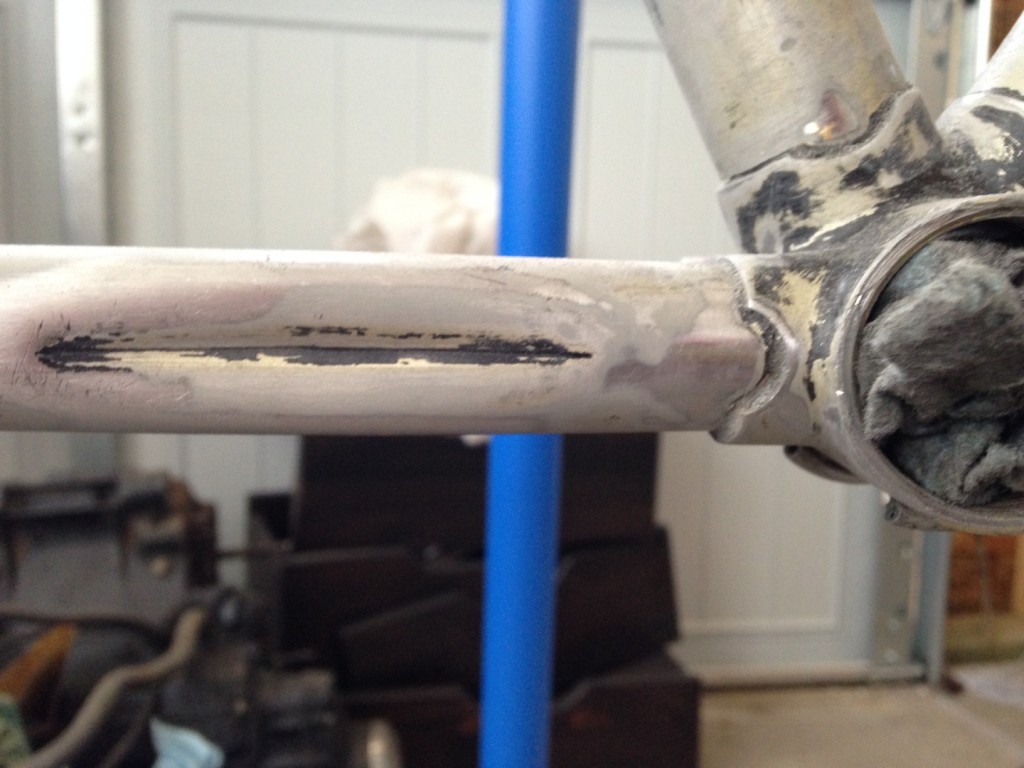
Step 5. Tubing vs Pipe
It’s not always possible to see this. In my case, because I sanded my frame down to bare metal I could make this observation.
Steel Tubing frames are made in forms and molds. Whereas piped frames are rolled metal. From a strength perspective there are tradeoffs. Randy from mytenspeeds.com mentioned that tubing can be more fragile than piping. But Tubing can generally be made to be thinner in some areas and thicker in others to save weight. Piping is uniform in thickness. Columbus frames are made of tubing.
I noticed what appear to be seams in the metal. That would mean that the frame is made of piping. It’s interesting to note that my seat tube was 26.6mm. So perhaps Benotto used a thinner piping. Either way my Benotto must be a Modelo 800 or lower.
Okay, so that’s where I am in the process so far.
More posts to come. Will write a piece about Benotto Forks as that should give some more clues. Will hopefully have the sanding completed and primer soon.
I remember it like it was yesterday. It was a bright sunny morning and I had just gotten a phone call from my friend Ryan, “You’ve got to come quick … there’s another guy that really wants this bike.”
The bike was a $5 Benotto at Ryan’s garage sale. It was a killer deal. Granted this was 10 years ago and the love of all things classic hadn’t yet come into vogue.
Bikes have somehow been involved with all the big milestones in my life. One of my earliest memories is of my dad surprising me with my first bike. He had worked in the garage fixing up and painting it. My family moved countries when I was 8. That was when I sold my then red 6 speed bike. It was the most precious belonging I had. Selling it was a big deal for me – bigger than moving countries. My parents were perhaps aware of this. They let me sell the bike myself, barter for a fair price, and then throw in my lock because I liked the kid.
Later at the iconic age of 16 I got my first “real” mountain bike. It was a Giant ATX 870. Our family had moved again (we moved around a bit growing up – which may explain my nomadic inclinations). Shortly after arriving in the new town I got this beautiful machine. It was my pride and joy. I liked that it was a hard-tail and I liked that it was a bit more technical to ride down some trails. I took care learning to do drops and my first gap jump. I never dropped the bike, never crashed, or endoed. It was the perfect bike for me. Then it was stolen.
The next day my dad called to let me know he saw a guy riding downtown on a bike that looked identical. But the guy disappeared and that was the last time I ever heard about it.
I learned a valuable lesson. If you value something – look after it. Instead of looking after this bike I had left it behind a friends house because I didn’t want to bike back up the hill home. That’s where it was stolen.
Skipping a few years and I’ve been without a bike for about 3 years. That was when my friend Ryan called. He knew that I had been looking for a road bike and a family member had donated this bike for his garage sale. So I headed over there and closed the $5 deal.
For me this Benotto represented more than a bike. It felt like a gift from God. It was just what I needed that summer.
It was late spring when I picked up the bike and the weather was warming up. That bike became my primary mode of transportation. In those days I was working on a construction site. I would bike to the job site early in the morning, work through the day, and then ride back through the town, cross the bridge and then up the long steady hill climb home. The Benotto took me on weekend adventures, peddling up the roads with friends to explore and climb nearby mountains.
I didn’t know anything about the bike, all I knew was that I loved the way it was to ride.
Earlier that year I had helped out briefly at a local bike shop as a bike mechanic. As the shop was on my route home I swung by to give the bike a tune up. It was the guys there that let me know just how special the Benotto was – and how rare it was to find. Apparently Benotto was one of the best bike makers in the world from 1930s to the 1980s. Benotto team riders lead the world’s cycling scene in the 1960s to 80s – breaking records and winning races.
This was all news to me. I liked the frame and had sprayed it black right after getting it. Later converting it to a single speed and using it as my town commuter. Turns out this was a mistake. Benottos are like the holy grail – not to be tampered with.
This faithful bike has been with me now for about 10 years, through thick and thin, rain or shin, and I feel it deserves a new life – one fitting of the Benotto name.
So this week I’ve started the restoration. It proved really challenging to identify the model and year having removed all decals when I first got it (I did leave the front decal). Despite its legendary status there is surprisingly very little information available about the Benotto. I’ve tried to document what I’ve learned as I go and share that with the world on this site. You can learn more about the history of Benotto here.
The restoration – Part 1
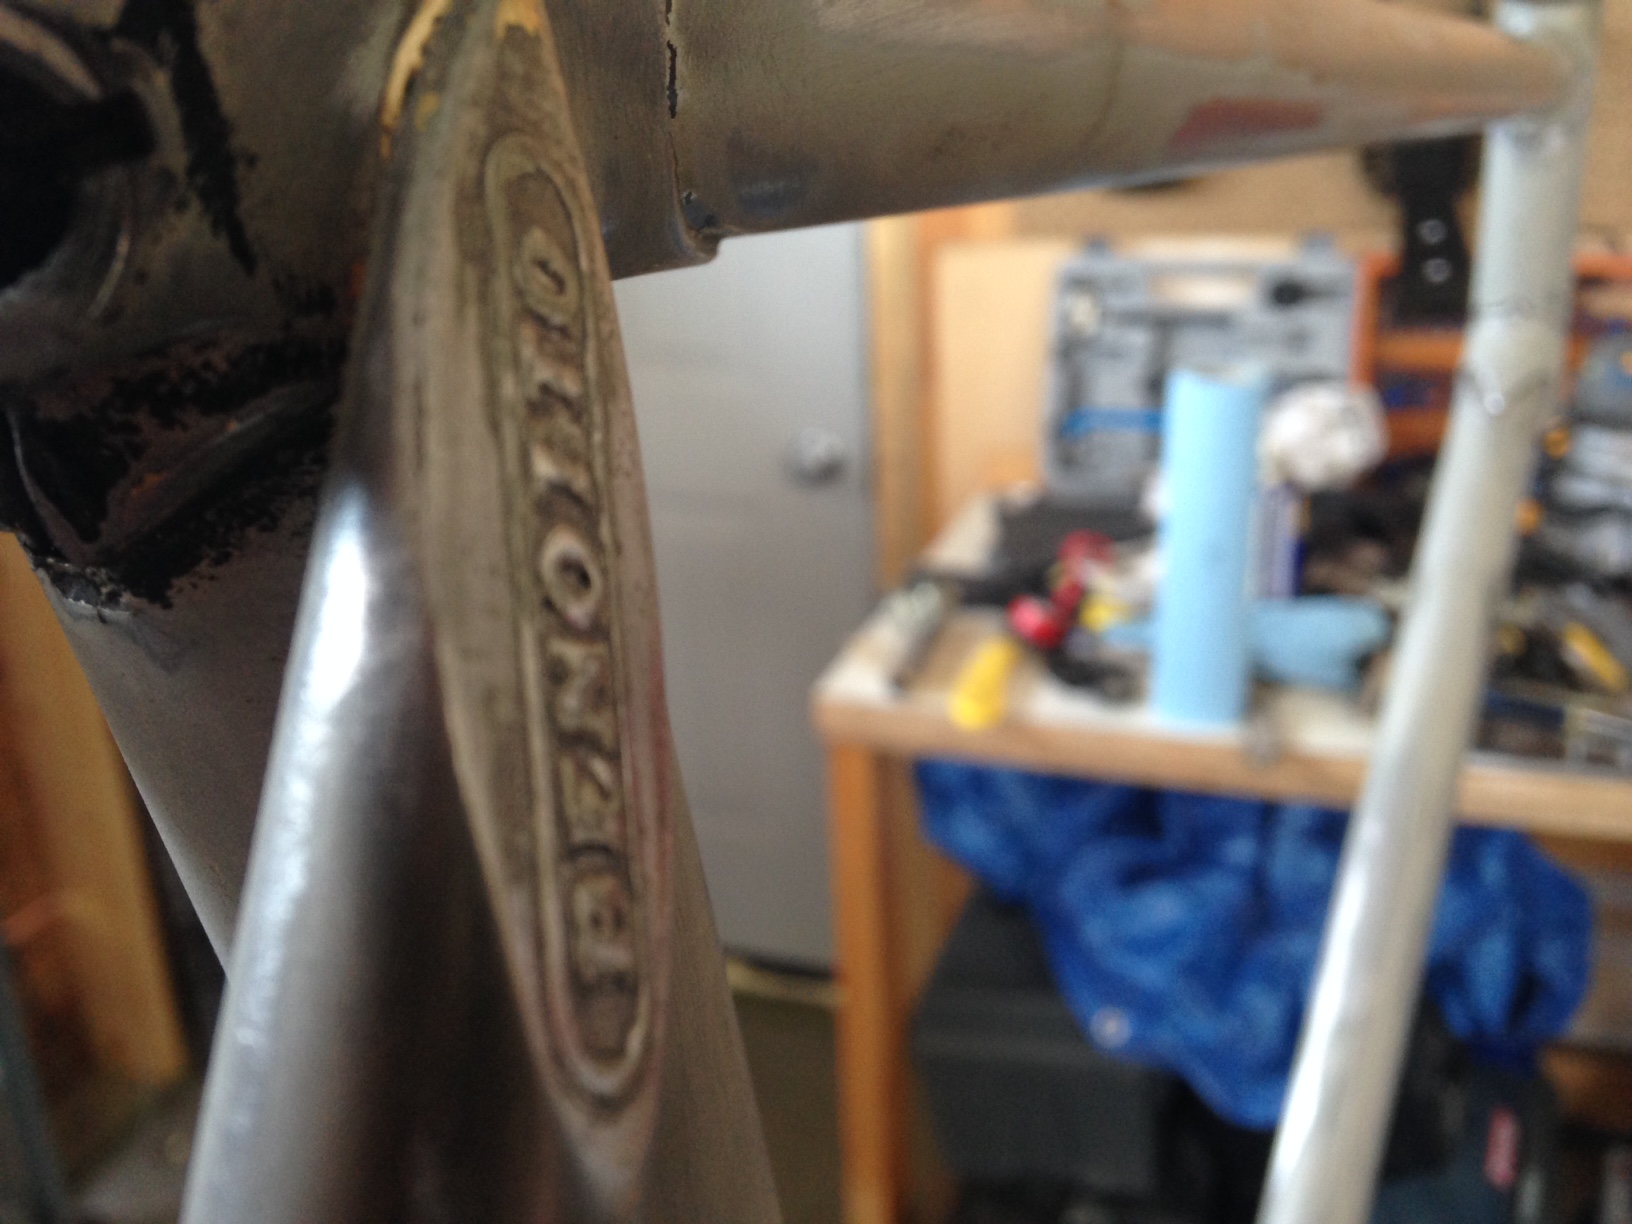
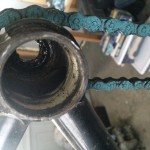
First the dismantling. This is the fun part. Stripping off all the parts revealed some really nice brazing in the bottom bracket.
You can see the original gold/champagne colour remained hidden beneath some of the parts.Sanding begun. You can see Benotto’s signature heart cutout. The quality of a Benotto bicycle can be seen everywhere. Here are the cast rear wheel dropouts.
As the black paint is removed, more quality craftsmanship is revealed. Here you can see the nicely built seat stays.
Then tragedy strikes. I accidentally broke one of the cable guides on the top tube with my bike stand’s clamp. Was hoping to braze it back in place, but it’s broken into 3 pieces. Not sure what I will do. Might grind off all the cable guides and replace them with new ones. Or I use the old fashioned cable guides. Will see what comes to mind tomorrow.
This is an attempt to document all of Benotto’s pre 1985 models. I need your help, if you have a photo of a Benotto and know the year/model please send it to me or share a link to it in the comment section. That will really help out the community.
About 10 years ago I was lucky enough to pickup a Benotto of my own at a local garage sale. Having ridden many local hills and windy roads on this beautiful vintage frame I have personally experienced the esteem and fondness that Benotto owners and admirers have for these bikes. Benotto is a true Italian classic. The only problem is that there is very little information about them online. So this is an incomplete list at best, but hopefully it will help you learn more about your bicycle.
If you have any question, ask me in the comments below and I will try my best to answer them.
1931 Bicicletas Benotto was established by 24 year old Giacinto Benotto
The 1960s to 80s were the golden years of Benotto bicycles. By the mid 1980s Benotto had numerous 1st place titles including 11 world championships and countless local, national and international competitions such as the Giro d’italia. In 1968 Ole Ritter famously broke the hour record while riding a Benotto Bicycle. He road a staggering 48.653 kms in one hour. It took four years before the great cyclist Eddy Merckx was eventually able to beat that hour distance riding 49.431 kms. Wikipedia
Ole Ritter breaks the hour record in 1968
Benotto Bicycles History And Timeline
Giacinto Benotto, a young Italian racer, aspired to build great bicycle frames. In 1931 he founded Bicicletas Benotto in Turin Italy, the year that Francesco Camusso won the gruelling 1931 Giro d’Italia.
Francesco Camusso wins the 1931 Giro d’Italia
“Typical of great cycling frame makers, Benotto grew out of the passion of racer Giacinto Benotto who was 24 years old in 1931 when he established the business in Turin.” Retrospective Cycles Amazingly, by 1951 Benotto bicycles had already competed in 3 world championships.
Giacinto and Lea Benotto with team
Another famous Italian frame builder Cino Cinelli also started first as a successful racer riding for Frejus (1938-39), Bianchi (1940-43) and Benotto in 1944.
In 1948 Giacinto Benotto had read of the newly discovered oil in Venezuela and thought it a good opportunity to bring cycling there. Eager to expand into emerging markets he took with him a shipment of 200 bicycles. At first he encountered opposition in Venezuela as he was told they “drive Cadillacs” not bicycles, but it wasn’t long before he began getting popular press excited about the Benotto Bicycles.
1948 Benotto Bicycle
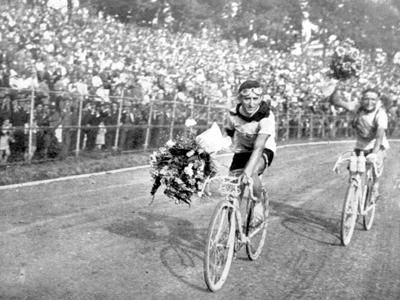
It seemed with each move Benotto’s success continued. In 1951 Antonio Belivacqua rode a Benotto to win the famous Paris-Roubaix.
Antonio Belivacqua wins the 1951 Paris-Roubaix on his Benotto.
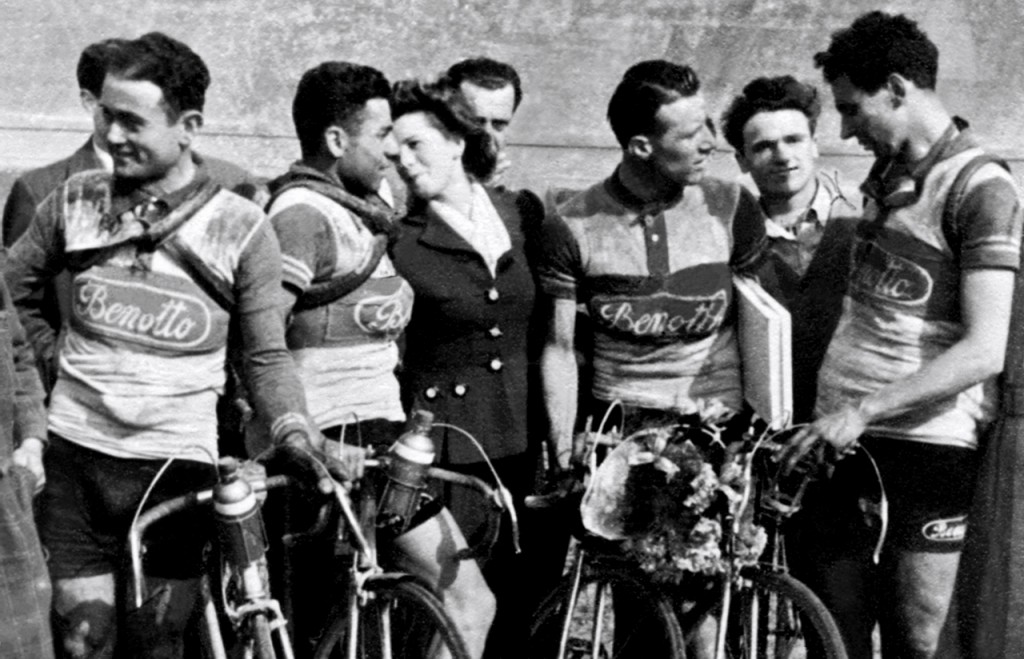
Felice Benotto, a family member, was engaged in the cycling scene in Venezuela and was able to get a team to Mexico by October 1950. By 1953 Benotto expanded operations into Mexico as they rapidly became Latin America’s most popular cycling brand. At this point Benotto split their operations between Italy and Latin America.
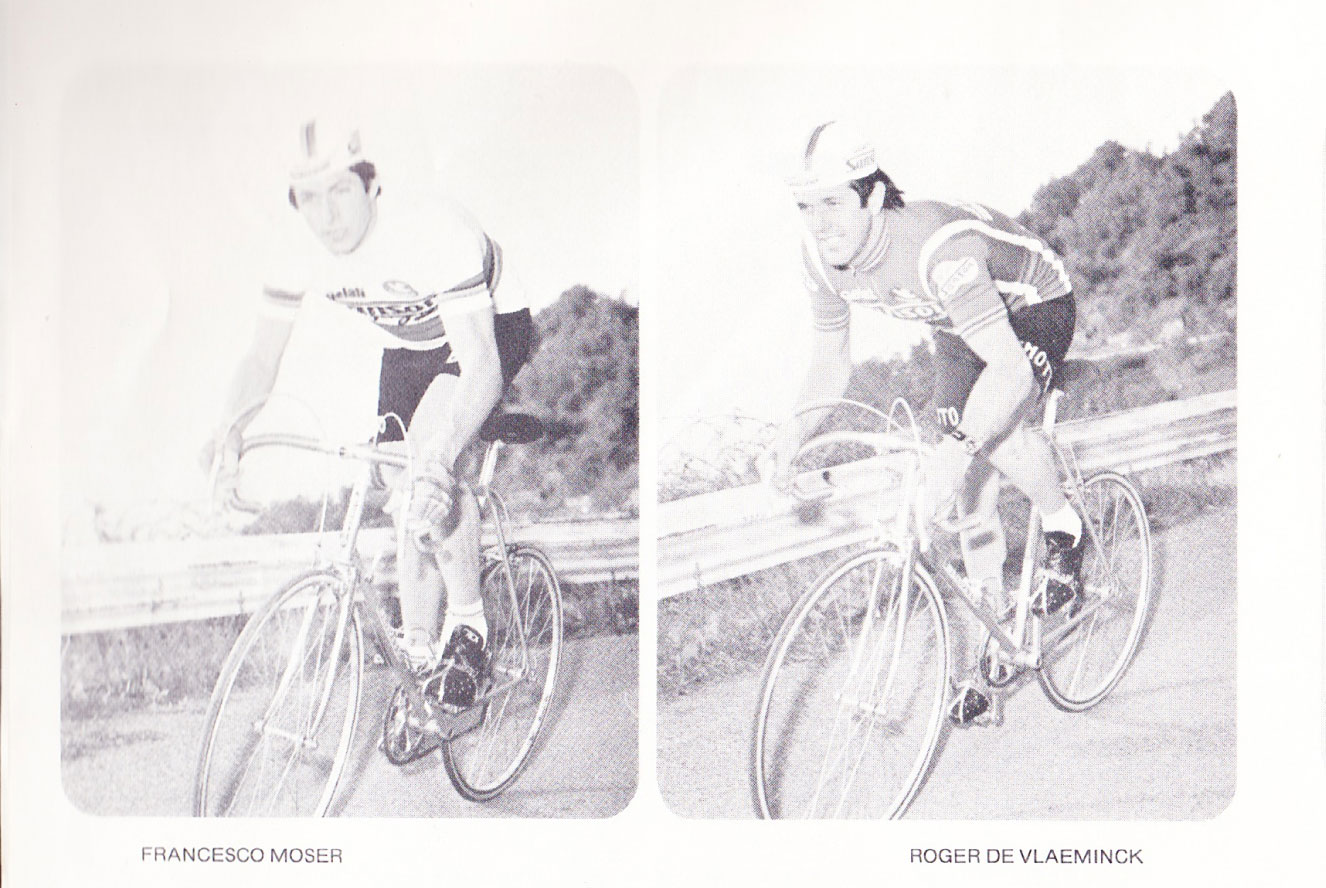
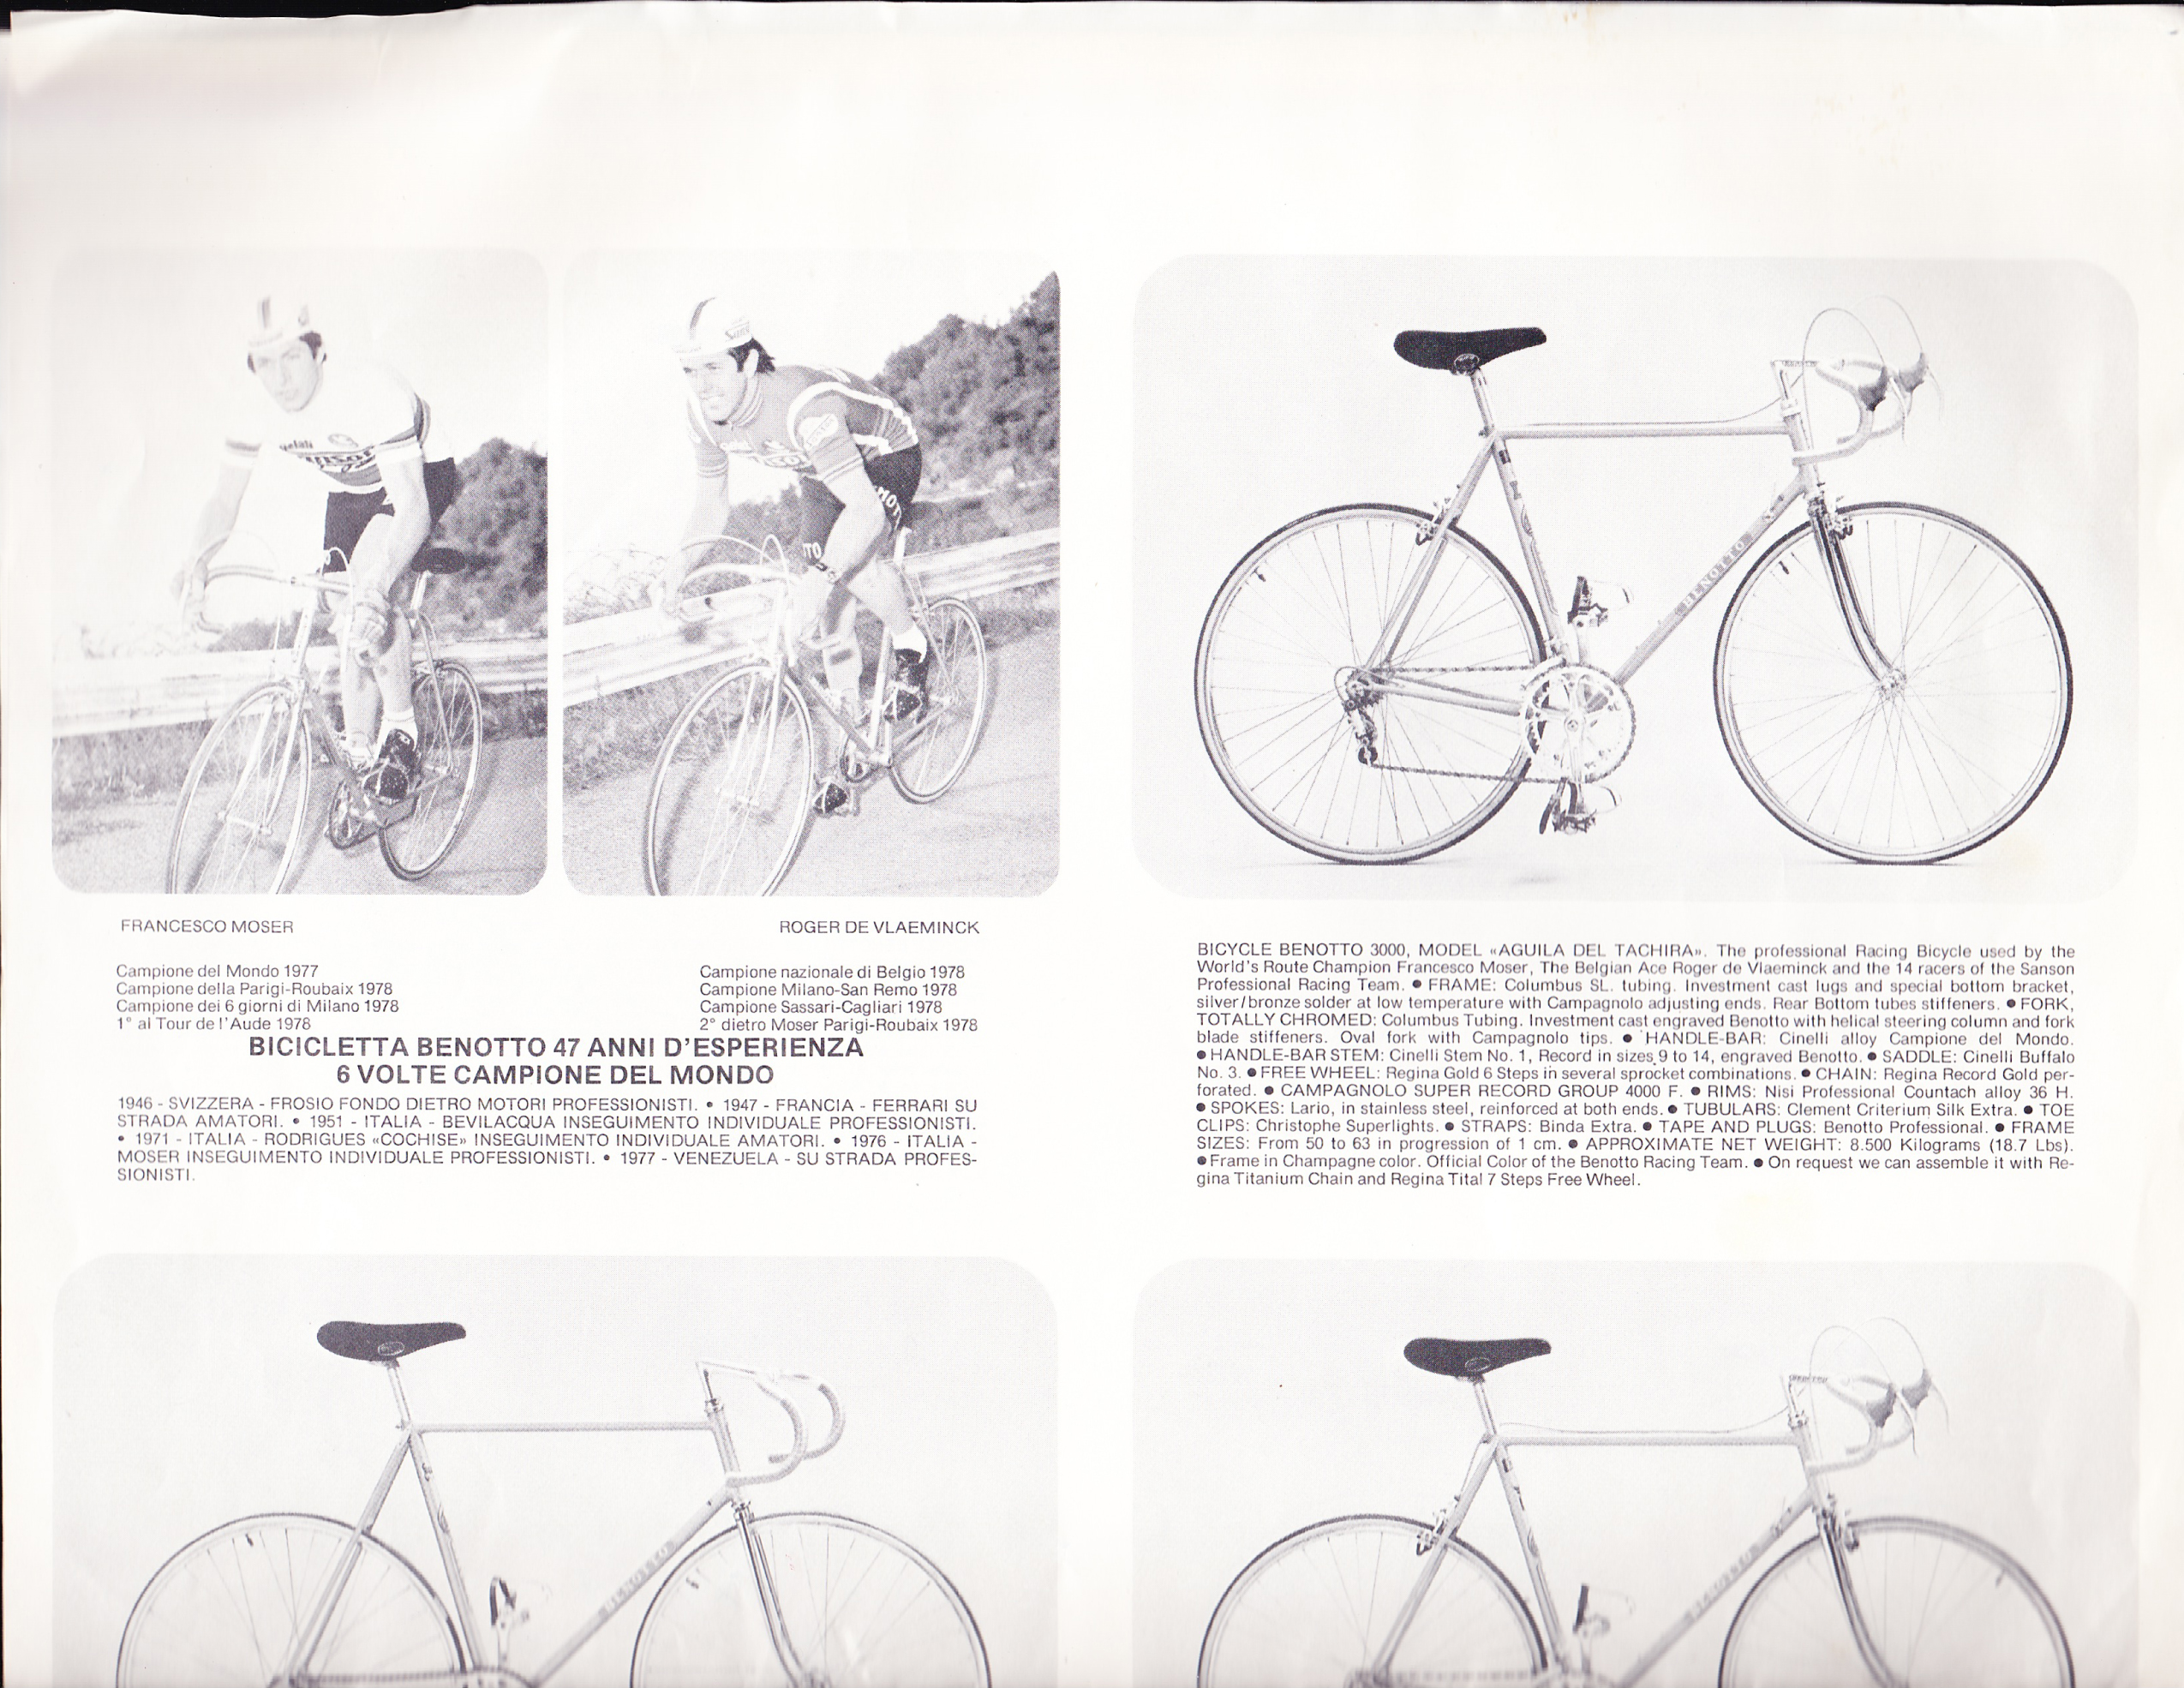
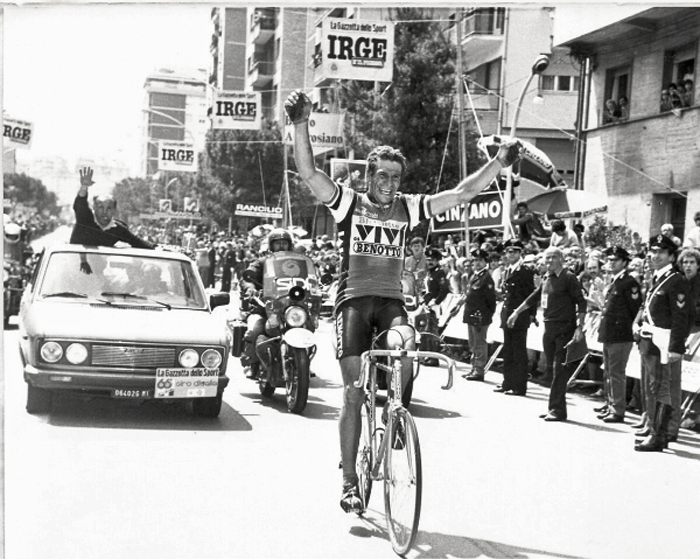
The Benotto brand continued to grow. Francesco Moser later won his World Championship in Cristobal Venezuela on a Benotto, in 1977. Then in 1978 Roger DeVlaeminck won Milan San Remo riding a Benotto in ’78. In that same year Moser went on to win the Paris-Roubaix.
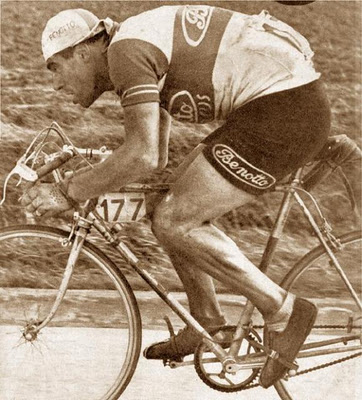
Benotto was now known as a serious bicycle among the cycling community and was being used by team riders everywhere. As was the case with heroic riders like Freddy Maertens who rode a Benotto in the 1980s SanGiacomo team and Moser who road a Benotto during the 1975 Tour de France.
Francesco Moser in 1975 Tour de France
The production of all high-end racing bicycles remained in Turin until 1983/84. Around this time Benotto made a decision to move both European and Latin American production of bicycles to Mexico.
By 1985 it is reported that all subsequent bicycles were manufactured in Mexico with the possible exception of the Modelo 5000. Steel Vintage
1984 is the last year of the historic “Italian Made” Benottos. Unfortunately some of the Benotto’s built in Mexico during this time suffered from the bottom brackets or head tubes cracking. This was due to inexperienced fabricators overheating the steel during the brazing process. The majority of Mexican Benotto frames on the road today were built well and others have reported that repairing the crack was a simple matter of rebrazing the cracked areas with bronze.
1984 Italian made Benotto Modello 850
Some models like the Modelo 800 and 5000 were unaffected. Modelo 800 was made with Hi-Ten steel which can handle a little more heat and abuse while the Modelo 5000 was unaffected as it was still made in Italy during this period. Also, Benotto forks are outstanding forks. So if you do happen to own or come across a cracked Benotto that you don’t care to repair, salvage the forks.
At this same time Benotto was at the height of its success. For many of the cyclists from this era a Benotto is a representation of the heart of cycling in the 1970s and 80s. It represented a time of quality craftsmanship meeting beautiful design that enabled human’s to go beyond their natural capacity. In the words of Nigel Dalton, “To be accurate, they are beautiful things” and “a bike dear to [Rob] from the early 1980s in Europe.” (source)
Benottos are famous for their racing geometry and quality of steel. Their bikes were designed for racing, with almost all models having the exact same geometry. The only difference between the frames was the type of metal used. This is a large reason for their popularity today as their frames are iconic of brilliant bicycle design and continue to be excellent frames for fixies and restorations.
In 1981 the elite US Amateur team was sponsored by Bicicletas Benotto along with other leading Italian cycling brands: Gipiemme components, Ambrosio rims, Hutchinson tires ad IscaSella Saddles. (flandireacafe.com) The team issue Benotto bikes were a mix of diamond and oval shaped chainstays, a testimony to their tradition of handbuilt machinery.
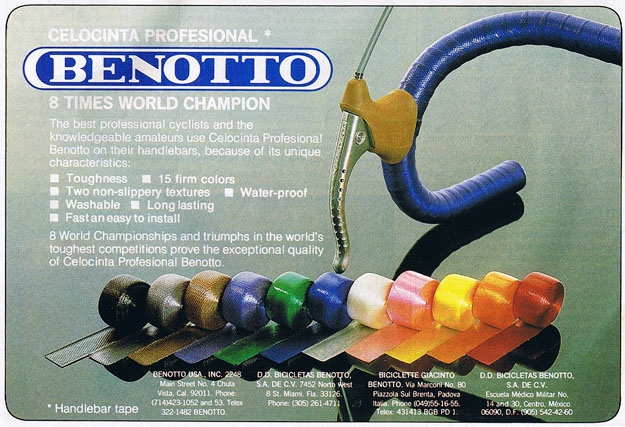
Benotto’s influence in the world cycling scene could even be witnessed on the handlebars of competitor cyclists. Benotto Handlebar Tap was the the handle bar tape to have in the 1970s and 80s. It was light, strong and bold and dominated the landscape.
US team rider Fast Eddy wrote on his personal blog that he didn’t know where his bike was built and it didn’t matter to him, all that mattered was they were riding the same frame as the bike featured in the opening sequence of the documentary “A Sunday in Hell” and the same frame that Moser won his World Championship in Cristobal Venezuela on, in 1977. They were riding a Benotto.
Fast Eddy
Yet by 1986 the glory days of Benotto were fast ending. Coincidently a change was taking place in the cycling scene as a whole. Many attribute 1983 as the last year of classic cycling. 1983/84 marked the beginning of clipless pedals, click shifting, the death of Tullio Campagnolo, a move away from brazing steel frames to welding, introduction of cycle computers, and along with it Benotto’s move to Mexico.
Braun Gregor Winning Stage 14 of the 1983 Giro d’Italia on a Benotto. Gregor also won the German National Road Race on a Benotto the same year.
In the following years Benotto attempted to enter the Triathlon and 7-speed market with the Shimano 600ex, but it was too little too late having not resolved the bottom bracket cracking problem.
Today Benotto’s classic bicycles are a reflection on a different time. Classic cycling events like L’Eroica that are “born out of that love for cycling” are trying to bring back some of the magic from pre ’84 cycling. In many ways a classic Benotto embodies that pure heritage and passion for cycling and the drive to create the perfect man-powered machine.
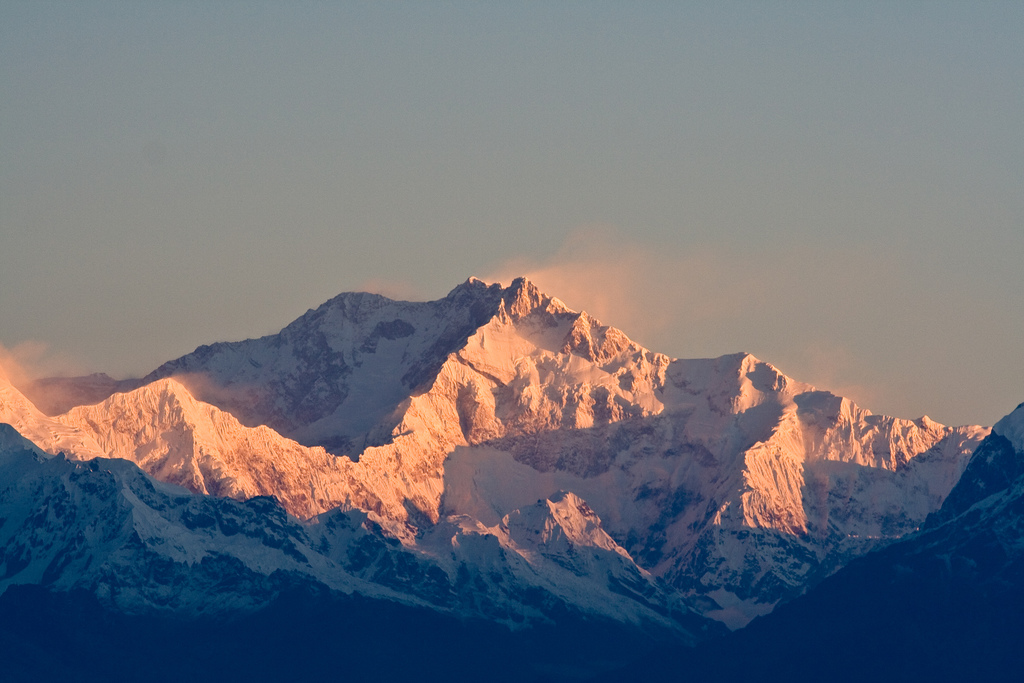
A few years ago I sat in an auditorium listening to David Graham tell the tale of how he, his son, and a family friend were the first Canadians to summit the peak of Pathangtse in the Nepalese Himalayas.
One of the stories he told has stuck with me to this day.
The mountains in the Himalayas are tall and the altitude at the base of them is high to start. The air is thinner, which means there is less oxygen to breath, making climbing there more challenging and physically exerting. As David Graham and his team were climbing their chosen route, it gradually became more technical and difficult. Until finally they reached a section of the climb that appeared beyond daunting, but overwhelming.
One of the Sherpas that was leading the expedition wore a smile everywhere he went. David described this man as enchanting. Whenever their route became harder he would encourage the others with a smile and say, “It’s easy.”
At this point in the route David looked at this man, expecting now he would admit that the challenge ahead was not easy but potentially deadly. Instead, he smiled at David and said calmly, “It’s easy, we’ll need to take it slower.”
David experienced an epiphany from this man. Life doesn’t have to be hard. It is really how we perceive it. This epiphany was clearly contagious because as he shared it I too experienced that moment of enlightenment.
I had recently launched a startup with my brother and friend Art. In the months and years that followed I had many opportunities to make this Sherpa’s approach to problem solving my approach. Often I was asked by the team if the task ahead would be difficult. I enjoyed responding that it was easy, it would just take time. It’s hard to know for certain, but it may very well have been the lessons learned from this talk that accounted for the amount of technical hurdles that we overcame in the first few years as a startup business.
Fast forward 5 years. Surfing Youtube I stumbled upon a video entitled, “Life is easy. Why do we make it so hard?” by Jon Jandai.
This remarkable talk reminded me of the story I just told you. In the video Jon Jandai describes his life growing up in a poor village in northeastern Thailand. It wasn’t until they got TV that his village suddenly realized they were poor.
To overcome his newly discovered poverty he moved to Bangkok, to work hard and earn a living. However, after moving there and working hard everyday he had very little to show for it. His diet was terrible and he lived in a cramped accommodation. He decided that he needed to make an improvement so he attended university. But university was hard, “because it’s very boring.”
Jon explains that he had a realization at university, “We were taught to make life complicated and hard all the time … but we don’t know how to make it easy anymore.”
So he decided to simplify his life. He moved home and started growing rice instead. He grew 4 tons of rice and it took only 2 months of work. He didn’t need all the food so he sold the rest at the market. He made a pond and now has fish for food year round. He’s since gone on to build a beautiful home with his own hands and has no debt. His friend, one of the smartest people in university, just built a home as well. However, he is in debt for 30 years to pay it back. The way Jon looks at it is that he now has 29.5 more years of free time compared to his friend.
Jon has many profound insights in his talk, one of which probably deserves it’s own blog post, “The four basic needs: food, house, clothes and medicine must be cheap and easy for everybody. That is civilization. But if you make these four things hard for many people to get, that is uncivilized.”
The biggest takeaway from Jon Jandai’s talk is that life does not need to be as complicated as it’s made to be. Jon said, “Now when you look around everything is so hard to get. So I feel like now is the most uncivilized era of humans on this earth. We have so many educated people and our life is getting harder and harder.” I realized that what Jon was saying is true. It’s easy to become absorbed by the demands of life and lose sight of the ease of a simple one. As I looked away from the screen of my computer towards my yard and aging fence I was filled with a deep sense of gratitude and appreciation.
David Graham learned from his Himalayan guide that a challenging climb can be an easy one. Jon Jandai’s outlook is much the same. A challenging life can be an easy one.
I leave you with this last statement of Jon Jandai, “Now I try to become normal, but people look at me like I’m abnormal. Crazy people. But I don’t care because it’s not my fault – it’s their fault, because they think like that. My life is easy and light now.”
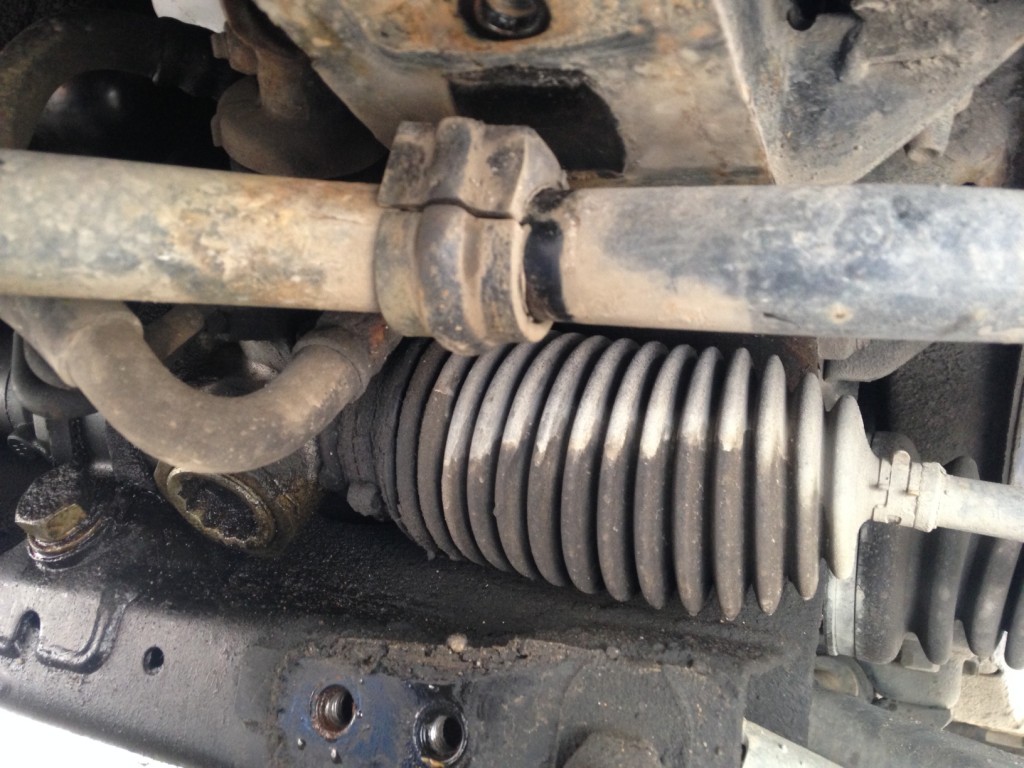
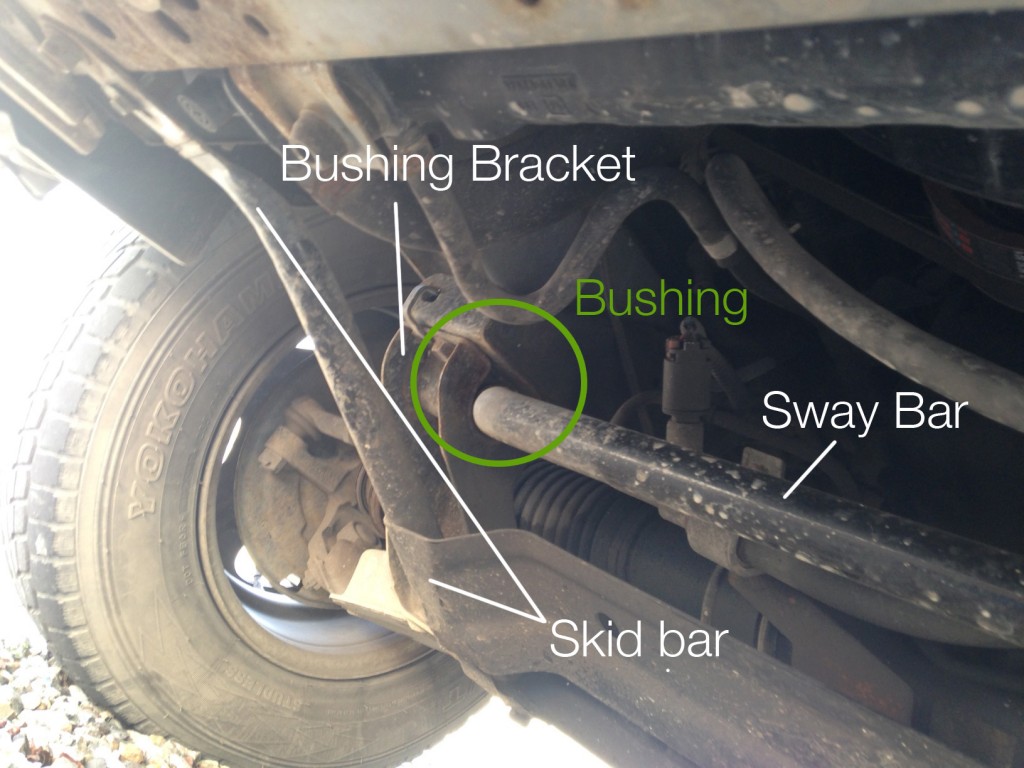
If you are noticing a clunking sound coming from the front of your vehicle when going over uneven roads and speed bumps it’s likely that their is play in your sway bar. If your front bushings are worn then your sway bar will move when your wheels go up and down. Resulting in a clanking sound.
It’s really easy to replace your bushings. It’s essentially the same procedure for all vehicles.
Here are the steps to replace your front sway bar (stabilizer bar) bushings
1. Check if there is play in your sway bar. I had Shawna jump up and down on the sidestep of our truck while I checked the sway bar underneath. Sure enough, the sway bars were loose and clunking.
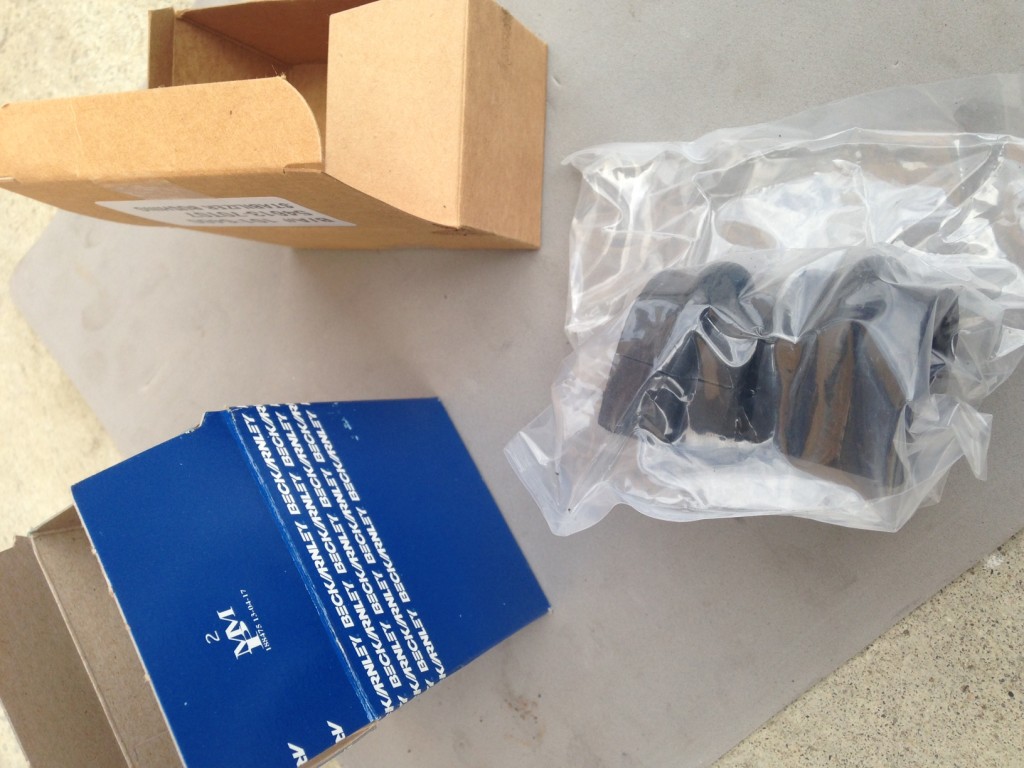
2. You will need:
Replacement bushings. These usually go for around $20-$30 for the pair. You can find them online for less. They are called Suspension Stabilizer Bar Bushing Kit.
14mm socket and ratchet
Socket extension
A rag
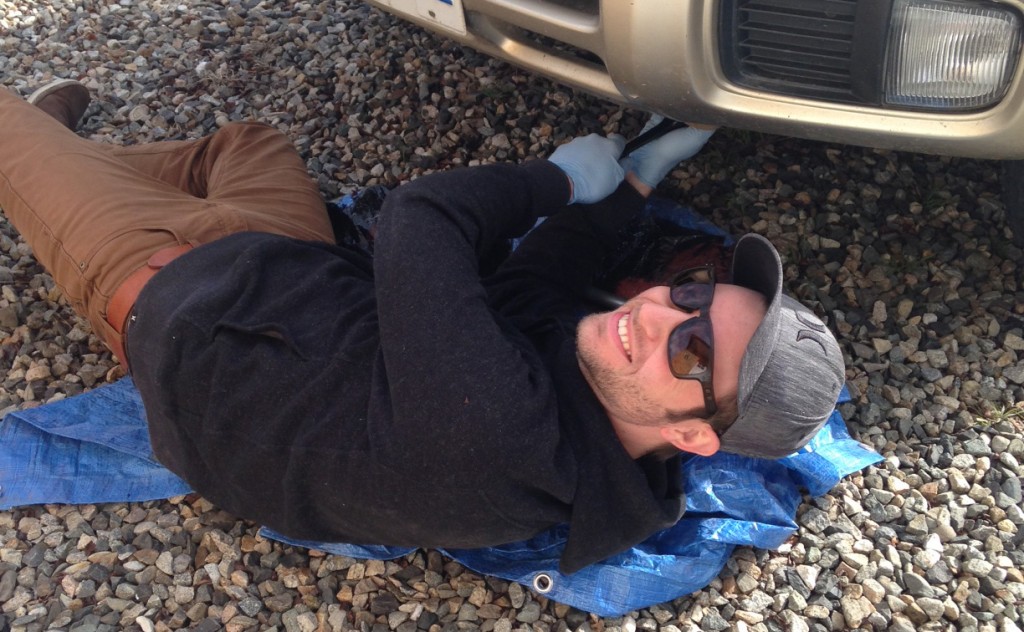
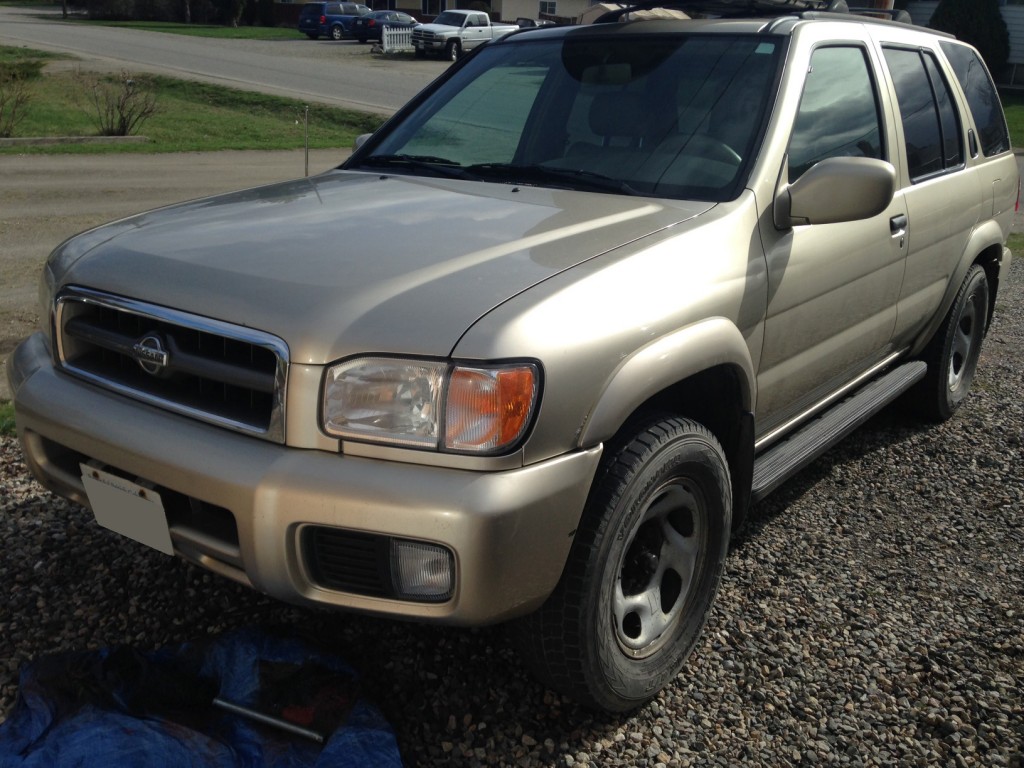
The nice thing about the Pathfinder is that it’s got good clearance. You won’t need to use a jack for this. (As you can see in the example photo Shawna took)
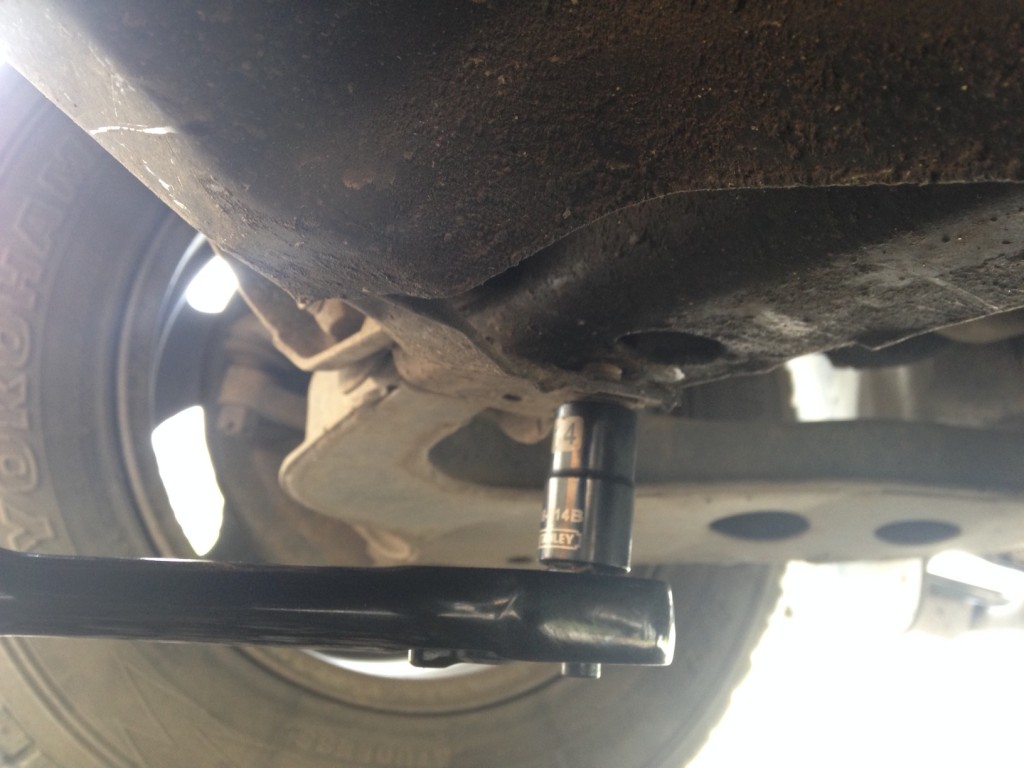
3. Remove your skid plate or skid bars so that you can get at the bolts on the stabilizer brackets holding the bushings. (If you don’t have skid plate skip this step).
There are 4 bolts holding your skid plate in place. Remove them all.
4. There are 4 bolts holding each of the front stabilizer brackets
Remove them all.
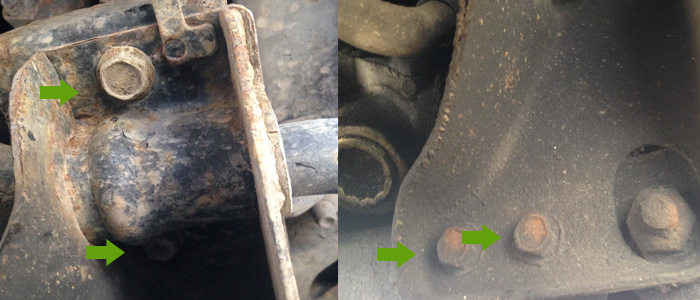
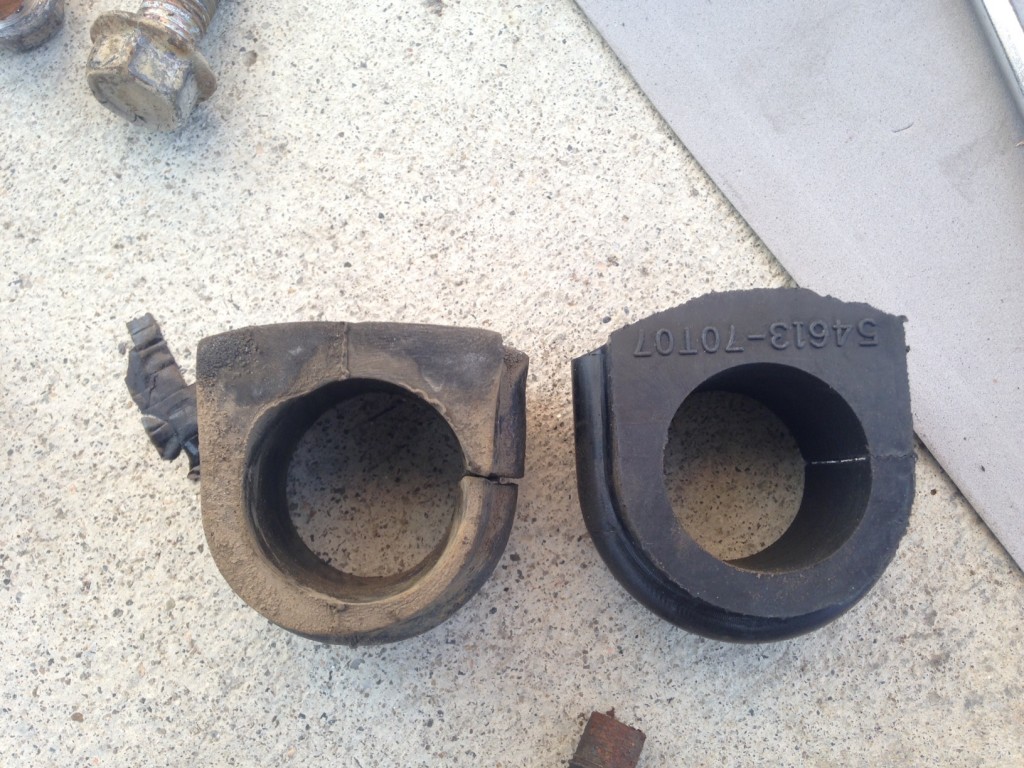
5. Once the brackets are removed, your bar will swing freely. Remove the bushings. They have a slit on one side making them easy to slip off.
You can see the just how much the old bushings have worn when compared to the new one.
6. Clean the area on the sway bar where your bushings sit with a rag.
7. Replace the bushings.
8. Bolt the stablizer brackets back in place.
9. Reattach the skid plate with the 4 bolts.
10. Go for a drive and enjoy your solid front sway bar.
This is a great DIY project. Will save you a few bucks doing it yourself and shouldn’t take more than an hour or two. Best of luck


 You can see the original gold/champagne colour remained hidden beneath some of the parts.
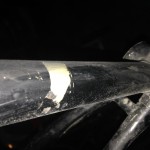 Sanding begun. You can see Benotto’s signature heart cutout.
 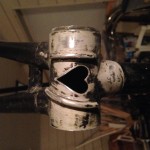 The quality of a Benotto bicycle can be seen everywhere. Here are the cast rear wheel dropouts.
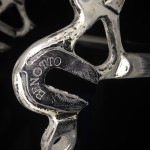
 Then tragedy strikes. I accidentally broke one of the cable guides on the top tube with my bike stand’s clamp. Was hoping to braze it back in place, but it’s broken into 3 pieces. Not sure what I will do. Might grind off all the cable guides and replace them with new ones. Or I use the old fashioned cable guides. Will see what comes to mind tomorrow.

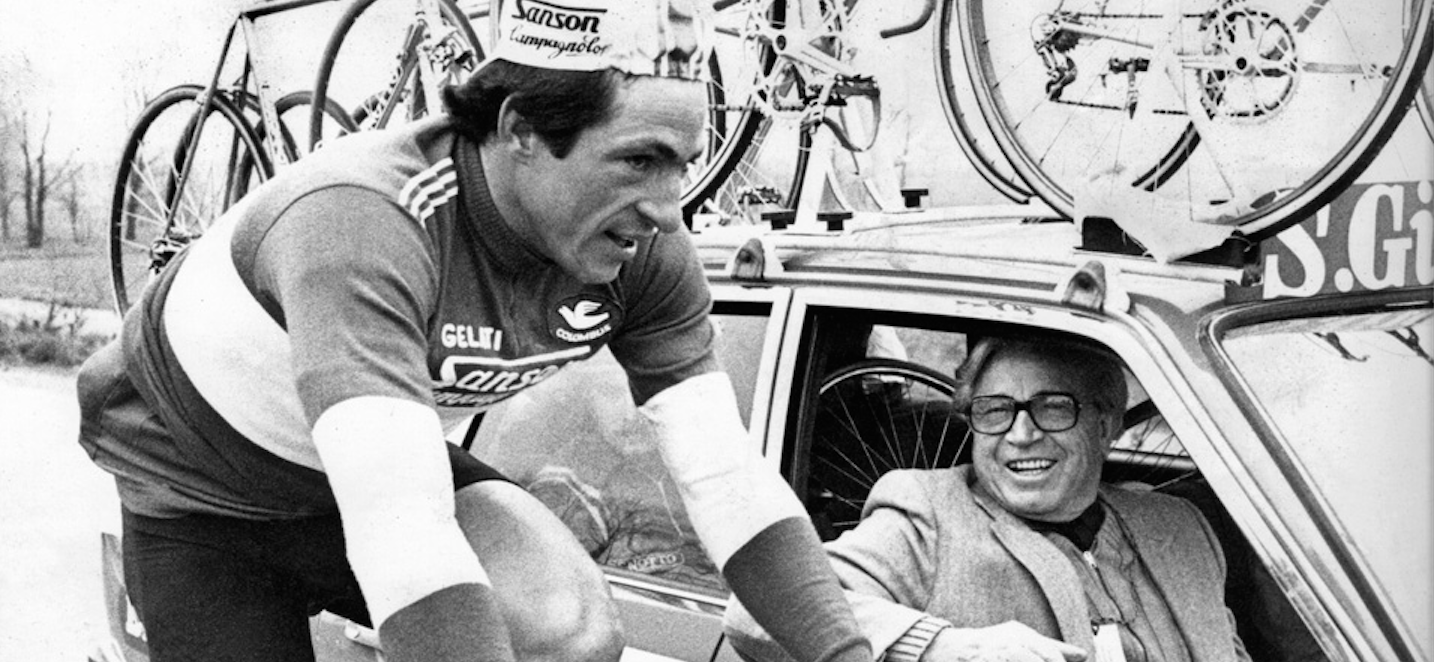


 The Benotto brand continued to grow. Francesco Moser later won his World Championship in Cristobal Venezuela on a Benotto, in 1977. Then in 1978 Roger DeVlaeminck won Milan San Remo riding a Benotto in ’78. In that same year Moser went on to win the Paris-Roubaix.
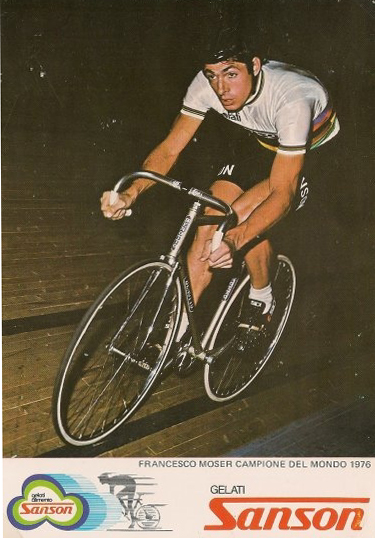
 It’s really easy to replace your bushings. It’s essentially the same procedure for all vehicles.