Welcome to part 5 of the MAMP tutorial. In this post we will go over setting up friendly URLs on your Mac server. We will be adding a new site called http://mysite.localhost
You will also learn how to run multiple domain sites on your local server. Having Virtual Hosts enabled is really useful when developing sites on your localhost. It’s also super easy to setup.
What green means: any lines that you need to replace in this tutorial will be in green.
1. Enable virtual hosts
1. Open your Terminal (found in your Utilities folder which is inside your Applications folder)
Then you will need to open the file Apache httpd.conf file with the Nano editor and uncomment the virtual hosts line.
2. Type the following line in your Terminal window
sudo nano /etc/apache2/httpd.conf
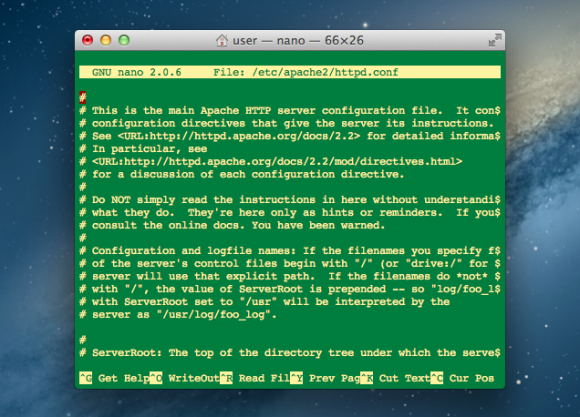 3. With the file open find the line where the Virtual Hosts file is commented out.
#Include /private/etc/apache2/extra/httpd-vhosts.conf
4. Remove the # in front of the line. This will enable the Virtual Hosts configuration file.
Include /private/etc/apache2/extra/httpd-vhosts.conf
5. Save and exit the file. Hold control + x to save and exit. Type Y to confirm. Then press enter.
2. Configure the virtual hosts file to setup the directories and logs for Apache
Next you want to configure your Virtual Host file. To do that you first need to open the virtual hosts file using Nano.
1. Type the following command in your Terminal window.
sudo nano /etc/apache2/extra/httpd-vhosts.conf
2. Scroll down to the end of the file and add the following.
<VirtualHost *:80>
   DocumentRoot "/Users/username/Sites"
</VirtualHost>
<VirtualHost *:80>
   DocumentRoot "/path/to/web/folder/where/site/is/located"
   ServerName mysite.localhost
   ErrorLog "/path/to/error/log/mysite.localhost.error_log"
   <Directory "/path/to/web/folder/where/site/is/located">
     AllowOverride All
     Require all granted
   </Directory>
 </VirtualHost>
The first VirtualHost record tells the server where to go if only http://localhost is entered in the browser. You can set this to any location you want.
The second VirtualHost record sets up your paths for a specific local domain. You will need to create a new record like this for each new site you want to add.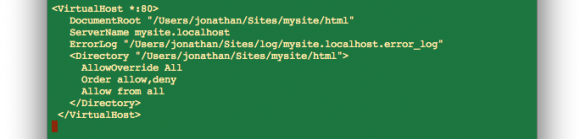
3. Save and exit the file. Hold control + x to save and exit. Type Y to confirm. Then press enter.
3. Adding the url record to your hosts file
This is very easy to do.
1. Open the hosts file in your nano editor using Terminal.
sudo nano /etc/hosts
2. Add a virtual hostname for each website.
Scroll down to the end of the file and add a new record.
127.0.0.1 mysite.localhost
Just like the virtual host file above you will need to add a new record foreach new website you want to add.
3. Save and exit the file. Hold control + x to save and exit. Type Y to confirm. Then press enter.
4. Restart Apache
Open terminal and run the following command to restart your Apache server
sudo apachectl restart
5. (Optional) Give Apache permission to access your site.
If you are getting a Forbidden message or you store your website folder in a location other than the /Users/username/Sites/ directory you will need to give Apache permission to access it.
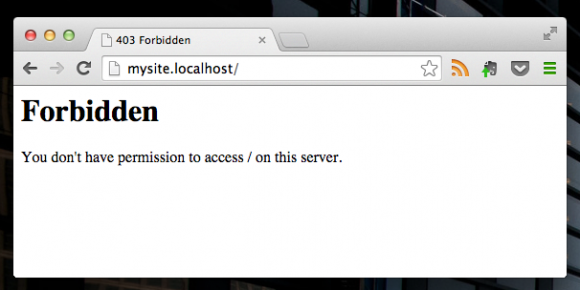
Here’s how you do it.
1. Open Terminal and navigate to base of your site. For example if your site is stored in /srv/www/mysite/ go to it’s parent directory
cd /srv/www/
2. Next give the Apache user ownership rights of your site’s folder
sudo chown -R :_www mysite
3. Lastly, give the Apache group now associated with your folder permissions to access and write to it
sudo chmod -R g+w mysite
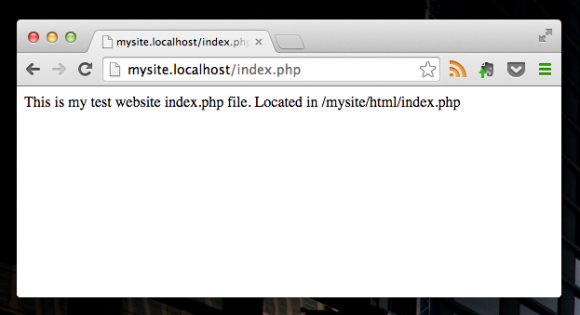
Restart Apache again and Congrats. Open your browser and go to the url http://mysite.localhost/
You will see your site there.
I created an index.php file to demonstrate how this works.
Part 1: How to install Apache and PHP on a Mac with OSX 10.8 + (MAMP Part 1)
Part 2: How to setup MySQL on a Mac with OSX 10.8 + (MAMP Part 2)
Part 3. How to setup phpMyAdmin on a Mac with OSX 10.8 + (MAMP Part 3)
Part 4: How to enable and setup php.ini on a Mac with OSX 10.8 + (MAMP Part 4)
Just dropping by to say that this is the best explanation I could find. Thank you so much! I’m new to Mac OS X and I was really having trouble understanding all the .conf editing and whatnot. This has made my life so much easier and I finally understand how it’s done. Thanks again man! 🙂
Hi Jelena, thank you very much for your kind words. Sorry for the slow response.
Hello Jonathan,
Can you tell me how can I access my site from another computer ?
You’ll need a static IP and then point the DNS records of the site domain to that IP.
Hey Jonathan, great tutorial man! Really very helpful it was. Thanks a lot and keep writing such coll and clean stuff 🙂
Hi Jonathan!
First of all wanted to say thanks for the tutorials, they are really helpful and guides newbs like me step by step.
I finished Part 1-5 step by step and I didn’t have any issues until I got to the end. In order to test everything, I created a test php file called “helloworld.php” which just prints out helloworld. I saved it in the directory “/Users/koj/Sites/mysite/html”.
I then went back to test if the phpinfo.php file would open in the localhost server but now that doesn’t work either. It was previously working before I got to the latter Parts in the tutorial. Now I get an error every time that says “This webpage is not available ERR_CONNECTION_REFUSED”. Strange this is that when I type in “http://localhost” I get the message that “It works!”
I can’t figure out what might have gone wrong. My only suspicion is in Step 2. Configure the virtual hosts file to setup the directories and logs for Apache; in the second virtual host record, I basically copied the exact same directory location in your example (in the green) except I changed “Jonathan” to “koj” which is my username. The thing is, I created the files and subdirectories “mysite”, “html”, “log”, and “mysite.localhost.error_log” in Finder before configuring the virtual hosts file. It wasn’t explicitly stated whether this was the right thing to do or not.
That’s the only thing I remember doing that was not explicitly stated in your tutorial. I can’t really find any other potential room for error. All I know is that the phpinfo.php was opening in the browser yesterday but after completing all 5 Parts today, I get a connection error…Please help if you can! 😮
Hi Joseph,
Thanks for your detailed question. This might take some digging, but I will be able to take a look at it later tonight to see if I can find a solution for you. Cheers
Hi Joseph, I’ve updated the virtual hosts file.
Try adding the following line inside the
Require all grantedGreat set of tutorials, Jonathan. I am having some difficulties with this last part however. For some reason, in following these steps I’ve managed to “break” the rest of the setup from the previous tutorials. I’m receiving a “connection refused” when trying to access mysite.local or even the phpmyadmin site from the other tutorials. I know it’s something in the vhosts.conf file because I went in and removed everything I added and everything started working again. Any ideas as to what I should look for?
Hi George,
Hmmm, that’s an interesting problem. Sounds like a setting issue. What does your apache error log say?
sudo nano /var/log/apache2/error_logSorry for the delay Jonathan, the one entry that stands out to me is this: “AH01797: client denied by server configuration: /Users/”username”/Sites/.” The log does have the correct username and path there. I’ve done some research and found some documentation that I may need to add this directory to my httpd.conf file to give access. Is that the case?
Operating system: OS X Yosemite Version 10.10.3
Apache version: Apache/2.4.10
Once again, thanks for the help.
Thank you for this resource! Very hand for a dev new to MAMP.
Welcome to MAMP!
Great tutorial! It was very easy to understand and follow, and had no issues setting up.
Thanks a lot, and hope you continue the great work 🙂
– a very happy programmer starting out on webdevelopment
Hi Sara, thanks for your comment! Happy coding
Thanks. Great Post! It helped me a lot. Very easy to follow.
By the way, you have a wrong path at 2. step / 2. Scroll down to the end of the …
“/User/username/Sites”
should be
“/Users/username/Sites”
Thanks for letting me know, will update that.