Categories
Fun Journal

Backcountry Skiing in the Monashees

Years ago I cycled a Gran Fondo from Coldstream to Arrow Lake. The route took us over the Monashee pass. A mountain range connecting the West Kootenays with the Southern Interior of British Columbia Canada. Passing the sign on a bicycle, I remember how cool it felt seeing that we were at the summit. I had no idea that years later I would be backcountry skiing mountains just minutes from that sign.

Monashee Summit Pass

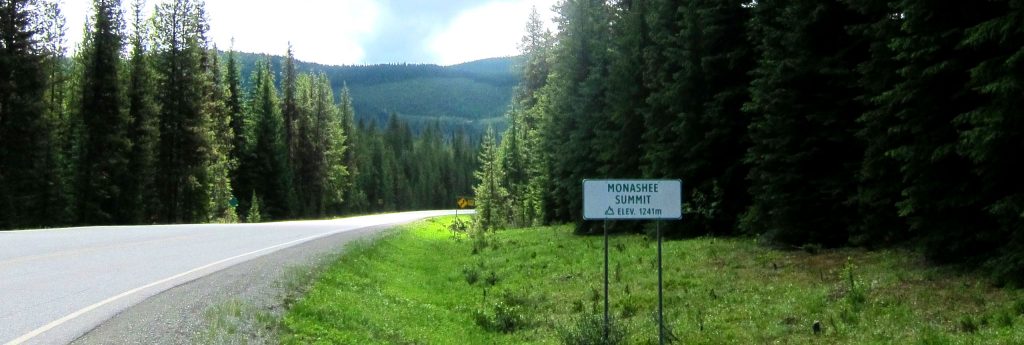
Monashee means mountain of peace. It’s from the Gaelic monadh, meaning mountain, and sith, pronouced shee, meaning peace.

And one word summed up the feeling of this trip. Gratitude.

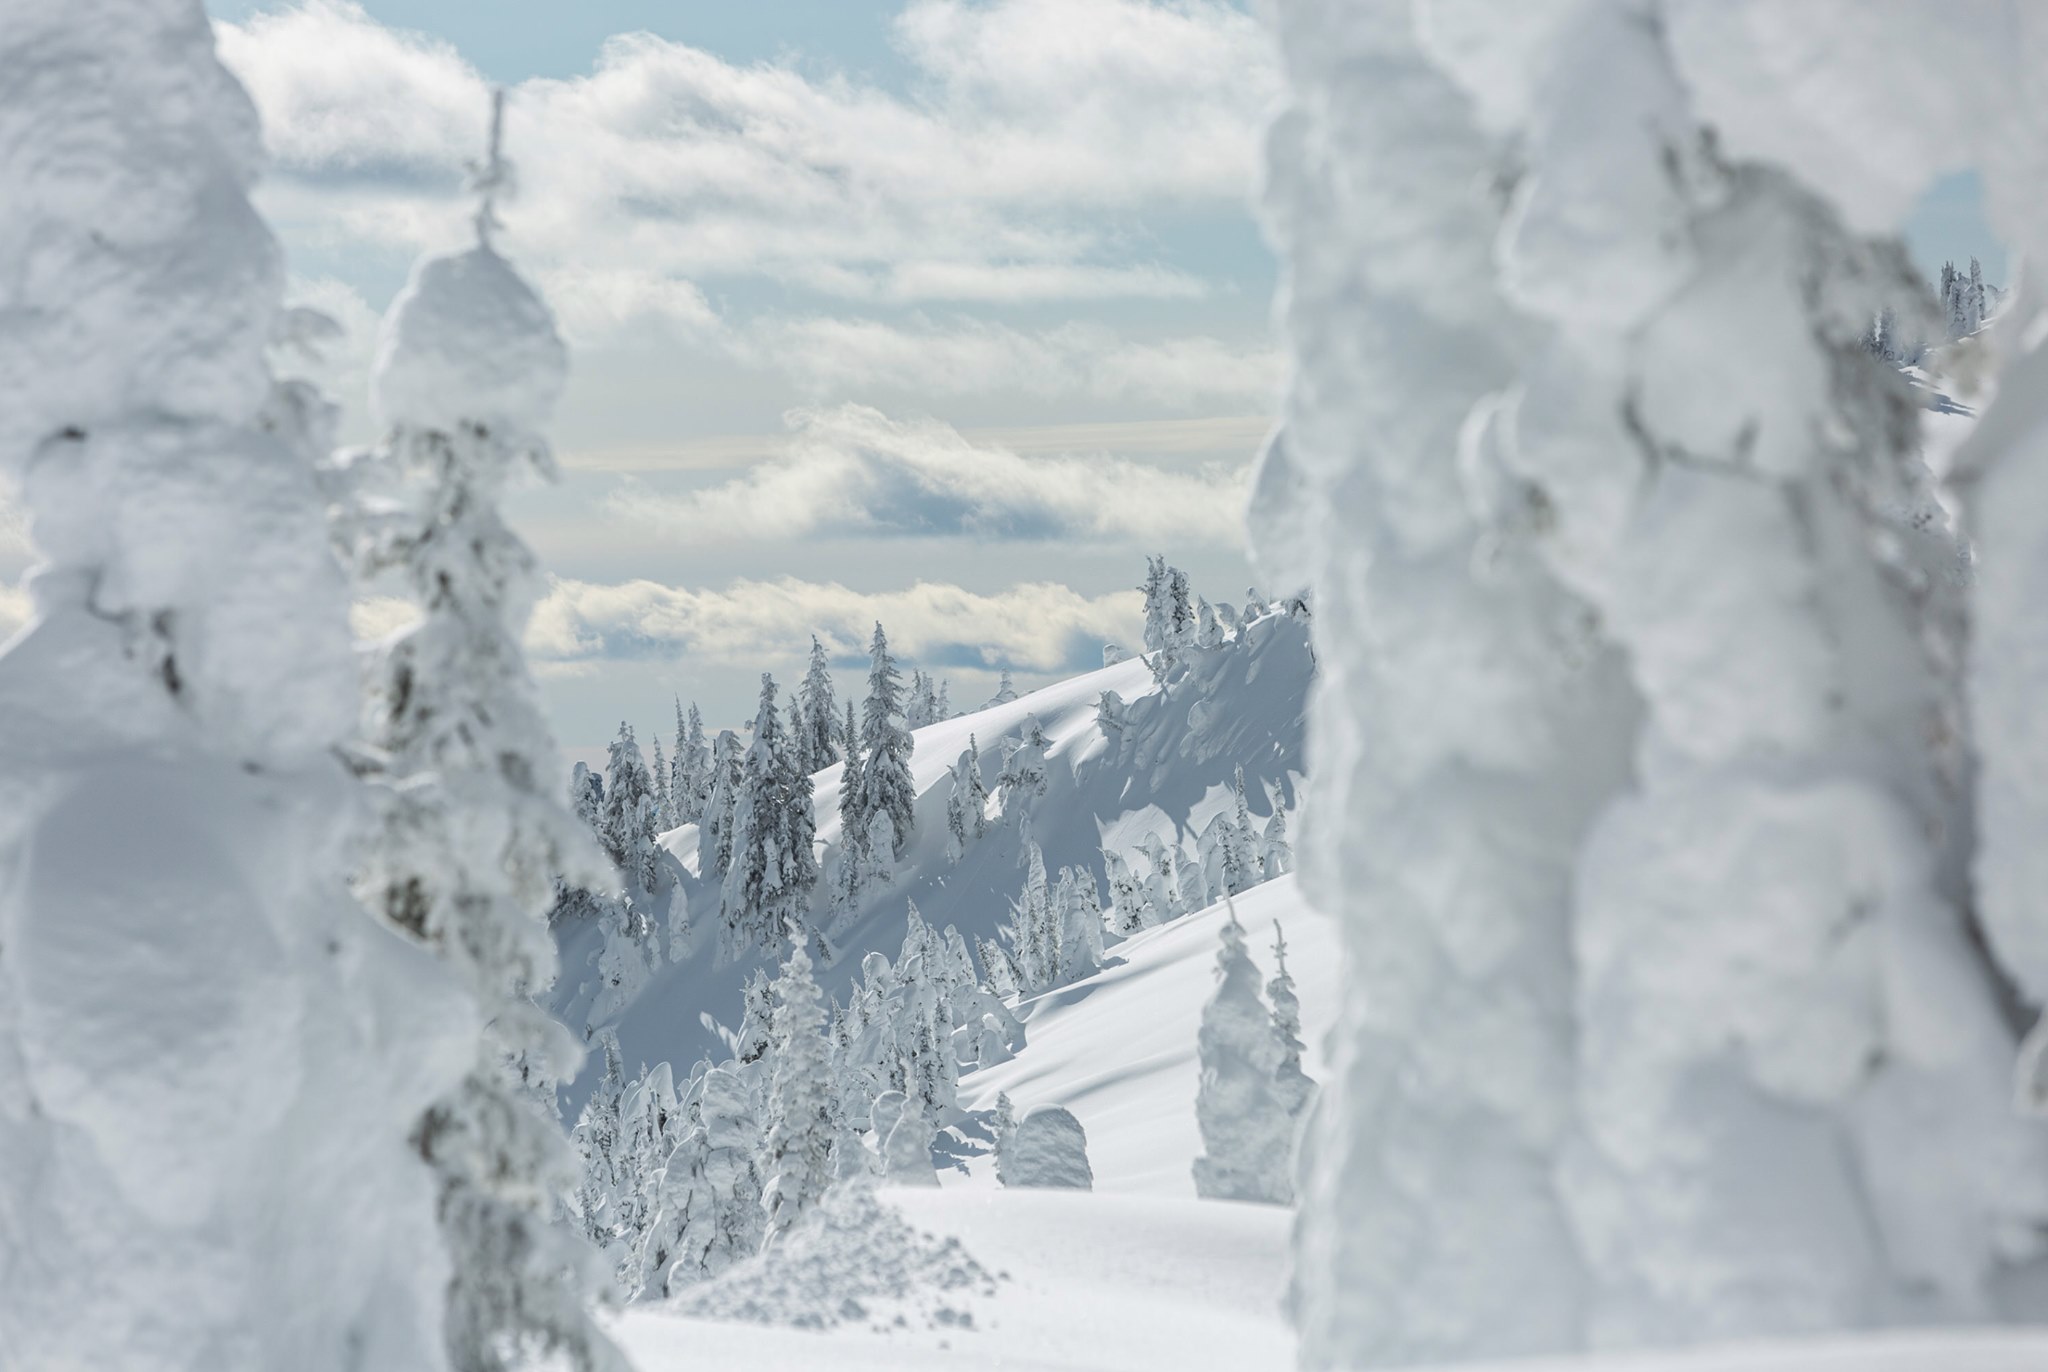
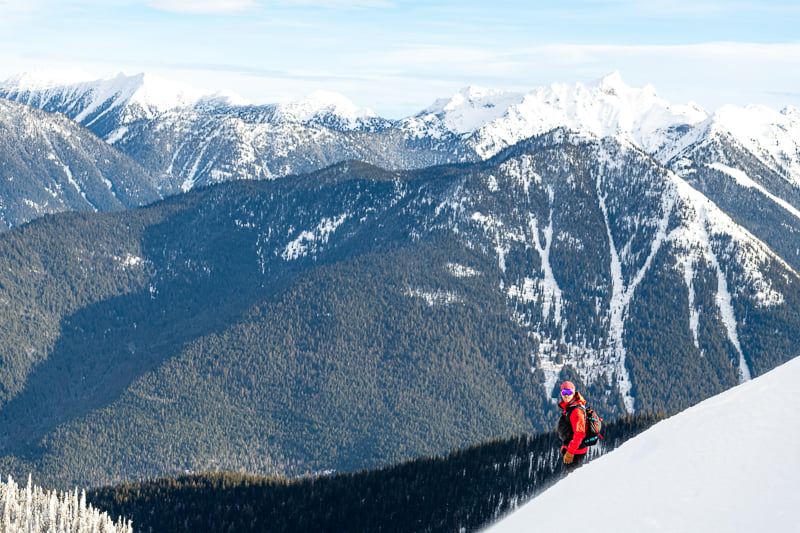
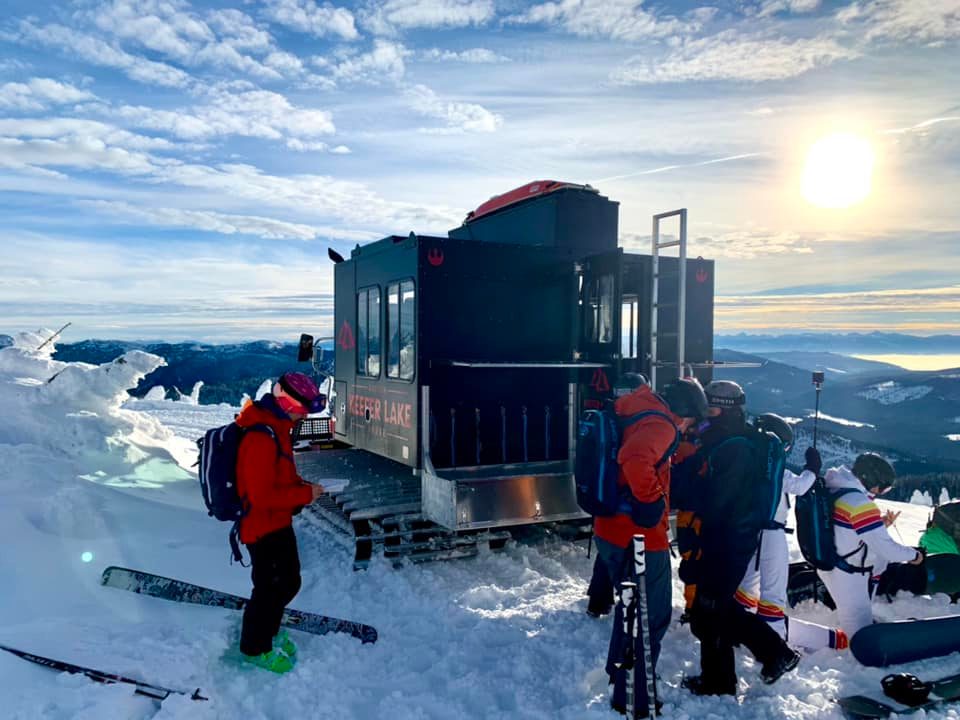
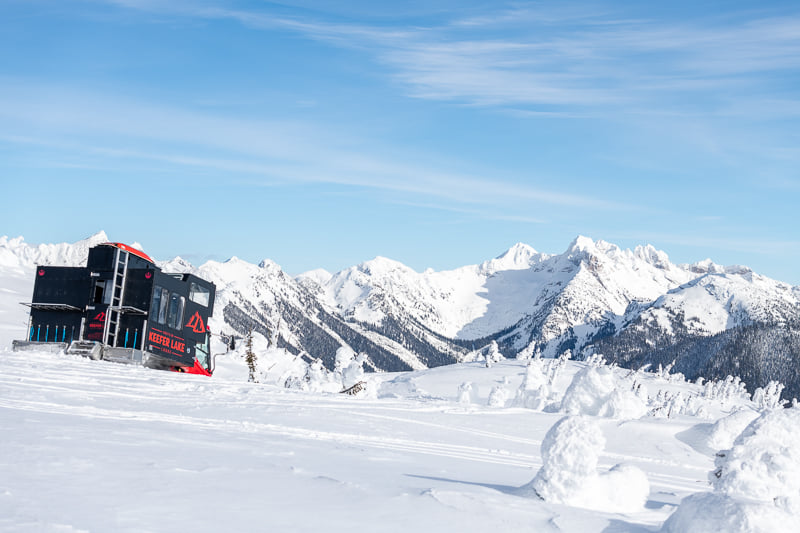
We were based in Keefer Lake Lodge, a cat skiing resort, situated in the heart of the Monashees. The lodge sits in a valley surrounded by mountains on all sides.

Monashee Range

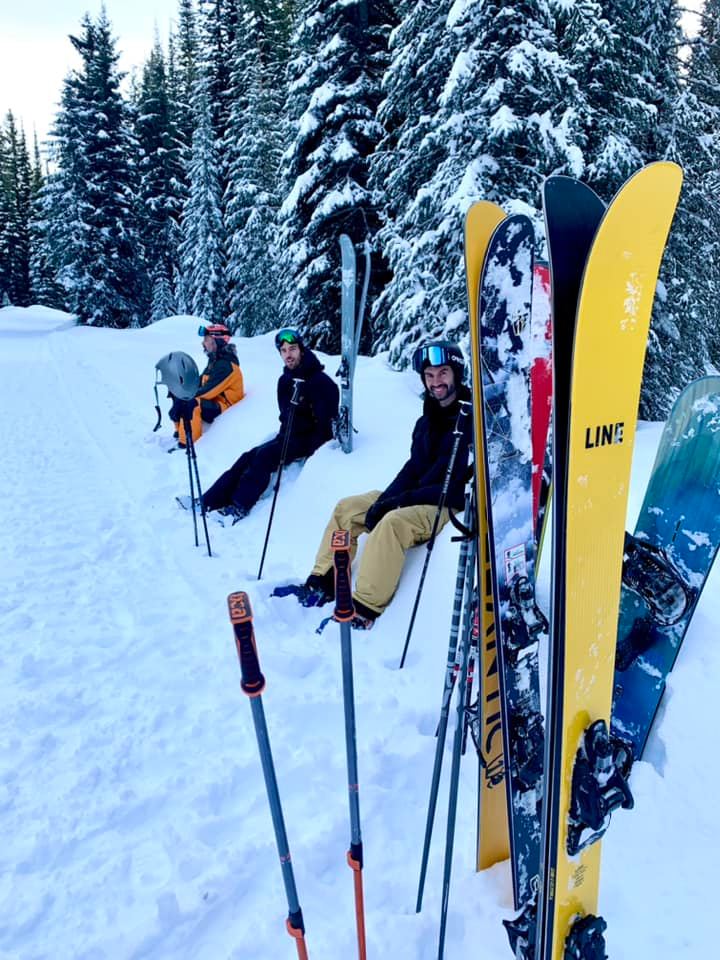
Staying with about 20 other guests we were split into 2 parties. I knew a few of the people there, but the majority I was meeting for the first time.

In the morning we rose, did a brief avalanche safety course, and climbed into the Snow Cats as we set off for the slopes.

Disembarking the Snow Cat at Keefer Lake Lodge

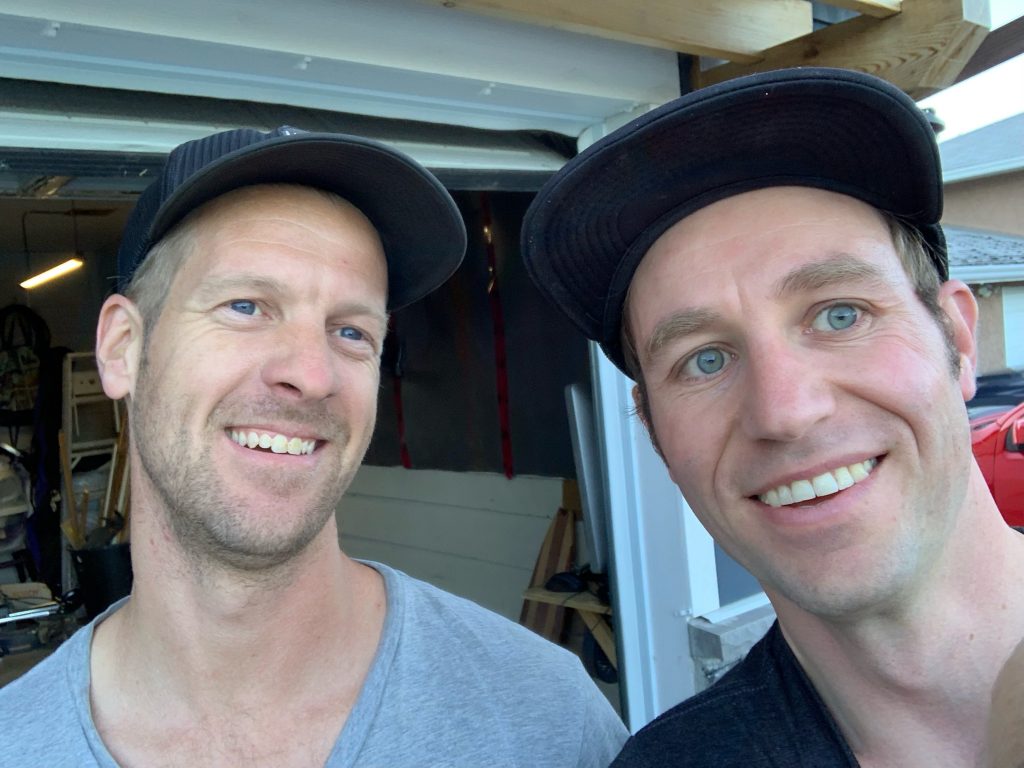
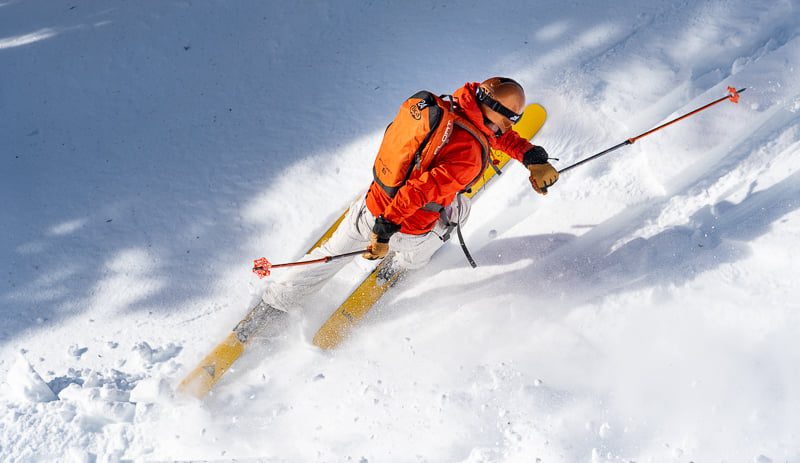
Everyone partnered up. My brother and I have skied together lots. So we rode together. With hoots and hollering we descended the first run.

Each trip up the Cat gave a chance to chat with fellow riders. Slowly getting to learn interesting stories about each of them. They were all solid skiers and snowboarders. By the days end we headed back to the lodge. Our legs worked, and hearts full.

Keefer Lake Lodge had a private chef and made us feel like kings and queens. We sat down to roast elk, buttery lobster, and delicious desserts.

That evening one of the skiers, Mike Shaw, shared his story. It was powerful.

Mike Shaw in competition

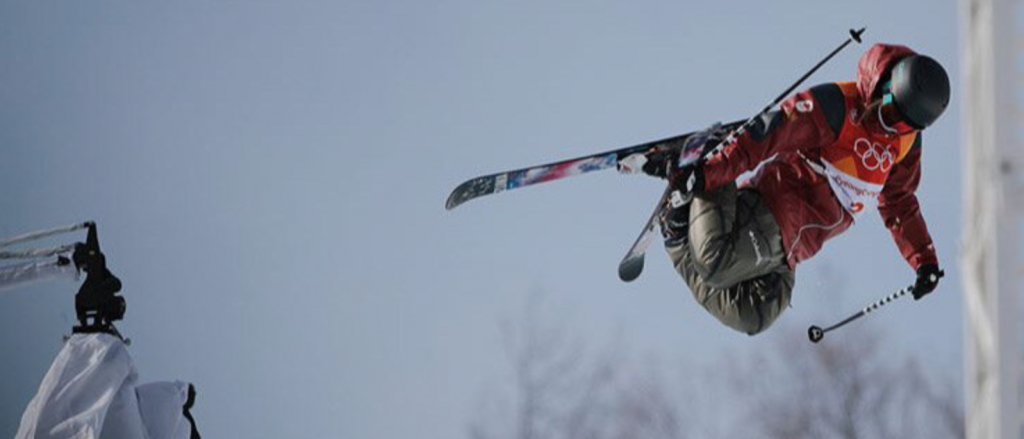
He was a pro skier, turned freestyle ski coach, who had trained 2 of the skiers competing in the 2022 Winter Olympics. Then while hitting a jump – everything changed. He shared a photo of himself standing with his arms around 4 pro athletes.

That was the last last photo of him standing.

He broke his neck that day. Rushed to hospital they gave him the option. Do an emergency surgery and have a 50/50 chance of ending up on a tube for the rest of his life. Or not do the surgery and have a 0% chance of recovering. He took the surgery.

Mike Shaw

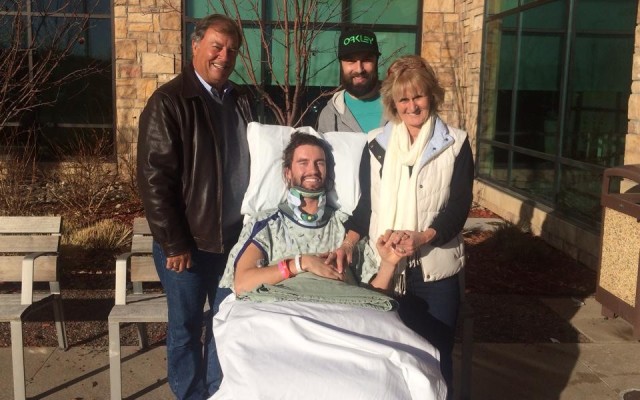
They removed 4 or 5 of the back bones in his spine and replaced them with metal pins so that his nerves would have room to swell.

He began working with physio rehab. It was a slow process. First he started with arm movement. Then slowly progressed to being helped up and out of a chair.

Yet here he was skiing with us in the backcountry.

He shared his heart, how grateful he is simply to be alive. He feels like he’s been given a second chance.

It’s a truly miraculous recovery.

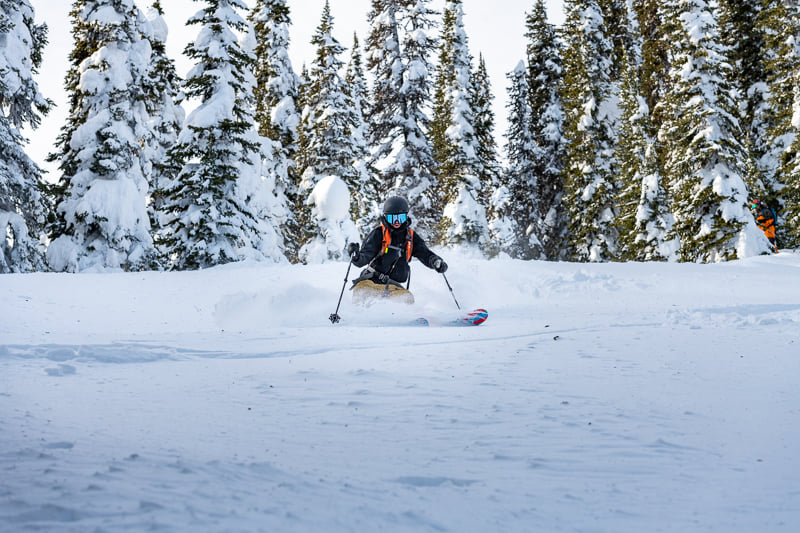
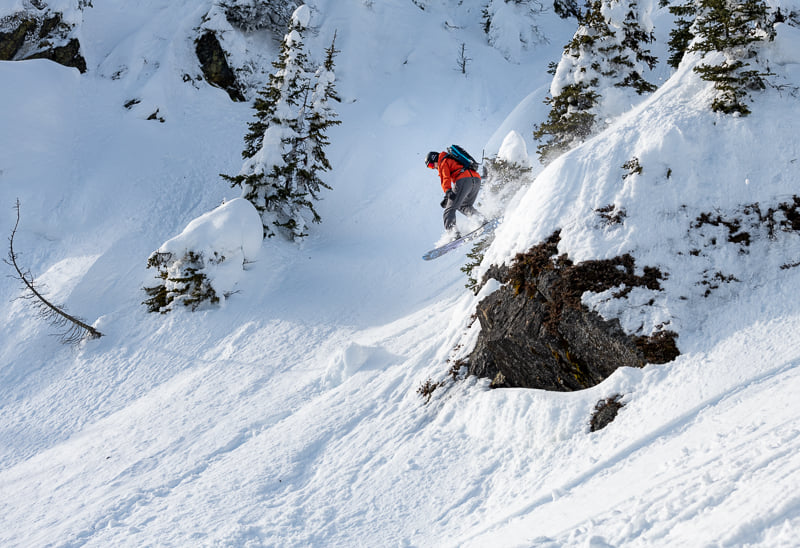
A 3 day trip, on the last morning we once again ascended the slopes in our Snow Cats. I observed how Mike skied. Despite the challenges he faced, he flowed with grace and ease. I never would have known had he not shared his story.

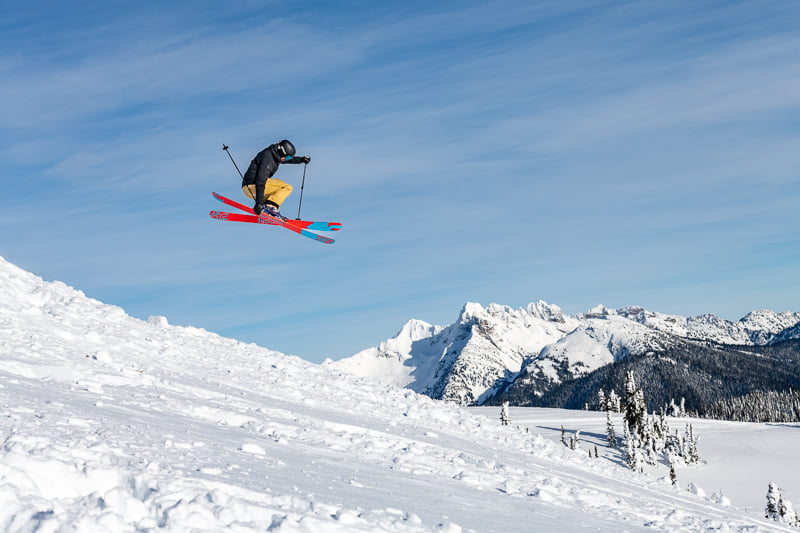
Still very much in rehabilitation, it turns out that he hasn’t hit a single jump since his injury. That was until this trip. With an abundance of playful features available it was impossible to turn them all down. I noticed Mike sizing some up. And carefully approaching one before finding his balance and sending some air. He landed gracefully, like a cat, and I could see him building confidence.

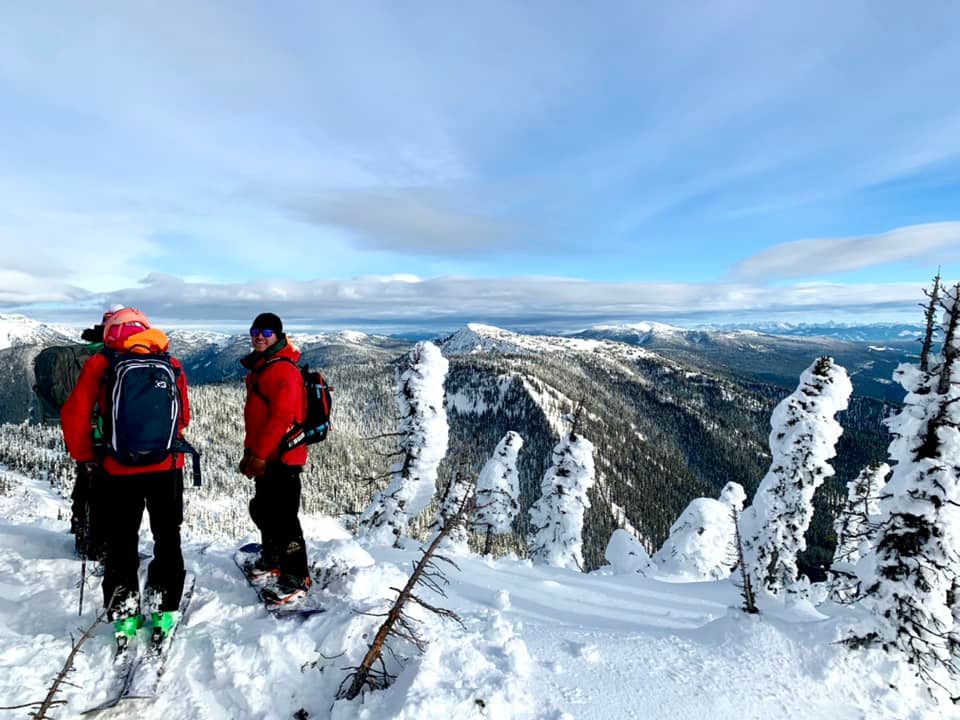
There are so many ridges available in this range, that we were taken to a new one each time. One of the mountain lines we dropped into on the last day took the cake. As we stood above the drop in, the slope dropped off quick, you couldn’t see what you were lining up for.

The guide called my name and it was time to send it. Everything clicked and I felt that surreal presence that comes when your body connects in harmony with the elements.

Here I am Skiing in the Monashees

There was a moment after that line when we all sat down waiting for the Snow Cat. It may have been right then, it may have been later in the afternoon, I can’t remember. What I do remember was feeling a tremendous sense of gratitude. And I could see it in the faces of my companions. They felt it too. We all felt it.

Mike shared with me later that being grateful was his secret weapon for recovery. It got him out of depression. “We can all go from surviving to thriving, choosing gratitude and our full effort. When you take control of your mind, it’s incredible what you will achieve.”

Mike Shaw on the right

Then something magical happened.

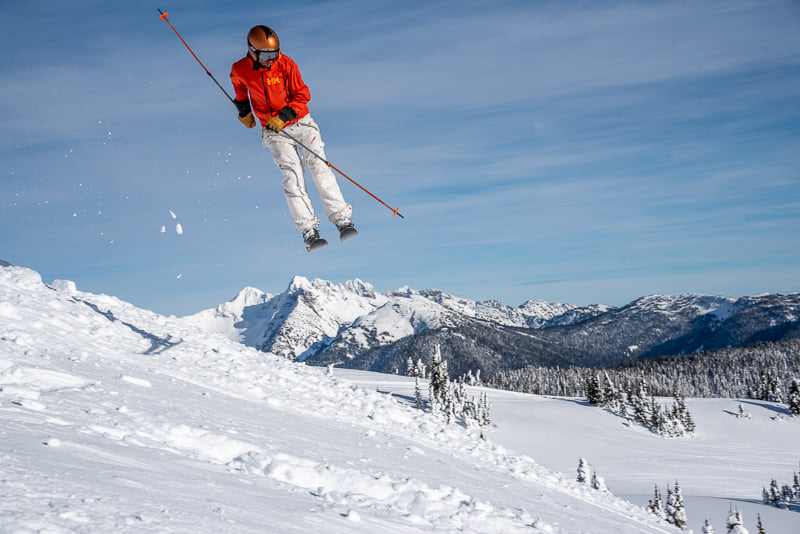
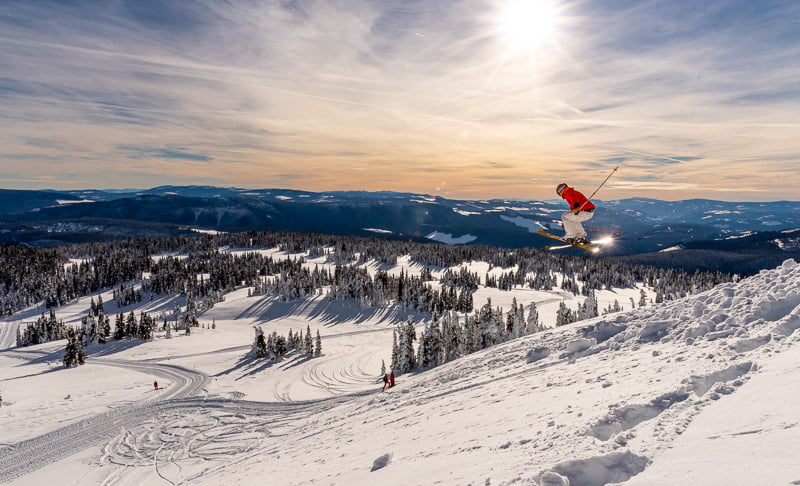
At the end of the day, we climbed one of the mountains for what I thought would be a run. But the guides had a different idea. We were joined by another Snow Cat at the summit and the 2 of the machines began pushing snow and building a kicker in the middle of the backcountry.

My heart skipped a beat. From fear. We were going to hit this?

A backcountry booter was a first for many of us. An experience I didn’t think I would ever have. Leaving the park days behind me a decade ago. It blew my mind that we were about to do this.

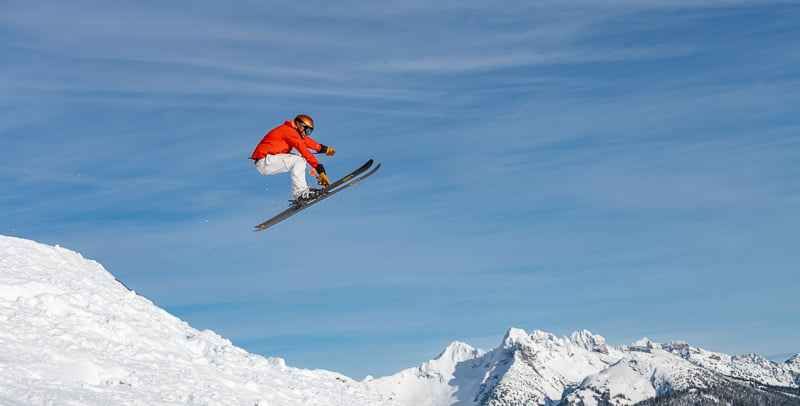
Then it was time to hit the jump. Inspired by Mike, who was leaving his limits at the door, I hit the kicker and launched a 360. There was plenty of time as I floated suspended in the air, spotted my landing, and felt the pillow snow beneath my skis. Euphoria filled my soul.

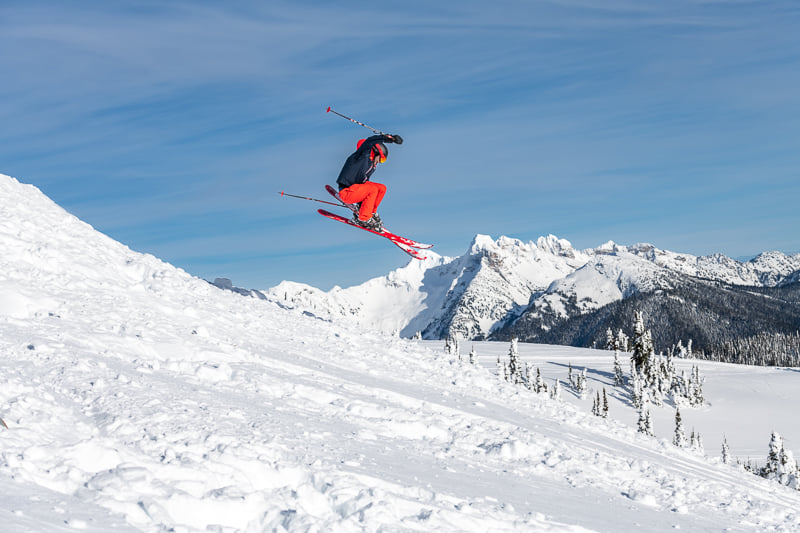
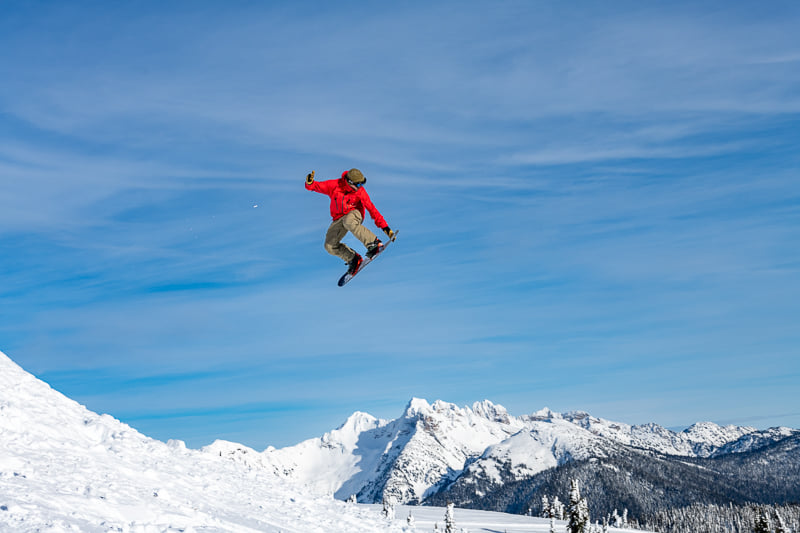
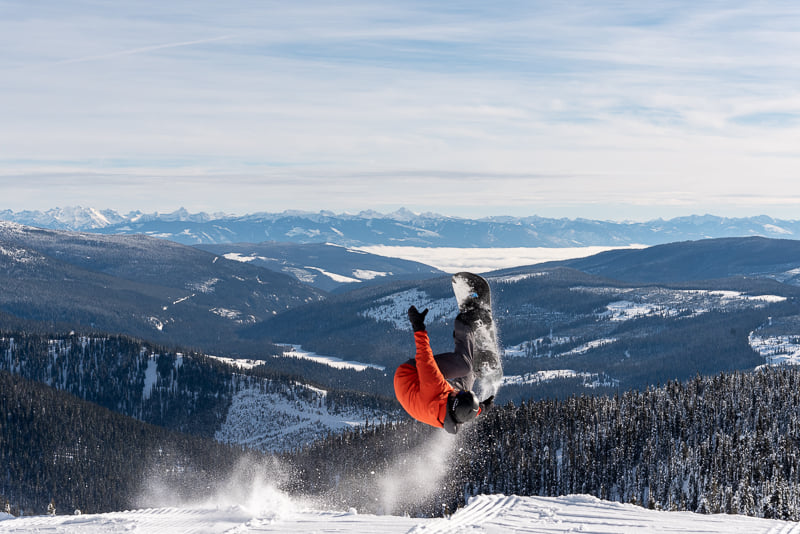
We climbed back into the Snow Cat and lined up again. Dan Martel sent a huge backflip. Mike Shaw did a beautiful grap. Stephen, my brother, who also broke his back skiing (another story for another day) soared through the air. We all left our limits at the door.

Mike Shaw leaving limits at the door

Then for my last jump of the day I went for it with an iron cross. Simply to see how big I could go. I never measured the distance. But the feeling of flying was unbelievable.

And the landing? It was like butter on the skis.

Clearing the impact zone

This was a trip for the books and one for the soul.

“Gratitude makes sense of our past, brings peace for today, and creates a vision for tomorrow.”
~ Melody Beattie

Categories
Honda CB550 Journal

Honda CB 550 Motorcycle Build

In 2019 I purchased a Honda CB550 motorcycle. The year on the front plate is 1974. Which happens to be the first year the CB550 was introduced.

Honda had raced the 500cc in the World Grand Prix. But in 1969 the FIM introduced new rules (including weight minimums, a maximum number of cylinders and a maximum of six speeds). Honda walked out. And didn’t declare their return until 1977.

Soichiro Honda, the founder of Honda, loved racing and the progress in technology that resulted. The 500cc was the creme de la creme of GP racing at the time. But, having departed the GP, Honda was left without a production 500cc engine to advance. Surprise surprise, the following year Honda released the CB500 in 1971.

Honda spent a lot of focus on the 500 engine, releasing the CB550 in 1974, which replaced the outgoing CB500 with a larger displacement, faster acceleration, and the ability to mount dual front disc brakes. This may have been surprising to the motorcycling world. But Yoshimura, who lead Honda’s 500cc engineering return to the GP, joined Honda in 1972. Remarked, he was tasked, “to create something that would represent the very best in technology. We were determined to create an engine to surprise the whole world.”

Then in 1979 Honda debuted in the Grand Prix with a new 500cc engine. While 2 stroke engines were by now considered an advantage on the racing circuit, “Nonetheless, Honda wanted an engine that displayed a level of originality that fitted in with the business principles laid out by its founding father. The result was an engine unlike anything ever seen before in the racing world—a high-revving four-stroke, four-cylinder unit, with unique oval-shaped pistons that gave the visual impression of a V8.” [Honda]

The CB 500 and CB 550 are part of this story. The build:

I had purchased a 1982 Honda CB750 in 2013. But after a house reno and an undiagnosed electrical problem, the bike remained a non-runner 5 years later. So when I saw a running CB550 project bike for sale in the classifieds, I jumped on the opportunity.

Viewing the bike for the second time. It was frozen solid on my first viewing, so was inside to thaw

But it wasn’t without its issues. As I would soon discover.

Job 1: Clean the bike

It was covered with wax, dirt and everything in between. It was used in a film and the set crew had gone to town with it. Turned out to be a much bigger task than expected. And really the bike needed a total respray.

Job 2: It was running rich. So my first mechanical job was to sort that out.

I wrote a full post about tuning the carburetors over here.

Turns out that it was actually running lean with one cylinder running very rich. This was not the last I would see of these carbs.

Carburetors disassembled to clean and rebuild

Job 3: Deal with bondo cracks in the gas tank

I sanded the bondo to remove the cracked filler. Originally I was going to simply fill the holes, but the more I sanded the more damage was revealed.

Initial sanding of the filler

I took it to Bill a man gifted at paintless dent repair. He did an amazing job with the tank. So good that I was tempted to keep the tank metal and clear coat it. I may still do this in the future.

Return from Bill’s with a dent free tank

Job 4: Rebuild the forks

The front forks were rusted. So I decided to remove them to restore them and give them a full rebuild at the same time.

Unrestored front forks

After removing the rust and polishing them, I dissembled and cleaned the inner workings. The oil that came out of these forks was the most foul smelling stuff of legend.

Disassembled front forks off the CB550

I ordered new gaitors and reassembled.

Job 5: Respray the frame

The frame had been painted silver. Then over sprayed flat black, then sanded back to the silver. It needed respraying.

We were getting ready to move homes, so rather than doing an engine out powder coating, I purchased good quality caliper paint from Lordco and sprayed the frame in place. (I plan on doing a proper frame restoration down the road).

First step is to clean the frame from all oil, wax and grease. Use a good wax and grease remover. Step 2 is to sand the entire area you are painting. Remove any loose chips (this bike had many) and sand smooth. Step 3 is to wipe clean of dust. Step 4. Prime. Step 5. Apply your coat.

Frame looking fresh after the respray

My wife and I then went to the ski hill for a few days.

Job 6: Sell my old 1982 Honda CB750 bike.

There was a lineup of people wanting to buy it. Ended up meeting a really cool guy who rebuilt bikes. And he picked it up in his mini van. Hilarious.

Making bike friends
There’s a first for everything. CB750 loaded in a minivan.

Job 7: Rebuild the brakes

I had to replace the brake fluid cylinder, lever and all brake lines. Also replaced the brake pads. Topped up the brake fluid. I did learn a lesson. I mistakenly pulled the brake lever while testing it with the disc out. That was a fun job opening the brake again. With the wheel in, the brake adjusted we were good to go.

I don’t have many photos of this job. I did purchase the mounting kit and a second caliper and disc to convert the front wheel to a dual disc at the same time. Which I will post about when I do the conversion in the near future.

Measuring all gaps prior to rebuilding and cleaning the front brakes.

My bro and I then headed to Facebook’s F8 developer conference in San Jose California.

Job 8: Paint the tank

While the tank was painted maroon for the movie, the insurance papers for the bike shows the original color as blue. So rather than inviting an inspection when reinsuring it. I opted to paint the tank blue again.

Painting is fairly straight forward. Sand everything smooth. Fill any holes/scratches. Clean it with a wax and grease remove. Wipe clean with a lint free rag. Prime. Sand. Clean. Prime again. Sand again with a 400 grit wet sand paper. Clean. I used spray paint to spray the tank with the top coat. Be sure to spray it in a shady and dust free area. Flash drying in heat and direct sun causes cracks. Painting after the rain is a good time as it clears pollen. Do 3 coats of top coat. Light at first. The final coat makes everything smooth. Sand with 800 grit wet sand paper if desired. Clear coat.

Painting the tank outside.

Other jobs

Oil change, new spark plugs, new battery (twice), timing, tightened the cam chain, set valve clearances, synced the carbs, wrapped the exhaust, and replaced/installed missing or broken components (such as the tachometer, seat lock, ignition, you name it).

I wrote a complete guide on how to tune your CB550 for pods here.

(Oh and I moved in the middle of this build)

Syncing carbs on the 4-stroke CB550

The bike is not showroom perfect, it has a ton of character, and rather than making everything like new, I’ve kept the original side emblems as they were, and the engine fins, which are chipped, are now clean, but not polished, as it tells the story. And honestly, I love it.

Build complete

I road the bike to my dad’s place to show him. He got real quiet. I was wondering why… Then he shared how he road an early 70 Honda CB250 bike very similar to this when my mom was pregnant. Coincidentally it had a blue and white tank, almost identical to the one on this bike. I knew none of this.

Categories
Essays Honda CB550 Journal On motorcycles

Unearthing the history of a 1974 Honda CB550

Hints of the story behind a Honda CB550 that is what it shouldn’t be.

When I went to look at a cb550 after it caught my attention browsing through the classifieds, I saw a rugged, characterful and misused motor with some semblance of charm. It was icy outside, so after taking the bike indoors to let it thaw, I returned the following day to hear it run. With the tap of a button the engine roared to life. Within an instant a connection formed, almost like meeting an old friend after many years.

The year was 2019 and with 45 years under its belt, having been built in Japan and driven across North America, I knew it would have stories. If only it could speak.

Laden with dirt, grease and wax the bike looked worse for wear. Tom, the prior owner of the bike, mentioned to me that he had rented to it to a movie production and their costume and set team had had their way. I couldn’t wait to get a rag and some soap to it.

As the bike stood, February 13 2019

But that’s when hints of a story began to emerge.

I noticed that the badly painted gas tank (again thanks in part to the apparent movie set team) had bondo cracks. So I called Bill, a talented dent repair specialist, if he would be able to take a look at it. “Sure,” he said, being a fellow bike guy. But mentioned that gas tanks were anything but easy when it came to popping dents.

Well that night I began the arduous work of sanding the bondo from the tank and prepping it for Bill. Yet as I peeled away the layers of old repairs and paint, more and more dents appeared. Clearly this bike had seen adventure.

Bill’s face lit with amazement when I showed him the tank. But faithful to his word he did his best. I was blown away by the difference. The once brutally damaged tank was enhanced to a patina that matched its age. I could almost hear my new old friend smile.

Tom had mentioned the bike was running rich. So I carefully tore open the carburetors. Meticulously organizing as I went. Someone, long ago, had rebuilt these carburetors before me. And had used some sort of seal gasket glue on everything, filling critical pathways and even covering the holes of the drain screws – which had been glued closed. It was obvious that others had since tried loosening them. Fortunately I had this incredible cleaner on hand. It’s probably toxic and deadly but eats through anything, so I love it.

The tear down begins

I found the source of the fuel mixture issue. The number 4 gasket was missing the needle. That would do it. Clearly someone else had discovered this too. The piston in the same carburetor was dented and bent from what appears to have been the work of a nonsamurai master. Fortunately, a file and carb cleaner made short work of the worst of it and the piston was removed. After addressing any issues, fixing all bent components and bolting it back together the carburetor looked and functioned as good as new… almost. The number 4 exhaust was cold after firing up the engine. Fortunately I was able to quickly find a replacement piston on eBay and then the engine ran without fault.

I thought it odd that the inner workings of the engine seemed to be in better condition than the carburetor.

Later, I began the simple task of bleeding and rebuilding the front forks. I ran into my first snag. The fork screws were sealed with the same gasket glue as the carburetor. And then, to my surprise, the lower springs were missing. I quickly checked online to see if any CB550s came stock without lower springs in their forks. Sure enough the CB550f did. 

Earlier I had noticed the original color of the bike was said to be blue. According to insurance files it had always been blue. I searched online to see if any CB550fours were blue by stock. At first my search would turn up fruitless. 

The rear passenger frame mounts had long since been removed and I hadn’t checked the serial number of the bike. Suddenly I began to fear that my bike wasn’t what I thought it was. 

Grabbing my papers I ran to the garage and scanned the front of the bike. There it was, the number stamped into the front. But I couldn’t see the vin plate which concerned me. Turning the handlebars I saw thick black tape covering half of the front of the frame. More concerning still.

I pealed back the tape to reveal a shiny original vin plate matching the vin stamped on the frame and the vin of the papers. Anyone standing nearby would have heard an audible sigh of relief.

Now I began to wonder about the engine. Fortunately, I had noticed on the website of a European Honda parts supplier a document of all the frame and engine numbers. I compared the number of the engine with frame. The years matched. Then I noticed they also documented the carburetor number as well – which surprised me. 

But as I checked the numbers, the carburetor matched a CB550f, like the forks. Another story emerged. Clearly the forks and carburetor were most likely from the same bike and for whatever reason had replaced the original ones on this bike.

That would explain why the motor seemed in better shape than the carbs. And why I couldn’t find any traces of that gasket glue anywhere else on the bike or engine.

But again I wondered about the color. I knew a CB550f came in blue. Perhaps that was the confusion. But no, the fuel tank was a different shape, rather than having the classic styling with the chrome lid, the CB550f was a more modern shape and had a hidden cap. Secondly, while the frame is nearly identical between the bikes, the mounting points are not. And the CB550f side panels didn’t fit the my frame.

Then by happenstance I stumbled upon a 7 year old video on Youtube of an original blue CB550. It appeared to be the same year as my own. Curious, I went back to the garage and examined my parts. The side cover was cracked and beneath layers of primer and repaints, there as clear as day was a metallic blue. I flipped over my fuel tank as well, and sure enough I could see metallic blue overspray. So definitely the original tank. I did also spot green overspray as well. Perhaps there was an option to custom paint the bike when purchasing it? Or possibly they swapped a cb500 tank and side panels when purchasing the bike? Perhaps someone reading this would know if that is something that was done in the 70s.  

The bike also had a blue face on the odometer gauge with miles matching the papers. Every reference of the bike I can find in bike reviews say the gauges were green. Now I know that my odometer could have easily been changed. So I did some more research on forums, classifieds and Youtube and have since found many 1974/75 cb550s with blue gauges. So again, an unlikely surprise, but it looks to be original to the bike. 

Remember how the tank was badly dented? Well, the story continues. Excited to get into things I immediately began giving the old beast a thorough cleaning. There was dirt everywhere with sand and grit found in every crevice of the engine body.

The bike had been given an intentionally “rustic” paint job for the movie. Where black was painted over silver and then sanded back to reveal the silver in spots. Again, apparently to serve the look of the film. But, despite soap being thrown in its direction the bike still looked dirty after each wash. So a quick trip to my local auto paints store and I returned with high quality black paint for rims. Something that would endure the elements until I would be able to powder coat it down the road.

Well, removing the gas tank revealed a very silver frame indeed. All the hardware such as the battery holder and metal clips were also painted in silver. And the quality was too good to fit the work of the movie look. This had been done before.

The more I investigated the frame and paint the more I was impressed with the workmanship. Someone at some point in its history cared for this bike.

But the cleaning revealed something else too. I noticed some dents on the side of the engine fins. But as the wax was removed the dents turned into chips and cracks. This engine had been through war. The majority of the wear was on the same side where the gas tank had most of its dents.

Had someone used this as an enduro bike? It’s possible.

In many ways, rediscovering an old bike is like unearthing an archeological site. One must rely on the remnants of clues to share the stories long forgotten or untold.

Yet it’s these discoveries that hint to the story and soul of the bike. The peculiarities of the engine. The way it sits on the road. And the charm of its character. Much like an old friend. Battered, bruised but no worse for wear.

And also, much like an old friend. Occasionally they share stories that almost seem too interesting to be true. Yet they are.

Many movies are filmed in the area I live. Mostly small production indie films. Some of my friends are filmmakers. So when Tom remarked that this bike was used on set it didn’t grab my attention. That is, until I began discovering more about the peculiar hints of history that this bike seemed to have. An unlikely original paint color. An unlikely pairing of forks and carburetor. An unlikely speedometer. And even an unlikely turn of events – from the pride of someone’s garage to become what appears to be an enduro to then appear on a film set. All of which was unlikely. But evidence suggested otherwise.

And like all nagging thoughts it asked to be investigated.

It turns out it was in a movie, titled Endless. The movie was released in 2020. And stared Nicholas Hamilton (from IT) Alexandra Shipp (Storm on X-Men).

And surprise surprise, the bike is featured on the cover of the film. 

Alexandra Shipp, Nicholas Hamilton, and the Honda CB550 staring in Endless

Now I know that the bike was in a movie. I know that it was painted blue. I also know that it has a CB550f fork and carburetor. And I know that it was owned by a chef at some point. Tom told me. But I don’t know that it was used as a dirt tracker or that it was stored in a garage. I only have the clues. But isn’t that what great stories are. Just enough to guide you along and just enough to let your mind wonder.

My humble CB550 in a scene from Endless
Categories
Adventure Vehicle Journal On Vehicles Resource

Installing Flatout Suspension on a 2009-2013 Subaru Forester SH

This past weekend I installed the Flatout Suspension’s GR-Lite coil overs and Rallitek spacers. They arrived packaged in the box.

There were a couple things that to note for the install.

  1. They are longer than stock suspension. They do fit. I had to disconnect the front sway bar links to drop the control arm low enough. Then used a jack to lift the control arm. After that I reinstalled all the bolts. And presto, it was installed.
  2. If you hear a spring recoil noise when turning your front wheel after the install, this means the bottom lockout rings need to be tightened. To do this place the provided locking ring wrench on the locking ring and tap it using a hammer to tighten it. You’ll see it snug up an additional quarter turn. After that, the noise is gone.
  3. The top dampening adjustment is set to 0. I counted the number of quarter turns to tighten them up. Divided that by half and then set all the dampeners to half way. This gave me a good baseline. I could stiffen it (for cornering) or soften the bounce (for going over corrugated gravel), but it is feels good at this setting.

Step 1

On level ground measure the current ride height from the ground to the centre of the wheel well. This will give you the baseline height. After the install, you will measure each wheel again and you will know how many inches you’ve raised or lowered the vehicle by. You can then make adjustments to the ride height accordingly.

Step 2 setup the suspension

Front suspension: I adjusted the lower struts so the inserts were flush with the bottom. And set the top lockout ring so it is at 0 preload. Basically spin the lockout ring until it is snug against the spring so there is no up/down movement, but the spring isn’t too tight so it can rotate freely.

Rear suspension: Adjust the top lockout right so it is at 0 preload. Same as above.

Installing the front suspension.

I started with the front to get momentum.

Step 1 remove the wheel

Loosen the bolts while the wheel is on the ground.

Then lift the vehicle with a jack. Be sure to put a safety stand under the vehicle once jacked off the ground, so it doesn’t fall on you if the jack failed.

Remove the bolts and take off the wheel.


Step 2 disconnect the bolts holding the brake line and sensor lines from the strut

*Tip: I don’t have an impact wrench, so what I do is spray nuts with WD40 and hammer a wrench using a 5 pound rubber mallet. This breaks the nuts loose without damaging them.


Step 3 remove the bolts and nuts holding the strut to the vehicle’s hub.

Note: The top bolt is used for adjusting camber. There’s a washer on the top camber bolt. Make note of the position of the camber bolt if you want to retain the original height. (I didn’t do this as I had an alignment booked at a shop, but would have been easier to set camber had I marked it).


Step 4 disconnect the nuts from the top strut mounts

Then with one arm on the strut drop it out

Step 5 Install the new front strut

Remove the top mount nuts from the new strut, install the front strut and screw the new nuts on top.

Step 6 Install the bolts and nuts holding the strut lower to the hub

*Note I had to disconnect the sway bar link to drop the control arm enough for it to fit.

Step 7 reconnect the brake line and sensor brackets.

Step 8* reconnect the sway bar link

Using a jack under the control arm hub, lift it up until the sway bar link lines up. Then reconnect. I found this step straight forward.

Step 9 reinstall the wheel.

Hand snug the bolts while in the air, then tighten them when on the ground.

*Once finished installing the suspension check the bolts on all the wheels use a torque wrench to tighten them all to spec

Step 10* check the height of the your wheel well

Do this step after all suspension is installed to ensure the vehicle is level. After measuring the height of your wheel well compare it to the heights you measured on step 1. Now you can make adjustments to the suspension to raise/lower it to your desired height.

To raise the suspension on the front twist the whole strut assembly, and it will unscrew. Using the locking ring as a guide, you can measure the distance you’ve raised it. You can also add preload using the lockout ring at the top if you need additional height. Again, use the lockout rings to measure the space adjusted.

Step 11. Tighten the lockout rings

Once happy with the heights of your suspension use a hammer and the lockout wrench supplied and tap all the lockout rings tight. You’ll see it tighten approximately a quarter turn.

Now do the other front wheel (repeat above steps).

Installing the rear suspension.

Step 1. Remove the wheel (see step above)

Step 2. Remove the nut and bolt holding the sway bar end link to the lower control arm


Step 3. Remove the nuts and bolts holding the shock to the lower control arm and the lower control arm to the vehicle’s hub.


Step 4. Open the trunk and remove the carpets and foam filler pieces


Step 5. Remove the clips holding the seat back carpet panel to the trunk and fold the trim forward

Step 6. Remove the plastic trim piece that covers the upper strut tower. (both sides)

Step 7. Remove the 2 nuts holding the strut mount to the strut tower and remove the strut from the vehicle


Step 8 Install the new rear strut

Remove the top mount nuts from the new rear strut, install the rear strut and tighten the new nuts on top.

Step 9 Loosely reattach the shock to the control arm

Do not tighten these bolts until the control arm is at ride height. Otherwise the rubber parts will twist and wear out sooner.

Step 10 Using a jack, raise the control arm 

The Flatout suspension is longer than stock, so raise the control arm using a jack until the sway bar end link and hub mount line up.

Step 11 Loosely reattach the sway bar end link and hub with the control arm

Step 12 Load the suspension using the jack until it is holding the vehicles weight. Then tighten all the bolts.

Tighten the sway bar, shock, and control arm with the hub.

(Now do the same to the other side).

Step 13 Clip the side panel piece back in place

Step 14 Attach the clips holding the seat back carpet panel to the trunk and fold the trim back in place

Step 15 reinstall the foam pieces and the carpet pieces.

And you’re done. Almost.

Step 16 after all suspension is installed check and adjust the heights of your suspension around the vehicle. 

With the vehicle on level ground measure the heights from the ground the centre of the wheel well.

After measuring the height of your wheel well compare it to the heights you measured on step 1. Now you can make adjustments to the suspension to raise/lower it to your desired height.

To raise the suspension on the front twist the whole strut assembly, and it will unscrew. Using the locking ring as a guide, you can measure the distance you’ve raised it. You can also add preload using the lockout ring at the top if you need additional height. Again, use the lockout rings to measure the space adjusted.

To raise the suspension on the rear simply rotate the locking ring using the locking ring wrench. Use the lower lockout ring to measure the distance raised.

Once complete reinstall the wheels and torque to specs.

Congrats, you’ve installed your new Flatout GR Lite suspension.

I also installed the Rallitek subframe spacers to help center the rear wheel. I may add another article to walkthrough how I installed those. They were somewhat straightforward to install.

The Subaru Forester build:

From the beginning

Categories
Adventure Vehicle Journal On Vehicles Resource

Do 15 inch Method 502 wheels fit a 2009-2013 Subaru Forester 2.5XT?

Yes!

The 09-13 Subaru Forester 2.5XT has bigger front brakes than the non-turbo Forester. So I was unsure if they would fit. Method’s website say they clear 300mm callipers. I checked the owners manual and the Subaru Forester’s are 300mm.

Hopeful they would clear the brakes, I nervously placed the order and waited patiently. And today they arrived so I pulled off the stock front wheel and test fitted them with success!

There’s plenty of clearance for the brakes and the gold/bronze looks like a dream with the white. Very happy.

Test fitting the 15 inch method 502 wheels on the Subaru Forester xt

The beginning of the Forester build is taking shape.

I went with 15″ wheels so that I could have more sidewall on the tire. This will allow me to deflate the tires more when needed driving over snow, sand and rocks. As well, the additional sidewall makes it less likely to hit the wheels when driving over pot holes, curbs or rocks.

Method 502 15x7 wheels on a 2009 Subaru Forester 2.5xt


Categories
Adventure Vehicle Journal On Vehicles Resource

09-13 Subaru Forester XT – The start of an adventure vehicle

I’d been considering setting up an adventure vehicle to access the backcountry roads for ski touring. A 2009 Subaru Forester 2.5XT sat stored at our property for a year. It was my folks’ and then my younger brother’s until he got married and moved to the UK. It needed some work so they offered it to us. Finally the day came. Do we insure it? Or do we sell it?

Then it hit me… what’s better on the snow than a Subaru? All it needs is clearance for driving the winter forestry roads where I go.

Subaru is world renowned for their rally racing having won 47 World Rally Championship races. In Switzerland there’s a saying, “Subaru is the farmer’s Ferrari.” Which, when translated, means Subaru’s powerful AWD has a reputation for holding up on difficult terrain.

Subaru Rally

A mostly stock Subaru Forester took on the Sunraysia Safari Rally and nearly won. It lead the race up until the last 3 miles of day 3.


In 2009 the Subaru Forester XT won MotorTrend’s Sport/Utility vehicle of the year. MotorTrend wrote that the stock 8.9” clearance bested the stock Land Rover LR2, Toyota FT Cruiser, Ford Expedition, Honda Pilot, among others. Along with that, it has a surprising 63.0/30.8 cubic feet of cargo space behind the front/rear seats. And the AWD system impressed MotorTrend with its capability.

2009 MotorTrend SUV of the year

There are a few other things that make the 4 speed Subaru Forester XT an interesting vehicle for enthusiasts. For one, the WRX/STI parts swap right in to the Forester XT. And even without modifying anything the vehicle can be tuned to increase gas mileage, horse power and torque. But… given the opportunity with a new exhaust and a couple of mods it can easily make 300hp. Why stop there? With the WRX/STI parts you can tune it for 400hp. Yet mere mortals drive 400hp. So some people tune it to 500hp – all with bolt on parts.

While handy when you’re late for work – for the adventure vehicle that I require… this is well beyond my needs. And not only that… maybe the most important feature of any adventure vehicle is reliability. So while I like the idea of tuning it for more torque at the low end – I think 500 horses ripping through the forest may be a bit much.

But arguably its single best trait is its low centre of gravity. This is due to the boxer engine, which not only reduces vibration because of the horizontally opposed pistons, it spreads the weight of the engine lower in the engine bay. It’s the thing that makes a Subaru so stable at high speeds and in rally races. In fact, the Subaru Forester is the only SUV that was not required to add a “risk of rollover” warning label when it entered the market.

In an ideal world the wheels stay on the ground while cornering

There are other features that make this candidate stand out. The turning diameter is only 34.4 feet. That’s 10 feet less than the very capable four door wrangler and 2 feet more than the nimble 2 door Suzuki Jimny. That’s outstanding for a four door SUV and simply means you’ll find it easier to manoeuvre while on the trails..

It has a multi-plate transfer case that distributes power to the front and rear wheels – while non-traditional in that it is not a differential – over the years it has proven faithful. What’s most interesting is how it splits the power. Is sends power from 60/40 to 50/50 front to rear. In other words, the front and rear will always be fully engaged with a 10% variation depending on the terrain. For example, while driving uphill 50% of the power will be sent to the rear wheels and while going downhill 60% will be sent to the front. And what’s incredible with this model year is that no matter the situation both the front and rear wheels will have a minimum of 50% or 40% power. That’s essentially the same as what a locked centre diff does and along with the VDC explains why it handles so well in loose gravel hill tests.

Gravel hill test

Feel free to watch the climb on Youtube here.

The Subaru has a unibody. Manufacturers are moving towards unibody chassis – think Hummer EV and new Land Rover Defender. The Subaru frame has been thoroughly tested in rally races and by enthusiasts alike. It’s torsionally stiff and lighter than a body on frame chassis. But if plan to add recovery points or a winch, it’s best to first mount a solid steel front or rear plate to distribute the load evenly across both sides of the frame.

Reinforced Steel Plate on the front bumper

Now you’re good to add a winch and build something fun like this.

Having owned the 2010 Subaru Impreza I know first hand how it drives in the snow. It’s incredible. I’ve also owned the 1999 Nissan Pathfinder R50 and the Mercedes GLK350. Between these three the Subaru is by far the best on the snow. It would spring to life in the winter taking on a personality all of its own. This is really what they’re known for.


Then the question for my purposes is… will it lift?

The stock 8.9″ of ground clearance on the Subaru Forester 2.5XT is fine. But ideally I would like more ground clearance for driving logging roads in the winter. The last thing I’d want is to find myself high centered out in the back country.

Well fortunately the answer is yes. There are suspension spacers and suspension lifts available giving you anywhere from 0.5″ to 4″ of additional clearance.

Flatout Suspension makes an adjustable set with spacers for the Forester that will give it an additional 2 to 3 inches of suspension lift. Not only will this give you more clearance, it will also increase the articulation of your wheels. Excellent.

To put this in perspective check out the RTI score, which is a measure of wheel articulation for a given wheelbase length. These are articulation scores a few vehicles get:

Gladiator Rubicon: 623
TRD Pro: 492
Colorado ZR2: 489
TRD Off-Road: 468
Colorado Z71: 410

With a 2” suspension lift the Forester gets a score of 535. That’s pretty impressive. The higher the score the more your wheel can lift vertically while the others stay on the ground. Helpful as you navigate obstacles as you’ll have more traction to roll over lumpy terrain.

There’s another area for improved clearance. Increased wheel size. I’ve seen people fit 31″ tires on a Subaru Forester with a lift and some finagling.

31″ wheels with a lift and some finagling

I’ve chosen to go with 29″ wheels as that will give me an additional 1 inch of ground clearance and it fits without any modifications required. The stock wheels on my Subaru Forester are 27″

All-in-all together with the suspension lift this should give our Forester a combined ground clearance of between 11.9 inches to 12.9 inches. Plenty for my needs.

But speaking of needs there is a world of options that allow you to modify this vehicle as your needs require. This is where the community supporting Subaru stands out.

To list a few of the more notable mods.

  1. A rear automatic diff lock by Torq Masters is available
  2. Lo/Hi dual range conversion is available by All Drive Subaru
  3. Cobb tuning kit to increase the stock mileage and power

The list goes on…

In conclusion the 2009 Subaru Forester 2.5XT may be just the adventure vehicle I’ve been looking for – and the funny thing is that it was right in my own backyard, figuratively speaking (it was actually parked on the side). It’s affordable, capable, easy to work on, comfortable, reliable, light weight, decent fuel mileage, and fun. While I’ve taken it on gravel roads locally I’m most looking forward to exploring the backcountry this winter.


Categories
Adventure Vehicle Journal

From the backyard to the backcountry – the start of an adventure vehicle

For the past year a 2009 Subaru Forester 2.5XT has sat stored at our property. It was my folks and then my younger brother drove it until he got married last year and moved to the UK. It needed some work so they offered it to us. I had other things I’ve been working on… and there it sat largely forgotten.