Categories
PHP

PHP Classes briefly explained

Writing classes in php

What is a Class

A class is also known as an object. To better understand the concept of an object, think of it as you would a material object like a bear. Let’s pretend that we are going to have to make a bear using a class. To start you would give the animal a name. In this case, class Bear. Then you would need to add characteristics. Like the animal’s color and weight. These would be the variables declared at the beginning of the class. You are declaring them as variables as it is possible that these characteristics might change with different bears. You may have the variable $color = ‘white’ or $weight= ‘500kg’. You may also have constants, these don’t change. A constant might be something that classifies a bear as a bear, for example some Scientific classifications would be KINGDOM = ‘Animalia’, or PHYLUM = ‘Chordata’. These things are common to all bears and do not change. You would also have methods. Methods are functions that either call data about the bear or calculate something for the bear and return the values back to the caller. You may have the function getColor(), to get the color of the bear. Or getKindom() to get the kindom of the bear.

When you write a class you have the option of declaring a variable or method public or private. A public method or variable is accessible by all. A private method or variable is only accessible to methods and variables within the class. A good rule of thumb in writing classes is to try to avoid making variables public. You may need to edit your classes over the course of time and the variable may change, this would affect any application that would have been referring to the variable had it been public. Rather, try to refer to variables only using methods. This ensures that even if you change how or where you store the information, the method to get the information could be rewritten to handle the changes so the applications referring to your class would continue to work and know no different.

To create a class simply write: 

class Bear { #Any code goes here }
Code language: PHP (php)


The following is an example of a simple class. A class can include variables (methods), functions, constants etc.

class Bear { const KINGDOM = 'A constant value'; const PHYLUM = 'Chordata'; private static $color = 'White'; private static $diet = 'Salmon and Berries'; public static function getColor() { echo self::$color; } public function getDiet() { echo self::$diet; } }
Code language: PHP (php)

Important Notes:

Usually it is good practice to save each class in individual files. In this case I would save the above class in the file Bear.class.php. I like to include .class within the file name. It is not necessary but it makes it much easier to know which files are classes.

There are a lot more to using Objects than what I showed you in the simple example above. But that is all you really need to know to get started using static functions and classes.

In the future I will create more tutorials showing you how to extend objects and to call them. And explain what new ClassName(); means and how the operator -> works.

Categories
Dropbox

Remove dropbox conflicted files on Mac or Linux using Terminal

dropbox
I like Dropbox. I use it all the time to share files across machines and work on group projects. However, I don’t like how Dropbox duplicates files as and saves them as conflicted copies. It’s not something that I need or use. I just delete those “conflicted” files. 99.99% of the time the conflicted files are not conflicted, Dropbox is just over zealous. Also I use .git to handle my file pushes so I know right away if files have changed. I don’t need Dropbox doing this for me.

I work on a Mac so here is something I run in my terminal to quickly remove those annoying conflicted files.

$ cd dropbox
$ find . -type f -name "* conflicted *" -exec rm -f {} \;
Categories
PHP

Increase PHP Script Execution Time Limit Using ini_set()

Today I had to set the PHP script execution time directly from within the php file. Here’s what I did.

Add the following code to your file. You can change the seconds to what you need. It is important to be careful using this on a live server. If you allow a script to run too long you could hog all your servers resources and bog the site way down. 5 minutes is a lifetime in server time and it might be longer than you need.

ini_set('max_execution_time', 300); //300 seconds = 5 minutes
Categories
MySQL PHP

What to do when you have the error “too many connections”

Recently our servers went down. The error we were getting was “Too many connections”. This meant that we needed to increase the limit on the number of available connections within our mysql config file. The setting is called

max_connections

Before you go upping the number of max user connections there are two things to consider.

1. Is your code opening and closing the connections efficiently?

According to the mysql “using mysql_close() isn’t usually necessary, as non-persistent open links are automatically closed at the end of the script’s execution.” However, there are rare occasions where the connections do not close properly, so it is always a good rule of thumb to include mysql_close() at the end of your scripts.

Another mistake that can occur is that you may be unintentionally opening a new connection for each query, rather than opening one connection and then closing it once all your queries are completed. This will definitely increase the number of user connections.

Also, using persistent connections are generally frowned upon these days. For php using mysql_connect has actually proven to be more efficient.

2. Do you have enough memory (RAM) available to handle your increased connections.

Once you know your code is clean and you are still running out of available user connections the next step will be to increase your number of max_connections on your mysql config file.

It is important to calculate your available memory before upping your connection limit however, other wise you will encounter this error:

Connect Error (1135) Can't create a new thread (errno 12); if you are not out of available memory, you can consult the manual for a possible OS-dependent bug

This error is simply telling you that you are using too much memory. To avoid this error when upping your connection number use the following formula to calculate your number of available connections.

Key_buffer_size + ((read_buffer_size + sort_buffer_size)*max_connections) = memory needed

If you know your server’s ram, calculating the number of max_connections is straight forward.

I hope this helps you if you are encountering this problem

Note: Your current settings for Key_buffer_size, read_buffer_size, sort_buffer_size and max_connections can all be found in your mysql config file. 

Categories
PHP

MVC architecture explained briefly.

Inevitably every programmer is going to encounter MVC architecture. MVC or model-view-controller is a pattern used by applications that divides the application into 3 parts. At first glance MVC can look more complicated than it is. Let’s look at the three parts.

Model – The model handles the data and cares about where the data is coming from. Typically it involves connecting to a database, but it could collect data by reading a file. The model only knows that data is there, it does not know what the data is or what you are doing with it.

View – The view cares about how to display the data. It doesn’t care where the data comes from or what the data means only that it is to display it.

Controller –  The controller is the bridge between the Model and View it interprets the data and handles any calculations. It doesn’t care how the data is stored or how to display it. It does care what the data means.

The advantage of MVC is that you can change things in one part of the application without “breaking” the other parts. For example, you could change where the data comes from in the Model. Because the View and the Controller never knew where the data came from they are not effected by the change. Likewise, you could change how you want the data displayed in the View but neither the Model or the Controller is effected.

For example. Let say we are viewing Facebook. What you see is the view. When loading a FaceBook page the view tells the controller that it needs data, the controller gets the correct data from the Model and sends it back to the View. The View then displays that data. The Model and the Controller don’t care that the data is being displayed on a computer or on an iPhone application.

So it’s really not a very complicated architecture structure.

Categories
WordPress

Tutorial: How to add Google Analytics to WordPress

Step 1. Sign up for Google Analytics

Sign up for Google AnalyticsStep 2. Add a New Account

Once you are logged into Google Analytics:

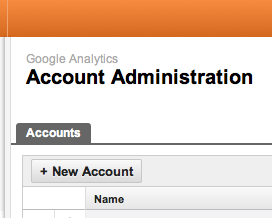
Create New Analytics Account

    1. Click + New Account.
    2. On the Create New Accountpage, under General Information, enter your account name and the URL for your web property. You may see that the Account Name field has a default value of the URL for your web property. You can change that value to something more meaningful.
    3. Under Data Sharing Settings, select the data-sharing options you want.
    4. Under User Agreement, select your country or territory from the menu, read the terms of service, then select the check box for Yes, I agree to the above terms and conditions
    5. Click Create Account.

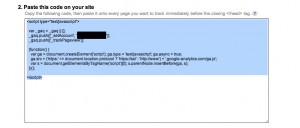
Step 3. After creating your account you will see your tracking code. Copy your analytics code for later use.

Google Analytics tracking code


Step 4. Add code to WordPress

I will be using the functions method.

      1. Login to your WordPress admin.
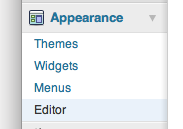
      2. Expand the Appearance tab and click Editor on the menu.
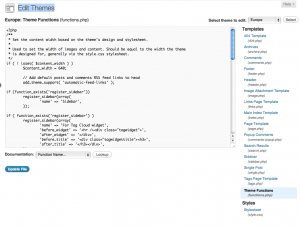
  • In the Edit Themes page you will see a list of files on your right. Click functions.php
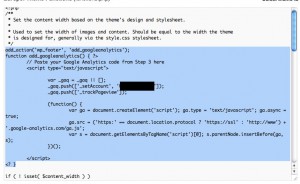
  • Now on the top of the functions.php file below the comments add this code. Remember to paste your Google Analytics code from Step 3 here.
add_action('wp_footer', 'add_googleanalytics');
function add_googleanalytics() { ?>
	// Paste your Google Analytics code from Step 3 here
<? }

Now you have installed Google Analytics to your WordPress site. It takes 24 hours for Google Analytics to start showing your results. Log into your Google Analytics account in the next couple of days and you will see your traffic stats.


Categories
CSS

Tutorial: Force text to line wrap using CSS

Here is a problem I face occasionally. When displaying a long line of code, like the full URL of a link, the text can be wider than the containing div and instead of wrapping the text goes beyond the edges of its containing div which looks ugly.

Example:

Solve this by simply adding the following CSS property to your div’s CSS style

.wordWrap { word-wrap: break-word; }

Now the text will wrap nicely within your div container.